Project: Order Form
| We'll be creating a form in eight easy steps: STEPS
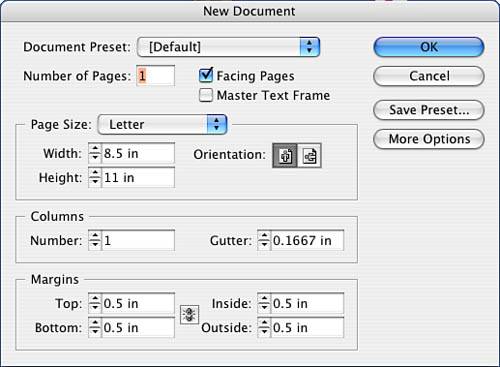
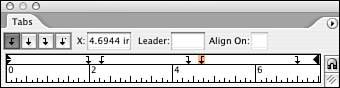
Step 1: Setting Up Your Document FormatLaunch InDesign, go to the File pull-down menu, and select New, Document. Fill out the New Document window as indicated in Figure 11.1. You will be creating a one-page portrait layout with one column. Figure 11.1. Fill out the window as indicated. Alternatively, you can open your catalogue file created in Chapter 10, navigate to page 15, and follow the instructions from here. Select the Type tool and draw a text frame to fit the margins of your page. Label your form. I've typed The Company Catalogue Form and formatted it with Century Gothic Regular, 24 points, right alignment, space after .2". Step 2: Creating Form Fields with Tab LeadersPress Return and let's begin some typographic control. We're going to set up a traditional form with categories and line leaders. We will use the Tab palette to accomplish the setup, and each line will require different tab structures. Let's begin with the first line. First, let's look at the text format. We've just composed the heading of the form and we don't want to continue along the same format. Change the font to Adobe Caslon Pro, 14 points, left alignment, 0 space after. Now, open the Tab palette by going to either the Type or Window pull-down menu. If the Tab palette doesn't align with the text frame, position it and then click the magnetit will snap into place as long as there is sufficient room above the frame. We're going to set a single tab with a line leader. Place a single right tab stop at the 7½" mark with an underline leader. Type an underline character to avoid any gaps between the characters. Use Figure 11.2 as a reference. Figure 11.2. Fill out the Tab window as indicated. Note
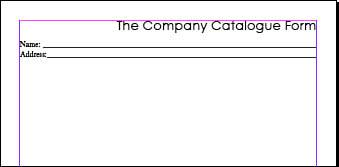
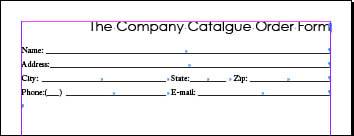
Type Name: and then press the Tab key. You should see a line appear and stop at the right side of the text box. Press Return. The next line will have the same tab stops. Type Address: and then press the Tab key. Again, a line should appear and stop at the edge of the text box. Press Return. Figure 11.3 shows your progress so far. Figure 11.3. The form so far. The next line will have different tab stops for the city, state, and ZIP Code. I like to think of them as fields and to refer to each field with curly brackets. I use a beginning bracket and an ending bracket for the field. The first bracket begins with the left indent, and the end of the first field is a right tab stop with a line leader. The next field begins at the bracket with a left tab stop and ends with a right tab stop and a leader. Finally, the ZIP Code begins with a left tab stop and ends with a right tab stop at the 7½" mark and a line leader. Here's an example:
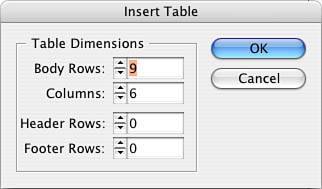
The bracketed fields represent the city, state, and ZIP Code. Each field starts at a specific point and ends at a specific point, as does the next field and the next field. Figure 11.4 shows what the tab palette will look like. Figure 11.4. The tab palette with left tab stops and right tab stops with leaders that set up the form fields. Clear the tab ruler using the palette menu. Let's create the brackets. Using Figure 11.3 as a guide, set the tab stops. Every right tab has a line leader attached. Type City: and press Tab. Then press Tab again and type State:. Press Tab twice, type Zip:, and press Tab one last time. Finally, press Return. The phone and email information is the last in this section. Clear the Tab palette and set two brackets, using Figure 11.5 as a guide. Again, all right tab stops have line leaders attached to them. Type Phone:, press Tab twice, type E-mail:, and press Tab again. Finally, press Return. Figure 11.5. The top third of your form. Before we leave this section, highlight all four lines and open up the leading by selecting 24 points. Figure 11.5 shows your progress thus far. Step 3: Inserting and Formatting a TableReturn to the end of your fields with the Type tool and clear the Tab palette. Now we are going to insert a table. Insert two returns between the top section and the table. Make sure that no paragraph styles are currently selected. Go to the Table pull-down menu and select Insert Table. Fill out the window as shown in Figure 11.6. Figure 11.6. Fill out the window as indicated. Step 4: Learning Table BehaviorLet's first take a quick look at table behavior. With the Text tool selected, hover over the top of the first column until you see the cursor change to a down arrow. Click with the arrow in this state and notice that you can quickly select a column. Do the same for a row by hovering over the beginning of a row until you see your cursor change to a right arrow; then click to highlight the row. Hover over any of the lines dividing the tables cells and notice that your cursor changes to a double-headed arrow (see Figure 11.7 as an example). Figure 11.7. Selecting columns or rows in tables.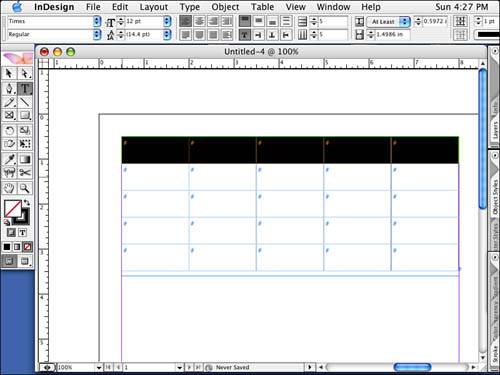 Turn on special characters and you will see a pound sign in every cell. (You see this in every text box, symbolizing the end of the copy or story; this convention has been used in copywriting for a long time.) If you click and drag, you can move the lines. With either your column arrow or your row arrow, drag a selection until your entire table is selected. You will do this when you want to change all the lines, rows, columns, or cells. Use the Table Options commands for alternating features. Use the Cell Options commands to affect selected cells. Step 5: Formatting Row and Column Strokes and Row HeightUsing Figure 11.8 as a reference, we'll format row and column strokes. Reposition the vertical lines in the table to appropriate more or less space for each category. Figure 11.8. Reposition vertical column edges and fill out the window as indicated. Tip
In the top row, type Item, Number, Description, Qty, Price, Extended. To move to each cell in the table, press the Tab key, which advances you to each cell. Select the entire table and make the vertical height of all the rows .45" tall. Remember that you should leave room for form fields in the future. You can do this in the Control palette, Table palette, or Table pull-down menu. Tip
Highlight the top row and format the text as Century Gothic, 14 points, bold, and centered alignment both horizontally and vertically. Insert a return after the table and you should find your text insertion point on the next line directly below the table you just created. Note
Before leaving the topic of tables, feel free to experiment with the look of your table by varying the lines and fills. Try merging cells together or splitting them apart for special effects. Now, back to the form. Click below the table to create two distinct pieces of information. One will be a return address and the other tax and shipping information. Open the Tab palette and make sure the ruler is clear. Create a right tab stop at the 6.25" mark. Create a left tab stop at the 6.5" mark and then a right tab stop at the 7.5" mark with a line leader. Use Figure 11.9 as a guide for how these two distinct, but physically side-by-side, groups of text should look. Figure 11.9. Your side-by-side paragraphs. I've formatted the text in these two paragraphs with Century Gothic Bold, 14 points, 18-point leading. The last line of copy should have space after of .2". Press Return. Step 6: Inserting Special CharactersNext comes the section for method of payment. Type Method of Payment and format it as Century Gothic, 14 points. I've offered four options for payment; however, your circumstances will be unique, so you might want to change this. I've set four left tab stops across the width of the text box. Type in a dingbat of your choice, followed by a space, followed by the first method, followed by a tab. Then type a dingbat, a space, the next method, and so on. Use Figure 11.10 as a reference. Press Return at the end of the line. Figure 11.10. Your initial tab stops for the method of payment. You might have additional information to capture, such as a credit card number, a check number, and so on. You should have a text insertion point at the beginning of the line just beneath the payment options. Open the Tab palette again; you should see the same tab stops as the line before. We are going to keep them and add to them. You will simply create right tab stops with line leaders to create the form fields as before. Visually position three left tab stops before all but the first pound sign and four right tab stops where you want your lines to stop. Type a pound sign, then two tab stops, a pound sign, and two more tabs. Then type another pound sign, two more tabs, the last pound sign, and a final tab. I've formatted this section again with Century Gothic, 14 points, 24-point leading, and no space after. Use Figure 11.11 as a reference. Figure 11.11. The method of payment section, complete. The bottom of your form might include tax information, shipping and handling qualifiers, and possibly a return policy. I've formatted this with Adobe Caslon 12 points, left alignment. Finally, for the finishing touch, do one of two things:
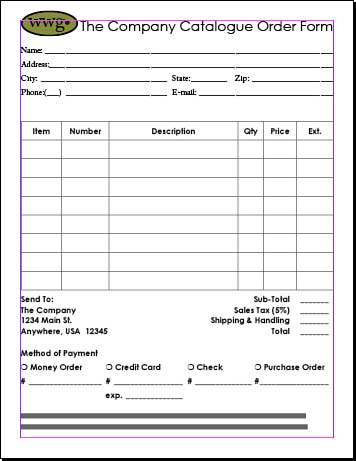
Save your work. Use Figure 11.12 to tweak your layout. Figure 11.12. Your form complete. Step 7: Creating a Color Composite ProofLet's print a content proof. Go to the File pull-down menu and select Print. Select the appropriate settings for the printer that is available to you. On the General tab, select one copy. On the Setup tab, select 8.5" x 11" and vertical orientation. Leave the Scale setting alone. On the Marks and Bleed tab, turn off all the options. On the Output tab, if possible, print a color composite output for your work; if not, select Grayscale. On the Graphics tab, the default settings should work. The remaining tabs can be ignored for now. Print and review your proof, make any necessary adjustments, and save your changes. Print it again. Step 8: Creating a PDF for Alternative DistributionWith your document open and already proofed, go to the File pull-down menu and select Export. Navigate to your Chapter 11, finished projects folder and name your PDF. At the bottom of the window, make sure the format is set to Adobe PDF. Click Save. Set the Preset to high-quality print if the recipient will be printing this form and then manually filling it out. Then click Export. If, on the other hand, the recipient will be viewing this online and your goal is to create a small PDF, select Screen. While interactive forms fall outside the scope of this book, Acrobat Professional 7 contains excellent tools to add electronic form fields to your layout so the document can be filled out electronically and sent back to you. |


EAN: 2147483647
Pages: 148