3.5 Load the database with online information
|
| < Day Day Up > |
|
WSAA lets you collect detailed information from your CICS regions and IMS subsystems. Given the limited amount of time we had during this residency, we concentrated our efforts on collecting inventory information from a sample CICS region in the DemoMVS system.
| Note | We apologize to those readers who are looking for information specific to IMS for the lack of that detail. Perhaps if this book is updated, that chapter can be included. |
3.5.1 How to load CICS resources
Unlike all of the other MVS assets, you collect information about your CICS regions using an ISPF interface, not a Web browser.
WSAA collects the following information for and about CICS regions, and loads it into the appropriate database tables:
-
Transactions defined to the region
-
The name of the program associated with each transaction
-
File resource definitions and their associated MVS data sets
WSAA uses the CICS utility, DFHCSDUP, to extract information from the CICS system definition (CSD) data set. It can also collect information from the region’s start-up JCL, if you supply that information.
To scan a CICS region and load the results into the database, perform the following steps:
-
Log on to your OS/390 (or z/OS) system.
-
Go to ISPF Option 6.
-
Enter the following command, substituting your site’s data set name (or high-level qualifier):
ex 'wsaa.v2r2.sdmhrexx(dmhinit)'
The WebSphere Studio Asset Analyzer main menu panel, DMHMAIN, is displayed, as shown in Figure 3-8.
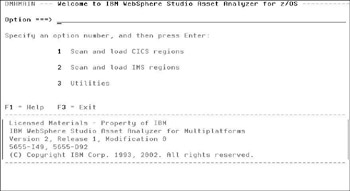
Figure 3-8: The primary ISPF menu for WSAA, DMHMAIN
Validate your batch job card
As you would with any other program product, review — and, if necessary, correct — the contents of the sample job card that is provided.
-
Select Option 3, Utilities. The DMHU000 panel is displayed, as shown in Figure 3-9.
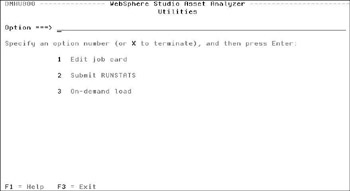
Figure 3-9: The WSAA Utilities menu, DMHU000 -
Select Option 1, Edit job card. The DHMU100 panel is displayed, as shown in Figure 3-10.
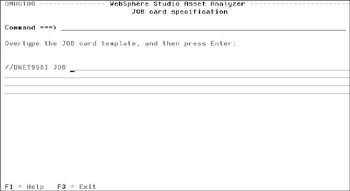
Figure 3-10: The job card data entry panel, DMHU100 -
Either verify or complete the job card with information that is specific for your site and your TSO user ID.
-
Press Enter to save any changes, then press F3 twice to return to the WSAA main menu.
Note When your MVS systems programmer installed WSAA, they set the site-specific job card information in WSAA.V2R2.SDMHREXX(DMHPARMS). Substitute your site’s data set name or high-level qualifier. The following excerpt identifies the section that contains these settings:
/***** Job Cards for building JCL ***/ DMHJBDF1 = "" DMHJBDF2 = "" DMHJBDF3 = "" DMHJBDF4 = ""
Fill in the CICS region information
After you validate the contents of the job card, fill in the information for the batch job.
-
Select Option 1, Scan and load CICS regions. The DMHMAIN panel is displayed, as shown in Figure 3-11.
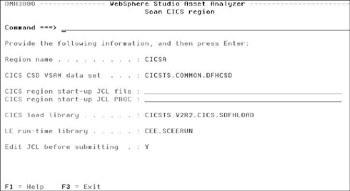
Figure 3-11: The CICS data entry panel, DMH3000, with values for the DemoMVS system -
Enter the appropriate values for each of the fields. For the most part, the field descriptions are self-explanatory; however, if you are unsure of what any one means, press the F1 key for help.
In our example, we specify a region called CICSA.
Tip We found the names of the CSD and load libraries by looking at the started task in SDSF. The CICS systems programmer then validated our findings.
-
When you are finished, press the Enter key.
-
If you entered N, to bypass editing the JCL, the batch job is submitted.
-
If you entered Y, to edit the JCL, you are switched to an edit session of the generated JCL where you can modify the job.
To submit the job, enter the SUBMIT command on the Command line.
Note We suggest that you edit the JCL for two reasons:
First, to verify that the changes you made to the job card were retained in your ISPF profile variables.
Second, to review the actual contents of the batch job.
-
-
Press F3 to return to the WSAA main menu.
The first time you scan a CICS region, continue with the sections 3.5.2, “Monitor and review the batch job” on page 73 and 3.5.3, “Verify your CICS resources in the database” on page 74.
After you become familiar with the entire process, repeat this procedure to scan the contents for each of your other production CICS regions, as needed.
Modifying the JCL
If you are loading a region and you want all of your information collected, you do not have to do this activity; by default, all groups in the CSD are examined.
However, in our system, we are going to load only resources specific for our sample application. To do that, we must first customize the JCL.
The key section of the JCL is in the CESYSIN DD statement. A sample is shown in Example 3-1.
Example 3-1: CESYSIN DD statement for CICS inventory collection
//CESYSIN DD * SITE **DEFAULT** Default Site REGN CICSA CSD CICSTS.COMMON.DFHCSD GRP * /*
| Tip | If you want to know more about the specific values that you can enter, and the format they should take, review the comments at the start of the REXX exec, WSAA.V2R2.SDMHREXX(DMH0733). Substitute your site’s data set name or high-level qualifier. |
For example, if you want to specify more than one library for your CICS procs, you can add a PROCLIB card in the CESYSIN input stream immediately following the PROCLIB card that was generated for you. However, because we did not indicate any JCL data sets, our sample does not show those values.
To analyze specific groups in the CSD instead of all groups, replace the GRP * record (which is provided by default) in the CESYSIN input stream with one or more records that name the groups that you want to analyze. In our case, we are looking for the following specific group:
GRP PDPAK
Don’t forget to issue the SUBMIT command after you make your changes.
3.5.2 Monitor and review the batch job
After the batch job completes, look in SDSF to see the output files associated with the job, as shown in Figure 3-12.
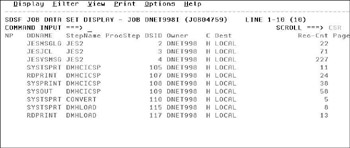
Figure 3-12: Output files associated with CICS inventory batch job
Pay particular attention to the output from the step, DMHCICSP, for detailed the results of the job, specifically:
-
SYSPRINT, which contains the messages from the DFHCSDUP utility
-
RDPRINT, which contains messages from the analysis of the CICS output from the CSD
If you see messages that indicate there are any errors, make the appropriate corrections according to the information provided, and resubmit the job.
| Note | If your batch job ends with a return code of 4 for the DMHCICSP step, it means that a resource definition was encountered at least twice in the same CICS GROUP. Since this can happen, WSAA only records one instance of the resource and continues. |
You can ignore the RC=4 only if no other messages indicate any other kind of problem.
3.5.3 Verify your CICS resources in the database
After you finish scanning each of your CICS regions, launch your Web browser and access WSAA.
Click Explore -> MVS assets to see the results of your scans.
Click the number (link) next to CICS online region under the Run time heading to see a list of all of your CICS regions, as shown in Figure 3-13.

Figure 3-13: CICS online region summary page
Click one of the CICS online region names. In our case, CICSA. You can view groups, transactions, and online data stores, as shown in Figure 3-14.
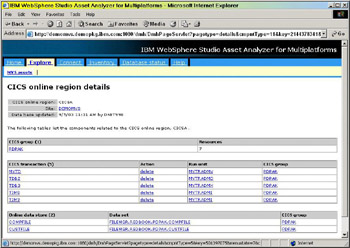
Figure 3-14: CICS online region details page
As you can see, the CICS group is, in fact, PDPAK, the group we specified in our JCL. Each of the transactions is listed, along with two online data stores (files) used by the transactions.
Alternatively, you can click CICS transaction (on the Explore MVS assets page) to see information about all of the transactions and their associated run units and online regions.
| Note | At this point, the source code for these programs has not been loaded. You can drill down by clicking on a link to a run unit, but you will not see any pertinent information yet. |
We describe more about how to explore your MVS assets in Chapter 4, “Exploring your inventory” on page 115.
3.5.4 Assign CICS components to an application
Because the ISPF entry screen does not provide a field for application name, you must use WSAA’s Web interface to manually assign your CICS transactions to their appropriate application.
-
In your Web browser, open the Home page of WebSphere Studio Asset Analyzer.
-
Recall that there are two ways to open the Application summary page:
-
Click Explore -> MVS assets. The Explore MVS assets page is displayed.
-
Click the number (link) next to Application under the Inventory heading. ora. Click Assets by Application on the Home page
The Application summary page is displayed
-
-
Click the application name, in our case WSAAREDBOOK. The Application details page is displayed, as shown in Figure 3-15.

Figure 3-15: Application details page -
Click Assign components under the Actions heading. The Application details: Assign components page is displayed, as shown in Figure 3-16.
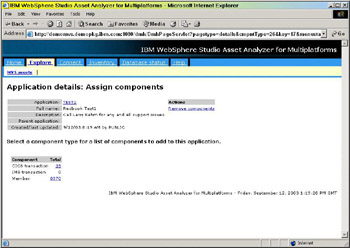
Figure 3-16: Application details: Assign components page showing CICS transactions to be assignedNote Recall that this is the last page you saw when you defined an application.
-
Click the link (number) next to CICS transaction under the Component heading. The Application details: Assign CICS transaction page is displayed, as shown in Figure 3-17.

Figure 3-17: Application details: Assign CICS transaction page -
Scroll through the list of CICS transactions and select the ones that you want to associate with this application.
-
When you are finished, click the Assign all selected button. The page is refreshed and the CICS transactions that you selected are no longer displayed.
Repeat this process for each CICS region after you scan the contents into the database. When you are done, click Home to return to the WSAA Home page.
|
| < Day Day Up > |
|
EAN: 2147483647
Pages: 84