Section 5.1. MultiView and View Controls
Sometimes you might want to break a web page into different chunks , displaying only a single chunk at a time, with easy navigation from chunk to chunk . The classic use of this technique would be to step a user through a number of process steps within the context of a static page, such as the checkout procedure from an online store or the procedure to transfer funds from one account to another. You might also use these controls to create wizard-like applications, although there is now a Wizard control, described shortly, for this exact purpose.
ASP.NET provides the View control to manage the chunksi.e., the content in a section of the page: one View control per chunk. All of the View objects are contained together within a MultiView object, which makes one View object, called the active view, visible at a time.
As seen in Figure 3-4b both the View and Multiview controls derive not from WesControl, but directly from System.Wes.UI.Control.
The MultiView control has a read-only property called Views , of type ViewCollection , which is a collection of the View controls contained within the MultiView . As with all .NET collections, the elements in the collection are indexed. Hence, the MultiView control has a property called ActiveViewIndex , which gets or sets the zero-based index of the currently active view. If no view is active, then ActiveViewIndex will be 1, which is the default value.
The MultiView control has four properties, listed in Table 5-1, that correspond to the four CommandName attributes which you can assign to buttons for automated navigation of the views.
Table 5-1. MultiView CommandNames
| Field | Default CommandName | Description |
|---|---|---|
| NextViewCommandName | NextView | Navigates to the next higher ActiveViewIndex . If currently at the last view, sets ActiveViewIndex to -1 and nothing is displayed. |
| PreviousViewCommandName | PrevView | Navigates to the next lower ActiveViewIndex . If currently at the first view, sets ActiveViewIndex to -1 and nothing is displayed. |
| SwitchViewByIDCommandName | SwitchViewByID | Navigates to the View with the ID specified. Can use the CommandArgument attribute to specify the ID. |
| SwitchViewByIndexCommandName | SwitchViewByIndex | Navigates to the View with the index specified. Can use the CommandArgument attribute to specify the index. |
For example, a Button , ImageButton , or LinkButton with the CommandName NextView will automatically navigate the MultiView control to the next View when that button is clicked, with no additional code required. The developer (that's you) does not have to write a Click event handler for the button.
You can also set or retrieve the active view by calling the SetActiveView or GetActiveView methods of the MultiView control. SetActiveView takes a reference to a View object as an argument, and GetActiveView returns a reference to a View object.
|

Every time a view is changed, the page is posted back to the server and a number of events are raised by both the MultiView and the View controls.
Whenever the active view changes, the ActiveViewChanged event is raised by the MultiView control. At the same time, the ViewControl that is now active raises the Activate event, and the ViewControl that is now inactive raises the Deactivate event.
All of these events have an event argument of type EventArgs , which you will remember is a placeholder and provides no additional information about the event. However, as with all event handlers, a reference to the sender is passed to the event handler as will be demonstrated.
The View control has a Visible property of type Boolean, which can be set to control the visibility of specific View objects or retrieved to determine programmatically which View is visible.
Neither the MultiView nor the View controls have any style properties. That is not too surprising for the MultiView , since it is just a container for the Views . In the case of the View control, if you want to impose style properties, you must apply them to each of the controls contained within the View . Another technique would be to embed a Panel control in the View and set the style properties of the Panel .
The following example, MultiViewDemo , demonstrates many of the features of the MultiView and View controls. The web page, after some navigation has occurred, is shown in Figure 5-1.
Figure 5-1. MultiViewDemo
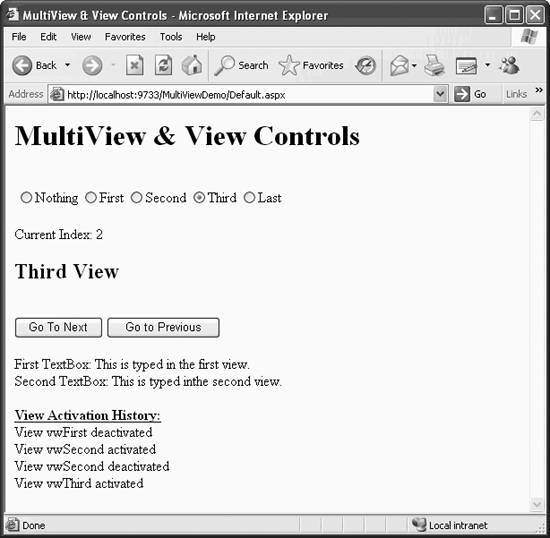
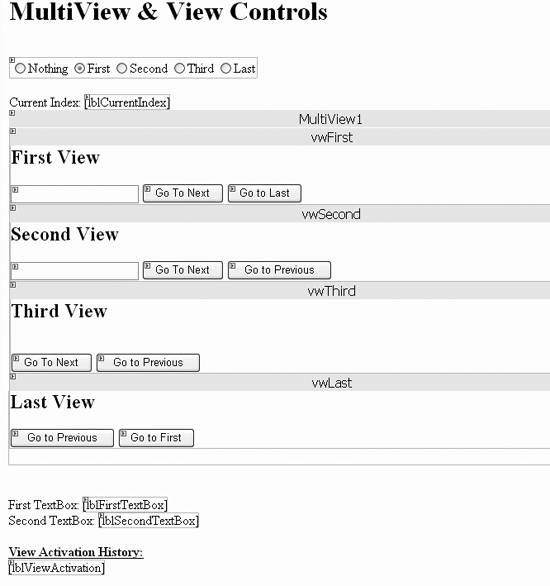
MultiViewDemo , shown in Design view in Figure 5-2, consists of a single web page with a MultiView control, MultiView1 . MultiView1 contains four View controls ( vwFirst , vwSecond , vwThird , and vwLast ), along with other controls for navigating the MultiView . The page also contains controls for displaying data from and about the MultiView and its contained Views .
Each of the four Views contain buttons for navigation. In addition, the first two Views contain a TextBox for demonstrating how controls on a View are accessible to the application even when that View is not visible.
To create this example, create a new web site in VS2005 called MultiViewDemo . The complete content file for this example is listed in Example 5-1, with the MultiView and View controls highlighted. We will look first at the MultiView and View controls in this source file and then look at the other controls on the page.
Figure 5-2. MultiViewDemo in Design view
Example 5-1. Default.aspx for MultiViewDemo
<%@ Page Language="C#" AutoEventWireup="true" CodeFile="Default.aspx.cs" Inherits="_Default" %> <!DOCTYPE html PUBLIC "-//W3C//DTD XHTML 1.1//EN" "http://www.w3.org/TR/xhtml11/DTD/xhtml11.dtd"> <html xmlns="http://www.w3.org/1999/xhtml" > <head runat="server"> <title>MultiView & View Controls</title> </head> <body> <form id="form1" runat="server"> <div> <h1>MultiView & View Controls</h1> <br /> <asp:RadioButtonList ID="rblView" runat="server" AutoPostBack="True" OnSelectedIndexChanged="rblView_SelectedIndexChanged" RepeatDirection="Horizontal" > <asp:ListItem Value="-1">Nothing</asp:ListItem> <asp:ListItem Selected="True" Value="0">First</asp:ListItem> <asp:ListItem Value="1">Second</asp:ListItem> <asp:ListItem Value="2">Third</asp:ListItem> <asp:ListItem Value="3">Last</asp:ListItem> </asp:RadioButtonList> <br /> Current Index: <asp:Label ID="lblCurrentIndex" runat="server"></asp:Label> <br/> <asp:MultiView ID="MultiView1" runat="server" ActiveViewIndex="0" OnActiveViewChanged="MultiView1_ActiveViewChanged"> <asp:View ID="vwFirst" runat="server" OnActivate="ActivateView" OnDeactivate="DeactivateView"> <h2>First View</h2> <asp:TextBox ID="txtFirstView" runat="server" /> <asp:Button ID="btnNext1" runat="server" CommandName="NextView" Text="Go To Next" /> <asp:Button ID="btnLast" runat="server" CommandName="SwitchViewByID" CommandArgument="vwLast" Text="Go to Last" /> </asp:View> <asp:View ID="vwSecond" runat="server" OnActivate="ActivateView" OnDeactivate="DeactivateView"> <h2>Second View</h2> <asp:TextBox ID="txtSecondView" runat="server" /> <asp:Button ID="btnNext2" runat="server" CommandName="NextView" Text="Go To Next" /> <asp:Button ID="btnPrevious2" runat="server" CommandName="PrevView" Text="Go to Previous" /> </asp:View> <asp:View ID="vwThird" runat="server" OnActivate="ActivateView" OnDeactivate="DeactivateView"> <h2>Third View</h2> <br /> <asp:Button ID="btnNext3" runat="server" CommandName="NextView" Text="Go To Next" /> <asp:Button ID="btnPrevious3" runat="server" CommandName="PrevView" Text="Go to Previous" /> </asp:View> <asp:View ID="vwLast" runat="server" OnActivate="ActivateView" OnDeactivate="DeactivateView"> <h2>Last View</h2> <asp:Button ID="btnPrevious4" runat="server" CommandName="PrevView" Text="Go to Previous" /> <asp:Button ID="btnFirst" runat="server" CommandArgument="0" CommandName="SwitchViewByIndex" Text="Go to First" /> </asp:View> </asp:MultiView> <br /> <br /> First TextBox: <asp:Label ID="lblFirstTextBox" runat="server" /> <br /> Second TextBox: <asp:Label ID="lblSecondTextBox" runat="server" /> <br /> <br /> <strong><span style="text-decoration: underline"> View Activation History: </span></strong> <br /> <asp:Label ID="lblViewActivation" runat="server" /> </div> </form> </body> </html>
The MultiView control highlighted in Example 5-1 is declared with a MultiView1 ID. The ActiveViewIndex attribute is set to , so the first view in the Views collection will display. If this property is not set, it will default to -1 and none of the Views will display.
The OnActiveViewChanged attribute points to an event handler method in the code-behind file, MultiView1_ActiveViewChanged (listed in Example 5-2), which will fire every time the active index changes.
Example 5-2. ActiveViewChanged event handler for MultiViewDemo
protected void MultiView1_ActiveViewChanged(object sender, EventArgs e) { lblFirstTextBox.Text = txtFirstView.Text; lblSecondTextBox.Text = txtSecondView.Text; rblView.SelectedIndex = MultiView1.ActiveViewIndex + 1; } This event handler does two things: it retrieves the values of the two textboxes on the first two Views and displays them on the page in the labels that were placed there for that purpose. Second, it sets the RadioButtonList at the top of the page, rblView , to the proper value. This code is relatively straightforward because the RadioButtonList.SelectedIndex and the MultiView.ActiveViewIndex properties are of type integer, however you must compensate for the fact that the lowest value of the ActiveViewIndex property is -1 , while the lowest index of the RadioButtonList is . That is, they are offset by one.
There are four View instances declared: vwFirst , vwSecond , vwThird , and vwLast . Each has both OnActivate and OnDeactivate event handlers declared:
OnActivate="ActivateView" OnDeactivate="DeactivateView">
The Activate event is handled by a method called ActivateView and the Deactivate event by DeactivateView . Those two event handlers are listed in Example 5-3. They retrieve the contents of the Label holding the activation history, append the ID and action of the current View , and assign the string back to the Label .
Example 5-3. Activate and Deactivate event handlers
protected void ActivateView(object sender, EventArgs e) { string str = lblViewActivation.Text; View v = (View)sender; str += "View " + v.ID + " activated <br/>"; lblViewActivation.Text = str; } protected void DeactivateView(object sender, EventArgs e) { string str = lblViewActivation.Text; View v = (View)sender; str += "View " + v.ID + " deactivated <br/>"; lblViewActivation.Text = str; }
|
Each View object contains navigation buttons. The .NET Framework makes it particularly easy to set them up. (It's harder to explain in words than to actually do it.) As enumerated in Table 5-1, if a button has its CommandName attribute set to one of the default values, the corresponding action will automatically occur. So, the first View object, vwFirst , will have buttons labeled "Go To Next" and "Go To Last," with CommandNames of NextView and SwitchViewByID , respectively. The first is easy, it just navigates to the next View .
The SwitchByViewID action requires an ID to switch to, so the CommandArgument attribute is used to pass in that argument.
CommandName="SwitchViewByID" CommandArgument="vwLast"
Each of the Views contains content in addition to navigation buttons. This content includes standard HTML elements and ASP.NET server controls. As you have seen, these server controls are accessible to the application even when their View is not displayed.
The next step is to update the RadioButtonList at the top of the page. As you have seen, the SelectedIndex property is set by the code in MultiView1_ActiveViewChanged every time the active view changes. When the SelectedIndex changes due to user action, the SelectedIndexChanged event is fired , which calls rblView_SelectedIndexChanged .
OnSelectedIndexChanged="rblView_SelectedIndexChanged"
This method, listed in Example 5-4, consists of a single line that sets the ActiveViewIndex property of the MultiView to the SelectedValue of the RadioButtonList .
Example 5-4. RadioButtonList SelectedIndexChanged event handler
protected void rblView_SelectedIndexChanged(object sender, EventArgs e) { MultiView1.ActiveViewIndex = Convert.ToInt32(rblView.SelectedValue); } The final bit of interesting code is contained in the event handler for the PreRender event of the Page (listed in Example 5-5), where lblCurrentIndex is populated with the index of the currently active view. This code cannot be run in Page_Load because Page_Load is called before the label is updated.
|
Example 5-5. Page PreRender event handler
protected void Page_PreRender(object sender, EventArgs e) { lblCurrentIndex.Text = MultiView1.ActiveViewIndex.ToString(); } Now that you've seen how to use the MultiView class to create a simple paged application, you can expand it to more complex uses. Sometimes, though, you want a traditional Windows-style wizard on your page. In that case, you can use the Wizard control, discussed next.
EAN: 2147483647
Pages: 173
- Challenging the Unpredictable: Changeable Order Management Systems
- ERP System Acquisition: A Process Model and Results From an Austrian Survey
- Distributed Data Warehouse for Geo-spatial Services
- Data Mining for Business Process Reengineering
- Relevance and Micro-Relevance for the Professional as Determinants of IT-Diffusion and IT-Use in Healthcare