| One of the most common and powerful ways to achieve interesting navigation schemes is to use JavaScript rollovers . JavaScript rollovers allow you to swap a linked image on the fly. With image swapping, you can add visual cues to indicate which link the user is about to click and even add information about the link. A more advanced form of the rollover is termed the navigation bar . Dreamweaver allows you to quickly assemble a collection of menu options with rollovers, which you can conveniently edit at any time. Dreamweaver's built-in rollover capabilities can save you hours of coding time. However, Fireworks MX 2004 has even more sophisticated rollover capabilities. If you spend much time creating rollovers, learning Fireworks may be worth your while. Meanwhile, this section gives you a look at Dreamweaver's rollover and navigation bar features. Creating a Rollover The concept behind creating a rollover is simple: When the visitor places her mouse over a linked image, the browser replaces that image with another image. Then, when the visitor moves her mouse away from the image, the browser replaces the new image with the first image. You can use behaviors to hand-script rollovers, but that can be time-consuming , tedious , and error-prone . One misplaced semicolon can take hours to track down in a really complex script. Macromedia Dreamweaver's controls make setting up and editing rollovers easy. Creating the Images You need two graphics to create a rollover with Macromedia Dreamweaver: An off state image and an on state image. The off state is how the image appears when the page first loads and how it should appear after a rollover. The on state is how the image looks during the rollover. The on and off rollover images should be the same size to avoid distortion. You can use any program to create the images as long as they can be saved in a Web-ready format (GIF or JPEG are recommended). One way to create consistent rollover graphics is to use the Layers features available in your favorite graphics editor. For example, in Adobe Photoshop, you can set up a layer for each rollover state but keep the same background image. This is crucial because it allows you to keep a consistent background for all the states, and ensures that all the images will be the same size when saved. No matter how you create these images, save them as separate graphic files with filenames that help you remember what they are and which state is which. Adding a Rollover to Your Page After you have created your rollover graphics, add them to your Web page. To begin, open the Web page to which you want to add the rollover, and select Design view. To insert the rollover, do one of the following: -
Place an insertion point in your document. In the Insert bar's Common tab, select the Image drop-down menu and click the Rollover Image option. -
Drag the aforementioned Rollover Image icon to the desired location in the Document window. -
Select Insert, Image Objects, Rollover Image. In the Insert Rollover Image dialog box, type a new name for the rollover, even if you've already given names to the two individual images you plan to use. The rollover object will have its own name independent of those two. Specify the location of the "original image" (used during off state) and the "rollover image" (which appears during on state). You'll also usually want to select the Preload Rollover Image box because it prevents the pausing that can occur while the rollover image is being loaded after the onMouseOver event. Add the URL for the link in the When Clicked, Go to URL field. If this rollover is not a link, leave this field blank; Macromedia Dreamweaver automatically fills in the link with a pound sign ( # ) to indicate a null link. If you need to make changes to the rollover ”for example, if you want to change the link URL ”select the image and make your changes in the Property inspector. Designing Remote Rollovers Although rollovers are most often used to change the image being rolled over, you can use a rollover of one link (image or text) to change any remote graphic on the screen as long as the image being changed has a unique ID. For example, you could roll over a text link to change the contents of a floating glossary layer. This is referred to as a remote rollover or a disjoint rollover . To create this sort of rollover, you need to use the Behaviors panel, as described earlier in this chapter, with the Swap Image and Swap Image Restore behaviors. Creating Navigation Bars Most Web sites include a menu to help visitors navigate the site, and such menus often use rollovers to help communicate what is going on. Simple rollovers are helpful but limited for this task, so Macromedia Dreamweaver includes a navigation bar to collect menu options into one element and provide four rollover states: up, over, down , and over while down . Creating the Navigation Bar Graphics First, create the menu images in a graphics program such as Photoshop or Fireworks. The obvious difference between the rollovers already discussed and the navigation bar rollovers is that you need to create four different states for each menu item in a navigation bar, versus just two states for a simple rollover. -
Up ” The "off" state for the link. This should let the visitor know that it can be clicked but should not overwhelm other elements on the screen. For example, use light text here. -
Over ” The "on" state for the link. This should convey that the link is ready to be clicked. You can communicate this through color changes, shifting size, shifting position, and so on. The idea is for an obvious change to occur between the up and over states. For example, text could become black with a drop shadow. -
Down ” The currently selected menu option. This should be clearly contrasted from the up state; for example, black text. -
Over While Down ” The "on" state for an element currently in the down state. Because the element is already down, indicating that it is selected, you need to either communicate to the visitor that this link is already active or simply leave it looking the same as the down mode. Red text could be used here. Adding the Navigation Bar Unlike a simple rollover, every menu option requires between two and four images. After you've made them, adding the bar to Dreamweaver is straightforward: - Open the Web page on which you want your navigation bar, place your cursor where you want the bar, and from the Insert bar's Common tab, click the Navigation Bar option from the Image drop-down menu to open the Insert Navigation Bar dialog box (see Figure 10.3).
Figure 10.3. The Navigation Bar button opens the Insert Navigation Bar dialog box. 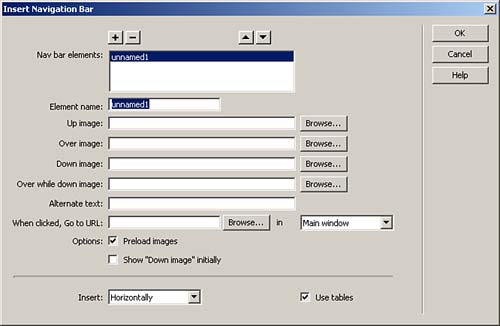
NOTE You can also use Insert, Image Objects, Navigation Bar to insert a navigation bar. - When the Insert Navigation Bar dialog box opens, it automatically creates a blank default button, called unnamed1 . Type a new and unique name for the first navigation element (button), replacing the default value.
- Specify the images to be used for the four states by typing the path to the image or by using the Browse button.
- Enter the URL to which the button should link and specify where the link should target. If you are working with a frames document, the frames appear in the targeting list.
- Select whether you want the graphics for this element to be preloaded. This is generally recommended for responsiveness.
- Select whether this element should initially be in the down state.
- Add as many navigation bar elements as desired by clicking the plus sign and following steps 2 “6 for each.
- Select whether you want the navigation bar to run horizontally or vertically and whether you want to use tables to create the layout.
After you have added all the navigation bar elements, click OK; the new navigation bar appears on your Web page. Editing the Navigation Bar You can use only one navigation bar per Web page with Dreamweaver, but you can change and add to the navigation bar as much as you want. You can edit the navigation bar in four ways: via the Navigation Bar button, via the Property inspector, in Code view (editing the JavaScript directly), and with the Behaviors panel. In the Behaviors panel, each element in the navigation bar has four events associated with it: onMouseOver , onMouseOut , onClick , and onLoad . Each of these events has a Set Nav Bar action associated with it. You can edit the Set Nav Bar action for each of these separately by double-clicking the behavior to open the Set Nav Bar Image dialog box. |