CAUTION The frameset is a conceptual replacement for the body in the frameset HTML or XHTML document. Therefore, no body tags should appear. The one exception to this is the noframes element, which allows you to place a body element within it.
In this section, you'll step through a series of exercises to get you working immediately with frame documents. The first exercise will be to create a frameset, and then you'll move on to build framed pages. Creating Framesets There are two ways to create a frameset in Dreamweaver MX 2004. You can create your own, or you can use a predefined frameset. Building Your Own Frameset Before you begin creating a frameset or working with frames , make the frame borders visible in the Document window's Design view by selecting View, Visual Aids, Frame Borders. You can design your own frameset in Dreamweaver by adding "splitters" to the window. Creating a Frameset Select Modify, Frameset, then select a splitting style from the submenu: Split Frame Left, Split Frame Right, Split Frame Up, or Split Frame Down. The window is automatically split into frames accordingly . If you currently have a document open , it will fill one of the frames. Figure 9.4 shows a frame being split. Figure 9.4. Using splitting styles, you can break the frame up as you need to without ever worrying about how to generate the complex frameset markup. 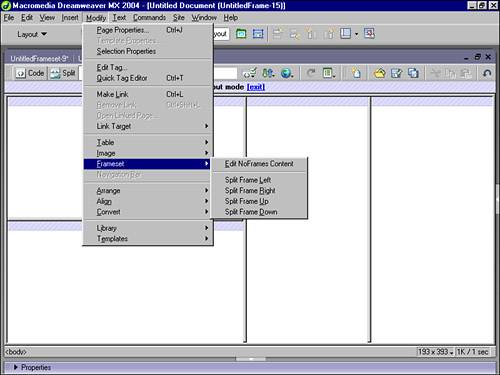 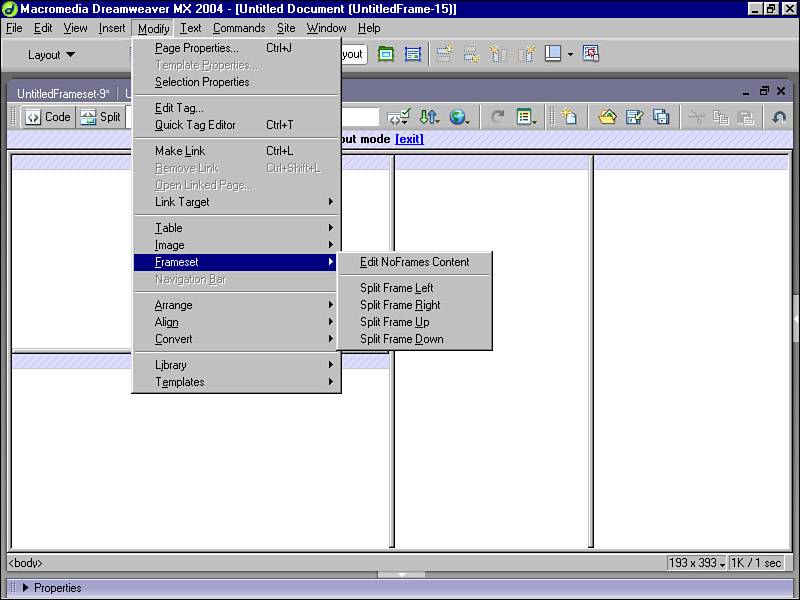
If you want to use one of Dreamweaver's existing frame layouts, you can create a frameset more quickly by using the Insert bar. For details, see "Creating a Predefined Frameset to Display an Existing Document in a Frame", later in this chapter. Splitting a Frame into Smaller Frames To split the frame where the insertion point is, select the frame. Now choose a splitting style from the Modify, Frameset submenu (see Figure 9.4). To split a frame or set of frames vertically or horizontally, move your mouse over the outer frame border until you see the two-arrow cursor. Now drag the frame border from the edge of the Design view into the middle of the Design view. To split a frame by using a frame border that isn't at the edge of the Design view, position your cursor until you see a two-arrow cursor. Now Alt-drag a frame border. To divide a frame into four frames, position your cursor in a corner until you see the four-arrow cursor. Now from the frame border, drag the cursor from the Design view into the middle of a frame. Deleting a Frame Position your cursor on the frame border to be deleted, and drag the frame border off the page or to a border of the parent frame. (This remains one of the least intuitive operations in the Dreamweaver program ”why not just right-click a frame in the Frames panel and choose Delete? No one knows .) Dreamweaver prompts you to save the document if there's unsaved content in a frame that's being deleted. Deleting a Frameset You cannot completely delete a frameset simply by dragging the borders off. Closing the Document window where it is displayed completely eliminates it. If the frameset file has been saved, the file needs to be deleted. Resizing a Frame There are two ways to resize a frame: approximately and exactly. To resize a frame approximately, position your cursor on the frame border and drag it in the Document window's Design view. To resize a frame exactly, set the options for the frameset dimensions in the Property inspector. (You may need to click the expander arrow in the inspector's lower-right corner to see the dimensions settings.) If you are happy with the frameset you've created, save the file and continue working. If you'd like to create more splits , follow these steps: - Place your cursor into the frame you'd like to split.
- Select Modify, Frameset, and again select a splitting option.
- Continue to split frames by dragging the splitting items to the required location.
Using a Predefined Frameset There are two ways to create a predefined frameset. To create a new empty frameset, use the New Document dialog box. To create a frameset and display your current document in one of the new frames, use the Layout tab of the Insert bar. Creating a New Empty Predefined Frameset Start by selecting File, New. Dreamweaver MX 2004 provides you with 15 different styles of predefined framesets at the opening window. Simply select the category titled Framesets from the Create From Samples category at the opening window. Now select a Framesets style from the list in the New Document dialog box, and click Create. Dreamweaver MX 2004 generates the frameset and opens it into the Document window. If you have activated the Frame Tag Accessibility Attributes dialog box in Preferences, it will appear. If so, complete the dialog box for each frame, clicking OK upon completion. Creating a Predefined Frameset to Display an Existing Document in a Frame Place your cursor in the document and then select Insert, HTML, Frames and pick one of the styles from the cascading submenu; or from the Insert bar's Layout tab, select the Frames button and choose a predefined frameset (see Figure 9.5). Figure 9.5. This frameset design would normally be complicated to mark up, but using predefined frameset styles allows you great design options.  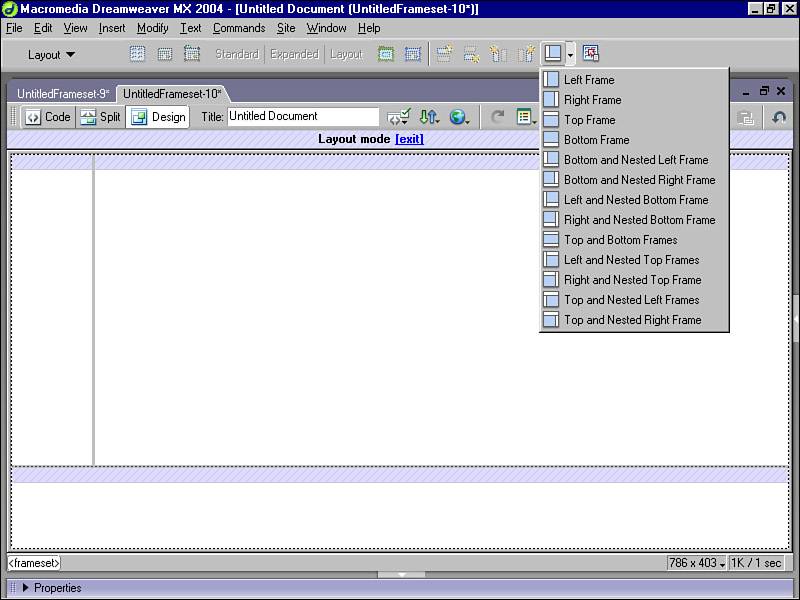
If you have activated the Frame Tag Accessibility Attributes dialog box in Preferences, it will appear. If so, complete the dialog box for each frame, clicking OK upon completion. The frameset illustration provides a diagram of each frameset as it is applied to the current document. The area highlighted in blue represents the frame in which the current document content will appear. Dreamweaver MX 2004 automatically applies the frameset. This means that it has also generated the individual documents that are delivered to each individual frame. If you're starting from scratch, these should be saved because you will eventually be adding content to them. You can now make modifications to the frameset, using the Property inspector. Using Frame Selection Tools Dreamweaver MX 2004 provides you with two primary visual means to help you make selections when working with your framesets and frame elements. You can work in the Frames panel or the Document window. As a general rule, it's much more user -friendly to work with frames and framesets in the Frames panel. To work in the Frames panel, select Window, Frames. A small diagram of the Design view appears on the Frames panel, providing an illustration of the frames within a frameset. After a frame is selected in the Frames panel, a black border surrounds it. After a frameset is selected in the Frames panel, a thick black line appears around the frameset. If the Property inspector is open, you can confirm your choice by viewing the frame or frameset name there. Selecting a Frame in the Frames Panel Click inside the frame in the Frames panel. A selection outline appears around the selected frame in both the Frames panel and the Document window's Design view. Selecting a Frameset in the Frames Panel Click on the border that surrounds the frameset in the Frames panel. A selection outline appears around the frameset in both the Frames panel and the Document window's Design view. After a frame is selected in the Document window's Design view, a heavy dotted line surrounds each frame. After a frameset is selected in the Document window's Design view, all the frames contained in that frameset are surrounded with a faint dotted line. Selecting a Frame in the Document Window's Design View With your frameset document open, switch to Design view by selecting View, Design. To select a frame, (Option-Shift-click) [Alt-click] inside a specific frame. Selecting a Frameset in the Document Window's Design View To select a frameset, be sure the frame's visual borders are on so you can see what you're doing. Select View, Visual Aids, Frame Borders. Now click any of the frameset's borders (see Figure 9.6). Figure 9.6. Select Dreamweaver MX 2004's visual frame border aids to make frame and frameset selections. 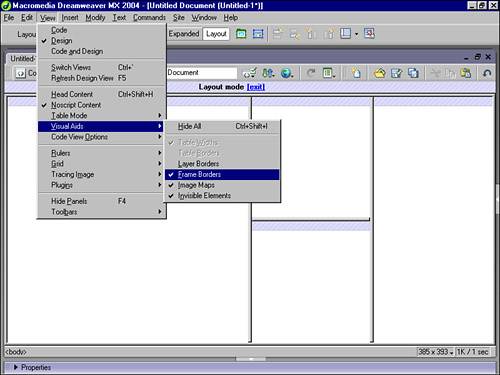 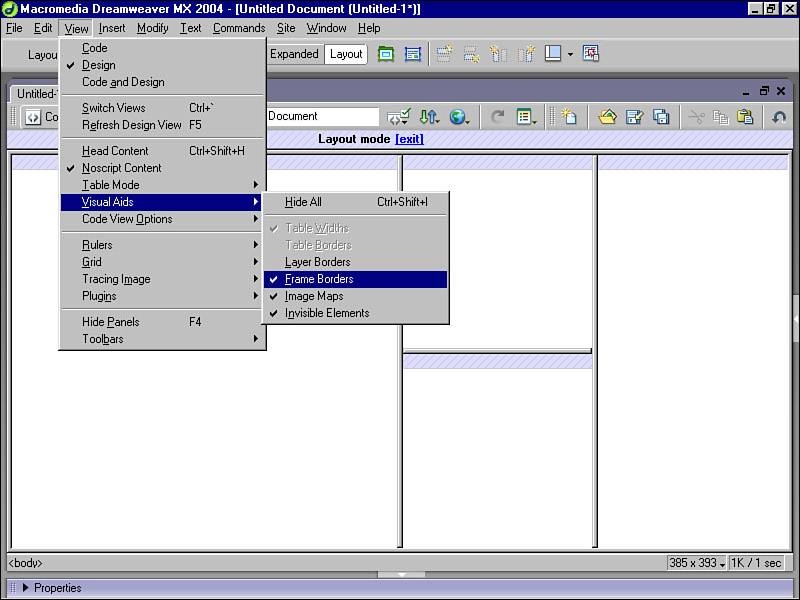
CAUTION Simply clicking in a frame in the Document view does not select it. Instead, a single click in a frame enables you to edit the contents of that frame.
|