| When you create your first Library item, you can immediately see how it appears in Design view when inserted into a page because the selected elements become a library instance (see Figure 7.7). Figure 7.7. When you insert a Library item, the markup for the elements is inserted, surrounded by comment tags. The item appears highlighted in Design view to distinguish it from regular, editable content. 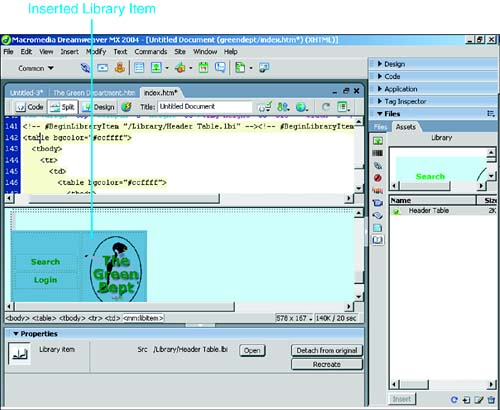
To insert the Library item elsewhere in the site, follow these steps: - Position the insertion point in the Document window where you want the Library item to be placed.
- Open the Library category of the Assets panel.
- Select the Library item you want to insert.
- Click the Insert button at the bottom of the Assets panel, or drag the Library item to the Document window.
You can insert the Library item content and immediately detach it from the library by pressing the Ctrl key as you drag or click the Insert button. If you do this, the content will be copied into the document at the insertion point, but the inserted content assumes the same status as any other element on the page and must be manually changed in Design or Code view. The status of the Library item itself remains unchanged. You can still insert the Library item elsewhere in the site, either retaining its attachment to the item or detaching it, as necessary. Editing Library Items As mentioned earlier, the advantage of the library is that modifications made to an item are updated site-wide. Here's how to edit a Library item: - Select the item.
- Click the Edit button in the Assets panel. You can also open the Library item for editing from the Property inspector when an instance of the item is selected in the Document window.
- Edit the syntax and content as you require.
When you edit a Library item, the content of the item appears in a new document window. After making your changes, save the document. An alert box prompts you to update any pages containing the Library item (see Figure 7.8). Figure 7.8. When you save changes to a Library item, you're prompted to update all instances of the item throughout the site. 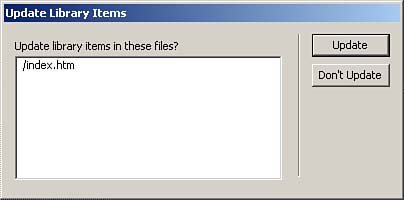
If you don't update pages at this point, you can use Modify, Library, Update Current Page or Update Pages later. If you choose to update, the Update Pages dialog box appears and lists the number of updates made (see Figure 7.9). You can also use this opportunity to update the remainder of the site's library and template instances. Figure 7.9. The Update Pages dialog box is used to update both Library items and templates used in the site. 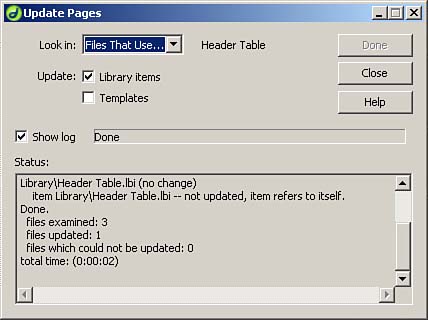
CAUTION When editing Library items, you can't use Cascading Style Sheets (CSS) because they insert code into the head section of the page. Library items can insert a consecutive block of code only into the body of the document.
NOTE Although you can't include style rules in a Library item, you can include class attributes. When the Library item is inserted, it assumes the styles set for that class in the attached internal or external style sheet, thus assuming the appearance of the rest of the site.
If the Library item is updated, all markup between the comment tags is modified to reflect the changes. In templates, certain regions can be locked so you don't inadvertently modify pieces of the template. Library items, however, have no such constraints. Changing the content of the inserted Library item doesn't break the link to the library. However, if you manually modify the content of the Library item within the document ”adding content to a table inserted using a Library item, for example ”those changes will be lost when and if the Library item is updated. If you don't want your changes to be overridden, you need to detach the inserted Library item from the source. Detaching from the Original To detach an instance of a Library item from the library and thereby prevent it from being edited and updated when the Library item itself is modified, you need to break the link between the document and the item. To detach a Library item from the original, do the following: - Select the instance you want to detach in the Document window. The Property inspector modifies to manage your item.
- Click Detach from Original (see Figure 7.10). The highlighting around the item disappears, signifying that the content is now simply a part of the document.
Figure 7.10. Detaching a Library item from the original merges the content and code from that item with the document at hand. 
- Save any changes.
Figure 7.10 shows the Detach button in the Property inspector. Deleting Library Items To delete a Library item, follow these steps: - Make sure the Assets panel is open and the Library is selected. Then, select the item to be deleted.
- Click the Delete button at the bottom of the Assets panel.
The item is deleted from the Assets panel, but any instances of it remain in their respective documents. CAUTION The delete process is irreversible. After a Library item is deleted, it is removed from the hard drive.
 | Did you accidentally delete a Library item? See "Re-creating Library Items" in the "Troubleshooting" section of this chapter. |
Behaviors in the Librarys When you create a Library item out of content containing Dreamweaver behaviors, the elements and event handlers are copied, but the associated JavaScript is not. Remember: The Library item can't update head content. Fortunately, though, when you insert the Library item into a document, Dreamweaver is smart enough to know to add the appropriate JavaScript functions. If those functions are already in the head , Dreamweaver knows not to duplicate it. You can't use the Open option in the Property inspector to edit behaviors. This option only opens the Library item itself, which won't contain the necessary JavaScript and access to the Behaviors panel. Editing behaviors in a Library item, therefore, requires a workaround. Follow these steps: - Open a document that contains an instance of the Library item.
- Select the Library item in the document.
- Click Detach from Original in the Property inspector to make the item editable.
- Use the Behaviors panel to change events and actions as necessary.
- In the Library category of the Assets panel, delete the original Library item by clicking Delete at the bottom of the Assets panel.
- In the Document window, select all the elements contained in the Library item.
- In the Assets panel, click the New Library button, giving the Library item the same name as the original.
CAUTION Be sure to note the exact name of the original Library item before you delete it. If you give the new Library item a different name, the links to all other instances of the Library item will be broken.
After the Library item has been re-created in this manner, you need to update the site to bring all the other instances of the Library item up to date. To do this, select Modify, Library, Update Pages from the menu. TIP Library items can be copied to another site in the same manner as any other asset on the Assets panel. Select the Library item, (Command-click) [right-click], and select Copy to Site from the context menu. A pop-out menu lists all the defined sites to which you can copy the Library item. If this is the first Library item being added to the other site, Dreamweaver creates a Library folder in the local site.
|