| Because it bundles functions and variables into objects and classifies objects in different classes, object-oriented programming (OOP) is designed to make complex programs easier to build and maintain. Classes are the most basic infrastructure for OOP. With ActionScript 2.0, Macromedia has accomplished something wonderful: They have radically simplified the task of creating and using classes, and allowed us to use the new approach for real-world applications immediately, because it works in movies targeting Flash Player 6 (which most people have by now), rather than requiring Flash Player 7 (which some laggards may not have installed yet). Macromedia was able to do this because in the SWF, the classes are still exactly the same as before. Another way of saying this is that AS2 classes "compile into" AS1 classes. Or, if you want to sound intelligent , say that the new system is just a "syntactic formalization" of the previous system: Macromedia changed the way that we give instructions to the Flash compiler; they didn't change the compiled code. The new instructions are simpler, more efficient and more foolproof.  This chapter talks only about the ActionScript 2 approach to creating classes. If you need to use the ActionScript 1 approach to creating classes (for compatibility with Flash Player 5, for instance), see functionsAsClasses.htm on the CD accompanying this book. There are also some files on the CD, such as drawing.htm and associated .fla files, which illustrate the ActionScript 1 approach to OOP. You may also want to consult Special Edition Using Flash MX , published by Que in 2003. This chapter talks only about the ActionScript 2 approach to creating classes. If you need to use the ActionScript 1 approach to creating classes (for compatibility with Flash Player 5, for instance), see functionsAsClasses.htm on the CD accompanying this book. There are also some files on the CD, such as drawing.htm and associated .fla files, which illustrate the ActionScript 1 approach to OOP. You may also want to consult Special Edition Using Flash MX , published by Que in 2003.
This section discusses basic techniques and best practices in -
Defining classes -
Creating class instances -
Using a constructor function to initialize attribute values when creating instances -
Managing the "visibility" of class features ( methods and attributes defined in the class) -
Accessing and modifying ("getting" and "setting") attributes in classes -
Allowing or disallowing the creation of new class features at runtime -
Creating hierarchies of classes and subclasses -
Facilitating the creation of standard interfaces to classes -
Telling the compiler where to look for classes Terminology The term member is commonly used in the Flash environment to denote a method or attribute belonging to a class. I like "feature" more, because it has always seemed intuitively to me that a "member" of the MovieClip class (for instance) should mean a movie clip ”an object belonging to the class, like a member of a club. But that's not the way it is. A movie clip is an instance , not a member, of the MovieClip class. Members are methods and attributes (that is, functions and data). Property is officially another synonym for "feature" or "member," but even the Flash MX 2004 documentation often uses "property" to mean "attribute" instead. It doesn't cause any confusion if it's used in a context such as "properties and methods." Nevertheless, I try to use "property" to mean any kind of member, and use "attribute" when I want to make it clear that I mean a non-method property. Class features = methods and attributes Class members = same as class features Class properties = same as class features Class instances = objects belonging to the class, for example, myDog in the Dog class Methods = functions Attributes = data (variables) |
Defining a Class You create a new class by creating a file with the extension .as. (Not all files with the .as extension are classes. But all classes are embodied in files with the .as extension.) The file must have the same name as the class. Within the file is the class definition and nothing else ”one class per file. Always put your .as files either in the project folder (the one with the .fla file in it) or into a common class library folder that you create. Never put them in any existing Flash MX folder that contains classes from Macromedia as this can cause problems. A common practice is to create a new subdirectory under the Classes directory under Documents and Settings, below which reside all the Macromedia Flash classes. A common convention for creating classpaths is to base the folder structure on the reverse of the domain name. For instance, for greendept.org, you might store classes in org\greendept\Classes. Here's a minimal class definition, for a Dog class: class Dog { // class definition goes here }
That's it: The keyword class , the name of the class (capitalized by tradition), and the class definition in curly braces. The class definition consists entirely of function and var statements, declaring methods (functions) and attributes (variables) respectively. For example: class Dog { var sound = "bow wow"; function getSound() { return sound; } }
By convention, all the attributes are declared first, then all the methods. This class doesn't follow best practices by a long shot. (Much of the rest of this section is devoted to explaining its deficiencies.) But it does work. Creating Class Instances You create class instances by using the new statement. Here's the simplest form of it: var myDog = new Dog();
However, you should never use this simplest form, because you should always specify the data type of the object you're creating, like this: var myDog:Dog = new Dog();
Note that the data type is simply the class. By declaring the data type in this way, you tell the ActionScript compiler what kind of object myDog is, making it possible for the compiler to warn you if you use myDog improperly. This is an example of strict typing, which was introduced in Chapter 20. For more on strict data typing, see "Managing Variables, Data, and Datatypes," page 460 and "Declaring Functions," page 486 , in Chapter 20, "Basic ActionScript."
The previous statement creates an instance of the Dog class, in much the same way that dragging and dropping a movie clip from the Library onto the Stage creates an instance of the movie clip. Here is an abstract representation of the previous new statement: var newInstanceName:Type = new ClassName();
After you've created an instance of a class, you use that instance to access the features of the class. (At least those that are publicly available. In the preceding Dog class, all the features are publicly available. That's one of the problems with it. We'll get back to that in a minute.) You use the dot (.) operator ”known in this context as the property access operator ”to access class features. For instance, the preceding Dog class has two features: a sound attribute and a getSound method. We can test them like this: trace (myDog.getSound()); // displays "bow wow" trace (myDog.sound); // displays "bow wow"
Using Default (Prototype) and Instance Features ActionScript implements an efficient, transparent system for conserving memory when storing the methods and attributes that instances access through expressions like myDog.getSound() and myDog.sound . The essence of the system is this: A default value for each feature is stored in a central place that all instances can access. If the default value works for everyone, that's the only place the feature needs to be stored. On the other hand, an instance can create its own instance copy of any feature, and use that instead of the default. This takes up memory in that one instance, but not in other instances. At any time, the instance can delete its instance feature and go back to using the default, freeing up the memory that was used by the instance copy. The "central place" where the defaults are stored is the prototype attribute of the class (which is an object, so that it can store any number of attributes itself). When an instance references a feature (as in myDog.getSound() or myDog.sound ), if the compiler can't find the feature in the instance itself, it looks in the prototype of the class. Consider the following code, which uses the previously defined Dog class: 1: var myDog:Dog = new Dog(); 2: var myDog2:Dog = new Dog(); 3: trace(myDog.sound); // "bow wow" 4: trace(myDog2.sound); // "bow wow" 5: myDog2.sound = "grrr"; 6: trace(myDog2.sound); // "grrr" 7: trace(myDog.sound); // still "bow wow"
In lines 3 and 4, both instances are still using the default prototype feature. That's because, so far, they haven't done anything but "read" the feature. As long as that remains the case, the feature will be stored only in the prototype, and neither instance will have an instance copy of it. In line 5, however, myDog2 " writes " (or sets) the feature ”gives it a new value. As soon as that happens, myDog2 gets its own instance copy of the feature. In line 6, myDog2 displays its instance copy. In line 7, myDog still displays the prototype feature, because myDog has never set this feature. Now, let's delete myDog2 's instance copy: delete (myDog2.sound); trace (myDog2.sound); // "bow wow"
Voila! The compiler, not finding an instance of sound associated with myDog2 , looks in the prototype, finds the sound feature there, and displays its value. The prototype object is also the basis for creating hierarchies of classes, a topic that we will go into later in this section. Static or Class Features Features stored in the prototype object are (or at least can be) shared by the whole class. However, they are generally accessed only through individual instances, such as myDog and myDog2 . There is another kind of shared feature that cannot be accessed through individual instances, but must be accessed through the class itself. These features are called static or class features. For these features, there is never more than one copy for the whole class. If the feature is changed, it changes for all instances of the class. The static keyword is a standard, used in other languages such as Java as well. However, it is perhaps not an ideal term, because these features are not unchanging. They can be changed, though you have to refer to them directly through the class (for example, Dog.sound ), not through the instance (for example, myDog.sound ). One approach is illustrated in the following example, which shows one .as file and two .fla files: // StaticDog.as class StaticDog { static var sound = "bow wow"; function getSound() { return Dog.sound; } function setSound(newSound) { Dog.sound = newSound; } } // StaticDog.fla trace (StaticDog.sound); // bow wow StaticDog.sound = "yip yip"; trace (StaticDog.sound); // yip yip // myDogs.fla var myDog: StaticDog = new StaticDog(); var myDog2: StaticDog = new StaticDog(); trace(myDog.getSound()); // bow wow trace(myDog2.getSound()); // bow wow myDog.setSound("yip yip"); trace(myDog.getSound()); // yip yip trace(myDog2.getSound()); // yip yip
StaticDog.fla doesn't even create an instance of the Dog class: It just sets the Dog.sound attribute directly. In contrast, myDogs.fla creates instances of the Dog class and uses getSound and setSound methods, which in turn manipulate Dog.sound . Notice that in myDogs.fla, even though only one instance changed the sound (third line from the end), the sound changed for both instances (as demonstrated in the last two lines). Using a Constructor Function to Initialize Attribute Values The Dog class, as you've seen, can give an initial value ("bow wow") to the instance attribute sound , by declaring it like this: var sound:String = "bow wow";
Instances can create their own unique values for this feature. But what if you want each dog, from the moment it's created, to have its own unique sound? You can accomplish this using a constructor function , which effectively "builds" each dog when the dog is created. In the new statement, you pass parameters to the constructor function to provide values for attributes or to provide other data or references that the constructor function may need. You use parameters to tell the instance "factory" (the constructor function) what special features you want on the instance that you're "ordering." The constructor function resides inside the class. It must have the same name as the class. It has no return statement and cannot have a return type, but it nevertheless returns an instance of the class, which you typically assign to a variable such as myDog or myDog2 . In fact, a constructor function has been used throughout this chapter, but it wasn't obvious, because the compiler created the constructor function automatically when I didn't define one in the class. The auto-generated constructor function is "empty" and doesn't do anything except return an instance of the class. Here's an example of a Dog class (not found on the CD) with a constructor function that does do something: namely, create a sound feature based on a parameter: // Dog.as class Dog { private var sound = "bow wow"; function Dog (sound:String) { this.sound = sound; } function getSound() :String { return sound; } function setSound(newSound:String) { sound = newSound; } }
Notice within the constructor function the use of the keyword this , which refers to the instance being created. Thus, this.sound = sound; creates a new instance feature ( this.sound ) and assigns to it the value of the sound parameter ( sound ). The first statement in the class ( var sound = "bow wow"; ) creates a sound attribute in Dog.prototype . You need this attribute in this case. Otherwise, the constructor function tries to add a new sound attribute to a non-dynamic class, which doesn't work. The this.sound = sound; statement in the constructor function fails with the error, There is no property with the name 'sound'. If you make the class dynamic, you don't need the var sound = "bow wow"; . For more on dynamic classes, see "Allowing or Disallowing the Creation of New Class Features" in this chapter, page 548 .
You may also want to make use of the sound attribute in the prototype. As it stands now, however, the prototype attribute will never be accessed: Every instance will have its own instance sound attribute. Even if the new statement creating the instance doesn't pass a parameter, the sound attribute will be created with the undefined value. However, you can modify the constructor function slightly, so that it doesn't do anything if no value or a null value is passed to it. Here's what that looks like: function Dog (sound) { if (sound) this.sound = sound; }
Now a statement like var myDog:Dog = new Dog(); or var myDog:Dog = new Dog(null); does not cause any instance attribute to be created. Therefore, a statement like trace(myDog.getSound()); accesses the prototype property. The following code illustrates this: var myDog:Dog = new Dog("ruff"); var myDog2:Dog = new Dog(); trace(myDog.getSound()); // ruff trace(myDog2.getSound()); // bow wow (from the prototype) myDog.setSound("yip yip"); trace(myDog.getSound()); // yip yip trace(myDog2.getSound()); // bow wow (from the prototype)
Without the if (sound) statement in the constructor function, the lines above that display bow wow from the prototype would display undefined . A class can contain only one constructor function. Some languages allow more than one, and let the compiler figure out which constructor function to use based on how many and what types of parameters get passed in ”a process called overloading constructor functions. ActionScript 2.0 doesn't support overloading in this context. (One of the few places that ActionScript does support overloading is with the + operator, which determines whether it should be adding numbers or concatenating strings, based on the types of data it is used with.) The only keywords that work in front of constructor functions are public and private . These two keywords are discussed in the next section. Managing the "Visibility" of Class Features I mentioned earlier that it is not a good thing that all the Dog class's features are publicly accessible. In a well-designed OOP application, each class publicizes what it can do , but it hides the details of how each task is accomplished (it encapsulates the functionality), and what data is maintained in connection with each task (known as information hiding ). This principle usually translates into publicizing only methods, not attributes. (Some methods may also be hidden.) The visibility of a feature describes the ability or inability of client code to access that feature directly, using the dot ( . ) property access operator. There are two kinds of visibility in ActionScript: public and private. With public visibility, clients can access the feature using the property access operator. With private they can't. By convention, the visibility keyword is the first word in the declaration, like this: private static var sound = "bow wow"; private var sound = "bow wow"; public static function getSound() { return sound; } public function getSound() { return sound; }
Public visibility is the default. So if you don't declare any visibility, the feature will be public. Thus, the following two statements are functionally equivalent: public var sound = "bow wow"; var sound = "bow wow";
The public keyword tells anyone reading the program that you deliberately made the feature public. You didn't just neglect to declare a visibility. You will get the following compiler error if you try to access a private feature from client code (that is, in your .fla file): The member is private and cannot be accessed. Private features are accessible from within the body of a method within the class. In Flash, this also applies to methods in subclasses. (Which makes private in Flash equivalent to protected in Java.) Accessing and Modifying ("Getting" and "Setting") Attributes If you follow the recommended practice of hiding attributes by declaring them private, you need to create methods within the body of the class to access those attributes. This is done through "get" and "set" methods. Every attribute that is used by clients has at least a get method, or some method that "reads" the attribute. Private attributes with only a get method are in effect read-only. Creating get and set methods does entail some extra work. The benefit is more flexibility as your program evolves. If you need to change the underlying data structure, for example, you may only have to modify your get and set methods to accommodate the change. If clients were to access attributes directly, you would have to modify every piece of code where such an access occurred. The get and set methods also provide a natural place to manipulate data before passing it on to clients. For these reasons, get and set methods are considered an essential part of good OOP design. Some attributes may be used only for internal "housekeeping" within the class. They don't need get/set methods, though you may decide to use get/set methods anyway, for your own convenience in maintaining the class. One potential disadvantage of get and set methods is losing the elegant, concise syntax of the dot operator. This: trace(myDog.sound);
is shorter and easier to read than this: trace(myDog.getSound());
Similarly, this: myDog.sound = "grrr";
is shorter and easier to read than this: myDog.setSound("grrr");
In ActionScript, you can have your cake and eat it, too. The get and set keywords allow you to create get and set methods that support access via the dot operator. Here's a bare-bones class declaration that does not use the get and set keywords, and therefore does not support access via the dot operator. class Dog { private var sound:String = "bow wow"; function getSound ():String { return sound; } function setSound (newSound:String) :Void { sound = newSound; } }
For the preceding class, you need to use statements like trace(myDog.getSound()); and myDog.setSound("grrr"); . Here's the same class, using the get and set keywords: // Dog.as class Dog { private var __sound:String = "bow wow"; function get sound ():String { return __sound; } function set sound (newSound:String):Void { __sound = newSound; } }
Now, if myDog is an instance of the Dog class, the trace(myDog.sound); statement actually calls the first function, which gets the __sound attribute. Similarly, a statement like myDog.sound = "grr"; calls the second function, which sets the __sound attribute. A get method cannot take any parameters. A set method takes exactly one required parameter. Notice that inside the class we have changed the name of the attribute by adding double underscores before it. The ActionScript compiler does not allow you to use the same name for two different members of a class; you'll get an error if you try. Using the same name but with double underscores added makes it visually clear to you which attribute is associated with the get and set methods. It is recommended that you use some naming convention that achieves the same goal. However, there are no hard and fast rules about how to do that. Similarly, when naming the parameter passed to the set method, it's common to use the attribute name with "new" (for example, "newSound") tacked on at the beginning. But it's by no means obligatory . Many programmers take the "less is more" approach and just use the first letter of the attribute for the parameter name (like "s" for sound). Again, some consistent naming conventions will speed up your programming and make your code more readable. There are few if any disadvantages to using get/set methods. Use them whenever you can because they eliminate most of the pain associated with information hiding. Get/set methods are accessible within other methods in the class. If you refer to sound , for instance, elsewhere in the Dog class, the compiler may very well take it as a reference to the get or set function. Therefore, avoid using the names of the get/set methods elsewhere in the class unless you want to invoke the get/set methods. One final note: When a set method runs, the corresponding get method runs automatically immediately afterwards. It doesn't do any harm, but it can drive you batty when you're debugging your program, if you don't know that it's expected behavior. Allowing or Disallowing the Creation of New Class Features In the Dog class that we've been looking at, instances have the features defined in the class, and only those features. If you try to do something like this: myDog.col = "brown" // col is the dog's color
you'll get a compiler error: There is no property with the name 'col' , indicating that there is no col attribute defined in the Dog class. You get this error because, by default, ActionScript classes are not dynamic : That is, they do not allow you to add new features to instances at runtime. Instances have the features defined in the class, and that's it. Sometimes, however, you may want to leave open the possibility of adding new features to instances at runtime. For example, if other programmers are going to use your class, you may want them to have the flexibility of adding new members easily. Macromedia made the MovieClip class dynamic, for example, because some ActionScript programs rely heavily on adding features to movie clips. You make a class dynamic by putting the word dynamic in front of the word class in the class declaration, like this: dynamic class DynamicDog { // details omitted file on the CD }
Now myDog.col = "brown" causes no problems. It adds a col attribute to the myDog instance. Other instances of the Dog class are not affected; they do not have a col attribute. There are two reasons to avoid using dynamic classes: -
You can unknowingly create a new feature with a slip of your fingers on the keyboard. For instance, with the following line, you might inadvertently create a new feature named soumd : myDog.soumd = "grr";
In a non-dynamic class, the compiler would have caught this typo, warning you that there was no such member. -
New features cannot be strongly typed. You cannot use the var keyword when creating dynamic attributes, so there is simply no opportunity for strong typing. For example, the following client code generates a compiler syntax error: var myDog.col = "brown"; // Syntax error!
Therefore, you cannot do something like this: var myDog.col:String = "brown";
If you create a function to set the new feature, strong typing will not work for that either. For instance, in the following example, the setColor function declares a string parameter, but the compiler does not generate an error if you execute setColor with a number as the parameter. For example, if Dog is a dynamic class: // myDynamicDog.fla var myDog: DynamicDog = new DynamicDog(); myDog.col = "brown"; myDog.setColor = function (newColor:String) { // try strongly typing myDog.col = newColor; }; myDog.setColor(16777215); // the compiler accepts this! :(trace (myDog.col); // 16777215
When you create hierarchies of classes, as described in the next section, all subclasses of a dynamic class are also dynamic. Dynamic classes are often a convenient , "quick and dirty" way of getting the job done. However, especially for your own internal use, there are usually other ways of accomplishing the same thing that don't sacrifice strong typing and typo-catching. Chief among those ways is creating hierarchies of classes. Creating Hierarchies of Classes If you want some, but not all, instances of the Dog class to have a col attribute, you can accomplish this by creating a subclass of the Dog class. You create a subclass by using the extends keyword in the class definition, like this: // DogOfColor.as class DogOfColor extends Dog { private var __col:String; public function get col ():String { return __col; } public function set col (newColor:String):Void { __col = newColor; } }
Then simply create an instance in the usual way: var myDog:DogOfColor = new DogOfColor();
myDog will have all the features from the prototype of the Dog class (the superclass) and all the features of the DogOfColor class (the subclass). If the two classes have any features with the same names, instances of the subclass will be created with the features defined in the subclass, whereas instances of the superclass will be created with the features defined in the superclass. The extends keyword gives only prototype features from the Dog class to DogOfColor instances. What if the Dog class also has a constructor function that creates instance features that you want your DogOfColor instance to have, too? This can be accomplished by using the super operator at the beginning of the DogOfColor constructor function, like this: function DogOfColor() { super(); // other details omitted }
The super statement actually runs the Dog constructor function. If the Dog constructor function requires parameters, you can pass those with super . Usually, you will take parameters passed to the DogOfColor constructor and pass them on to the Dog constructor. For example, let's say the DogOfColor subclass needs a parameter for the dog's color, and the Dog superclass needs a parameter for the sound. Then the statement that creates the DogOfColor would typically take both parameters (sound and color), like this: var myDog:DogOfColor = new DogOfColor("ruff", "tan");
In the DogOfColor constructor function, you would pass the sound parameter to the superclass constructor and set the color with the color parameter, like this: function DogOfColor (newSound:String , newCol:String) { super (newSound) if (newCol) this.col = newCol; }
If you want to pass all the parameters on, you can do that using the arguments object, like this: function DogOfColor () { super (arguments); }
Then, in the superclass constructor function, you can reference the parameters like this: function Dog () { if (arguments[0]) this.sound = arguments[0]; if (arguments[1]) this.col = arguments[1]; }
This last example shows a situation in which you don't want to create any instance features in the subclass constructor. You want to create all of them in the superclass constructor. In that case, all that the subclass constructor has to contain is super(arguments); . Notice that when you use the arguments object, you don't have to put anything in the function parentheses, because the arguments object is automatically created and named by the compiler. To make sure you get the proper instance features in subclass instances, running super must be the very first thing that happens in the constructor function. That way, superclass instance features are created first. When the subclass instance features are created later, if there are any with the same names as superclass instance features, the subclass features overwrite the superclass instance features, which is what you want. If you could run super after subclass instance features are created, superclass instance features could overwrite subclass instance features, which would tend to defeat the purpose of creating a subclass. If you put the super statement anywhere but at the beginning, the compiler will complain: The superconstructor must be called first in the constructor body. Notice that I used the term "overwriting," not "overriding," in the previous paragraph. Overriding is something that occurs between features that reside at different levels in the class hierarchy, such as an instance feature and a prototype feature. It refers to a situation where the compiler finds a feature with a particular name lower down in the hierarchy (in the instance, for example), and therefore does not keep searching to find a feature of the same name at a higher level in the hierarchy (in the class prototype, for example). Both values continue to exist, but in different locations. Overwriting , on the other hand, takes place at a single level ”at the instance level in the preceding paragraph, for example. There's only one feature and therefore just one value for the feature. When the feature gets set a second time, the value that was set the first time is permanently wiped out. Here is a Dog superclass and a DogOfColor subclass illustrating much of what you've looked at so far in this chapter. (This is available on the CD as Dog.as and DogOfColor.as. The myDogOfColor.fla file "exercises" these classes.) // Dog.as superclass class Dog { private var __sound = "bow wow"; function Dog (newSound:String) { if (newSound) { this.sound = newSound; } } public function get sound ():String { return __sound; } public function set sound (newSound:String):Void { __sound = newSound; } } // DogOfColor.as subclass class DogOfColor extends Dog { private var __col = "brown"; public function DogOfColor (newSound:String , newCol:String) { super (newSound); if (newCol) { this.col = newCol; } } public function get col():String { return __col; } public function set col(newColor:String):Void { __col = newColor; } }
Given these classes, a statement like this: var myDog:DogOfColor = new DogOfColor("ruff", "tan");
results in a new DogOfColor object with access to all the prototype features from Dog (the private __sound attribute and the corresponding get and set methods) and all the prototype features from DogOfColor (the private __col attribute and the corresponding get and set methods). The prototype attributes __col and __sound (with the values "brown" and "bow wow," respectively) are overriden by instance attributes of the same names (with the values "tan" and "ruff," respectively). Facilitating the Creation of Standard Interfaces to Classes It sometimes happens that you want to use the same function call to get the same basic service from two different classes. For example, perhaps you have an Employee superclass, with subclasses that include Executive , Hourly ( employees paid by the hour ) and Contractor . It makes sense to have the superclass, because there are a lot of identical tasks you need to perform for all employees, such as keeping track of their names and phone numbers. There may also be tasks that are unique to certain subclasses, such as managing per-project contracts with contractors. In addition, there may be tasks which are conceptually the same, but differ in their internal details. For example, computing the employee's monthly check may be conceptually simple: Perhaps you just want a method that takes the month and the employee's Social Security number (or Employer Identification Number, in the case of a business) and returns a dollar amount. It might look something like this: function computeMonthlyPay(month:String, SSN:Number):Number {//details omitted}
However, the internal details of the calculation will be very different for the three subclasses. Each class needs its own version of the method, but you'd like to ensure that they all use the same method name, parameter types, and return type. That way, you can use the same function call to get the same piece of information. You can enforce such consistency among multiple classes by using an interface . (And, by the way, the classes do not have to be subclasses of a single superclass as in the previous example. They can be completely unrelated as far as the class hierarchy goes. In fact, interfaces are often used precisely because you want to enforce some consistency among multiple classes without forcing them into the same class hierarchy.) An interface is embodied in an .as file containing an interface statement of the following form: interface interfaceName { // interface method declarations }
An interface method declaration looks like a normal function declaration, except that it lacks the function body (the curly braces and everything in them) and is terminated by a semicolon. By convention, the interface name usually begins with a capital I. For example, here is an interface containing a single method declaration: // IEmployee.as interface IEmployee { function computeMonthlyPayment(month:String, SSN:Number):Number; }
The interface can contain as many of these "abstract" (bodiless) functions as you want, but that is all it can contain: no variable declarations, and no functions with bodies. You use the implements keyword to assign an interface to a class. Then, of course, you also have to include the method itself in the class to conform to the interface. If you don't, the compiler gives you an error, such as The class must implement method 'computeMonthlyPayment' from interface 'IEmployee'. If you implement the function with the wrong data types, you will get an error like The implementation of the interface method doesn't match its definition. Here's an example of an Hourly class subclassing Employee and implementing the IEmployee interface: // Hourly.as class Hourly extends Employee implements IEmployee { // other details omitted function computeMonthlyPayment (month:String, SSN:Number):Number { // other details omitted } }
(The preceding example assumes that there is an Employee.as file embodying the Employee class. We have not shown that here.) Telling the Compiler Where to Look for Classes When it comes time to compile the SWF, the ActionScript compiler has to be able to find all the classes referenced in the .fla file. It can find them automatically if you put the class file in the same directory as the .fla file. In that case, you don't have to use any path when you create a new instance: var myDog1:Dog = new Dog (new Array() , 3) ; var myDog2:Dog = new Dog (new Array() , 4) ;
This is fine for small projects, or when you're just experimenting. For more complex projects, and for classes that you want to use in multiple projects, you'll want to organize classes in their own dedicated directories. In that case, you have to do two things: enter a classpath to tell the compiler where to look for the .as files, and put an import statement in your .fla file. There are two places to enter classpaths. You can use either or both. One sets global classpaths, which will be applied to every project. The other sets project classpaths just for the one .fla that you are publishing. Set global classpaths under Edit, Preferences. Go to the ActionScript tab and click the ActionScript 2.0 Settings button. Set project classpaths under File, Publish Settings. Go to the Flash tab and click on the Settings button next to the ActionScript version drop-down menu. The classpath can give just the drive, or the full path to the class files, or anything in between. Whatever part of the path you don't include in the classpath definition, you must state explicitly in the class declaration in the .as file. The import statement duplicates the classpath in the .as file, and may explicitly state the class to import, or may end in an asterisk, indicating that all classes in the directory should be imported. (A directory used to hold classes is known as a package . An asterisk indicates that you want to import the entire package.) If no classpath is required in the .as file, no import statement is required; the compiler automatically imports all the classes in the directory. This latter arrangement makes your classes more portable, because they don't include any classpath. It also relieves you of the necessity of including import statements. Table 21.1 illustrates some of the possibilities. For instance, in the second row, if the classpath is F:\org\greendept\, then the the import statement would be either import Classes.Dog or import Classes.* . Table 21.1. Import Statements and Corresponding Classpaths | import | .as | global or project settings | | None required | Dog | F:\org\greendept\Classes\ | | Classes.Dog | Classes.Dog | F:\org\greendept\ | | Classes.* | Classes.Dog | F:\org\greendept\ | | greendept.Classes.Dog | greendept.Classes.Dog | F:\org\ | | greendept.Classes.* | greendept.Classes.Dog | F:\org\ | | org.greendept.Classes.Dog | org.greendept.Classes.Dog | F:\ | | org.greendept.Classes.* | org.greendept.Classes.Dog | F:\ |
For both global and project classpaths, you can define multiple directories to be searched, and within each category (global and project), you can tell the compiler the order in which classpaths should be searched. The interface, shown in Figure 21.1, is the same in both places. There are five buttons that you use to add, remove, and reorder classpaths. From left to right, they are Add New Path (+), Remove Selected Path (-), Browse To Path, Move Path Up, and Move Path Down. To add a new path, click on Add To Path and either type in a path, or else click Browse To Path to use a Windows Explorer-style interface to select a path. To delete a path, select the path and click Remove Selected Path. To move a Path up or down in the list, select the Path and then click the Move Path Up or Move Path Down button. Double-click on an existing entry to edit it. Figure 21.1. The interface for configuring classpaths. 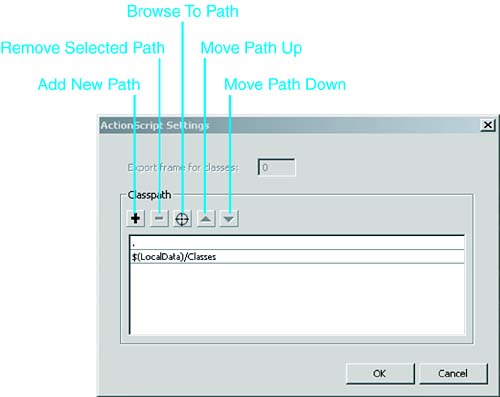
The default classpaths are misconfigured as shipped, and you should change them. The search order you want is -
Paths you explicitly set in Publish Settings -
The implicit project path, that is, the path of the .fla file -
The implicit built-in global path The actual order is -
Paths you explicitly set in Publish Settings -
The implicit built-in global path -
The implicit project path, that is, the path of the .fla file The correct order maximizes your flexibility in overriding existing classes, that is, substituting your own class for an existing class. You do this by creating a new class of the same name as the existing class, and getting the Flash compiler to find your new class before it finds the existing class. The as-shipped search order makes it impossible for you to override a built-in class by placing a class of the same name in the project path. The desired search order enables that. On the screen for setting default classpaths (Edit, Preferences, ActionScript tab, ActionScript 2.0 Settings), you should see two entries. The first should be something like $(UserConfig)/Classes or $(LocalData)/Classes . This is the global path. The second will be a period ( . ). This is the current working directory, that is, the project path. The $(UserConfig) path is the per- user configuration directory. In Windows, this is usually c:\Documents and Settings\username\Application Data\Macromedia\Flash MX 2004\en\Configuration . On the Macintosh, it is volume:Users:username:Library:Application Support:Macromedia:Flash MX 2004:en:configuration $(LocalData) resolves to the First Run directory of your Flash installation. Click on the first entry and click the Move Path Down button (the down arrow). The path moves down, so the dot is on top. Then click OK to exit. (Thanks to Grant Skinner, www.gskinner.com and Phil Chung, www.philterdesign.com, for pointing this out.) |