| Flash MX 2004 support for video enables you to incorporate live action content such as corporate announcements, movie trailers , instructional videos , and news and sports coverage into your Flash movies. Users can control the delivery of video content ”and not simply by using playback controls. As an example, with careful editing and compression to keep file size down, multiple video clips can offer user -controlled non-linear narratives. Further, it is possible to employ Flash text to offer optional video subtitles in multiple languages. Combining video and Flash can provide a highly individualized video experience. With Flash MX 2004, you can embed video at authoring time or load external Flash Video (FLV) files at runtime.  Theres actually a third option, linking video, discussed in this chapter. See "Embedded Versus Linked Video," page 433 . Theres actually a third option, linking video, discussed in this chapter. See "Embedded Versus Linked Video," page 433 .
 | The ability to load external FLV files at runtime is new in Flash MX 2004. Progressive loading of FLVs at runtime offers a number of advantages, including reduced memory requirements, which improves overall performance; the flexibility to use different frame rates for different clips within the "container" movie; more control, such as the ability to set the size of the video buffer; and less likelihood that the loaded video will interrupt the movie into which it is loaded. |
For more on loading external video at runtime, see "NetConnection, NetStream, and the Rich Media Classes," page 647 , in Chapter 22.
This chapter discusses embedding video. There are still at least four good reasons why you might want to embed video, as opposed to loading FLVs: First, embedded video enables you to distribute your application as one SWF, rather than as an SWF plus one or more .flv files. Second, embedding can be easier: Implementing embedded video can be as easy as importing a video file and placing it on the Stage. Embedding video also enables you to work with video on the Timeline and transform it using Flash's tools, such as the Scale and Rotate tool. Finally, embedding standard video formats such as .avi or .mov enables you to use the Video Import Wizard, new in Flash MX 2004. (The Import Wizard does not work with FLVs. ) Video File Types Flash can import video in a variety of formats if either QuickTime 4 (QT) or higher or DirectX 7 or higher (Windows) is installed, as shown in Table 18.7. Macromedia Flash Video format, .flv , the format created by Sorenson Spark, can be imported without QT or DirectX installed. Table 18.7. Video Import File Formats | File Type | Minimum Required Drivers | Platform | | Audio Video Interleaved (.avi) | QuickTime 4, DirectX 7 | Macintosh,Windows | | Digital Video (.dv) | QuickTime 4 | Macintosh,Windows | | Motion Picture Experts Group (.mpg, .mpeg) | QuickTime 4,DirectX 7 | Macintosh,Windows | | QuickTime Movie (.mov) | QuickTime 4 | Macintosh,Windows | | Windows Media File (.wmv, .asf) | DirectX 7 | Windows |
Flash uses the Sorenson Spark codec to import and export video. Codec is an abbreviation for coder -decoder , and refers to a software module that compresses and decompresses video. To compress video, the codec reduces the number of bits needed to represent video data. The codec then decompresses, or recovers the original data, during playback. Video files are notoriously data intensive , so compression is vital . Sorenson Spark Sorenson Spark is a powerful compression application. Video files are huge ”far too large for Internet delivery without intensive compression being applied. Codecs compress data for faster downloads and then decompress video data during playback. The Spark codec is integrated into the Flash Player, so no external players or plug-ins are required to display video content. The standard edition of Sorenson Spark is integrated into Flash MX and is used to import and compress video files. A professional edition is also available; it provides more robust compression options, including two-pass Variable Bit Rate compression. You can purchase Sorenson Spark Pro at http://www.sorenson.com. |
Video data can be compressed in two ways: spatially and temporally. Spatial (or intraframe) compression compresses data in each frame independently of other frames . Temporal (or interframe ) compression compares data in successive frames and stores only the differences between frames. Sorenson Spark takes advantage of both types of compression. Whenever possible, Sorenson Spark utilizes temporal compression to create the smallest file sizes. However, when significant changes occur in a video frame, spatial compression is used in creating a video keyframe. Video keyframes mark points of change and are similar to Flash keyframes. A video keyframe becomes the reference point for subsequent temporal compression. Video keyframes are created during import into Flash. Embedded Versus Linked Video You can either embed video directly into a Flash movie or else link video to a Flash movie. Embedded videos become part of the Flash document. Linked videos remain external to the Flash document. If you link to a QuickTime video, you must publish your Flash movie as a QuickTime movie. Video content is then displayed in QuickTime, outside the Flash Player. Embedding video integrates it seamlessly into your Flash movies, and no external players are required to view video content. The Video Import Wizard | | The Video Import Wizard walks you through the process of importing a video. It allows you to apply basic compression settings, such as a bandwidth or quality setting, as well as advanced settings affecting the color , dimensions, and other options. You can save your settings in a preset for future use. The new clip editing feature enables you to trim material from the beginning and end of your clip, reducing the size of the SWF. You can also create multiple clips, reorder clips, and export the audio from the video clip. |
The Video Import Wizard has two main functions: editing and encoding. There are both basic and advanced encoding options. Here are the basic steps for importing and embedding a video clip: - Choose File, Import, and then Import to Stage or Import to Library. The Import or Import to Library dialog box launches.
- Navigate to the location of the file you want to import, select the file, and click Open . If the imported file is a QuickTime movie ( .mov ), a QuickTime dialog box opens, prompting you to embed or link the video. Select Embed Video in Macromedia Flash Document.
- A prompt asks whether you want to import the entire video, or edit the video first. If you choose to import the entire video, skip step 4 and go directly to step 5.
- If you choose to edit the video first, the Editing dialog appears, as shown in Figure 18.40. When you are finished editing, click Next . The basic encoding screen, shown in Figure 18.41, appears.
Figure 18.40. The Editing dialog for the Video Import Wizard. 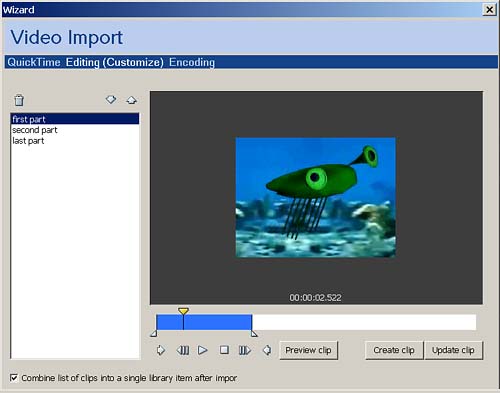
Figure 18.41. The basic Encoding dialog for the Video Import Wizard. 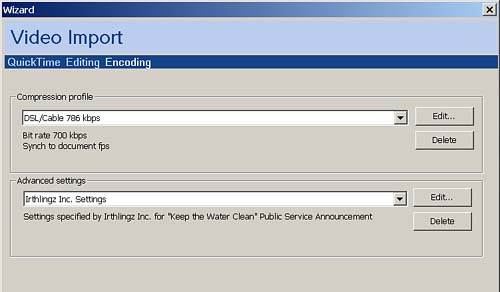
- On the basic encoding screen, you can select an existing profile of one of two kinds: either a basic compression profile (top half of the screen) or a custom preset that you created with advanced configuration options (bottom half of the screen). You can also create new basic compression profiles in the top half of the screen. You create a new profile by clicking the Edit button, in either the top or bottom half of the screen.
- Click Finish. You'll get an Importing dialog box with a progress bar, showing total import time on the right, and an updated count-down to zero on the left.
- If you chose Import to Stage and the Timeline does not contain a sufficient number of frames to display the imported video, you are prompted to extend the Timeline. Click Yes to extend the Timeline or No to maintain the current number of frames. Any frames in the imported video that exceed the number of frames in the Timeline are not displayed during playback.
The video is imported to the Library, and an instance is also placed on the Stage if you chose Import to Stage. To check the size of your imported video, save your movie and test it by choosing Control, Test Movie. Choose View, Bandwidth Profiler to preview your movie. Also, choose View, Simulate Download to preview how long users will have to wait for content to download. Editing The Editing dialog, shown in Figure 18.40, enables you to cut your clip up into sub-clips, toss what you don't want, and reorder what's left. The four basic functions are creating a sub-clip, managing sub-clips in the scroll pane, updating an existing sub-clip, and previewing a sub-clip. -
Creating a sub-clip. To define the points where a sub-clip begins and ends, you can use either the In and Out points (the triangles below the scrubber bar) or the In and Out buttons (on the left below the scrubber bar). To use the In and Out points, just moved them to the desired start and end points and click Create Clip. To use the In and Out buttons, move the playhead to the desired start point and click the In button, then move the playhead to the desired end point and click the Out button. (You can reverse the order, too, setting the end point first.) Click Create Clip. The clip appears in the scroll pane on the left of the Editing dialog, represented by the name of the original clip. Rename it by double-clicking and typing a new name . -
Managing sub-clips in the scroll pane. There are three controls above the scroll pane: The trash can allows you to delete the selected clip. The up and down arrows enable you to move a clip up or down in the list. The order of the clips is particularly significant if you choose to combine the clips into a single library item after import, by clicking the check box in the lower right corner. In that case, the clips are "spliced" into a single clip, in the order that they appear in the scroll pane. -
Updating an existing sub-clip. The most recently created clip appears in the central Editing pane. If you have created several clips, and you want to go back and change the In and/or Out point of a previous clip, select the clip in the scroll pane and click Update Clip. That Clip will appear in the central Editing pane, and you can change its In and/or Out points. -
Previewing a sub-clip. The familiar VCR-style controls allow you to step one frame backward, play from the current position, stop the video, or advance by one frame. To return to the start of the clip and play, click Preview Clip. Basic Encoding If you click the Edit button at the top of the Encoding dialog (refer to Figure 18.41), you can set basic encoding options, as shown in Figure 18.42. Figure 18.42. Basic encoding options for the Video Import Wizard. 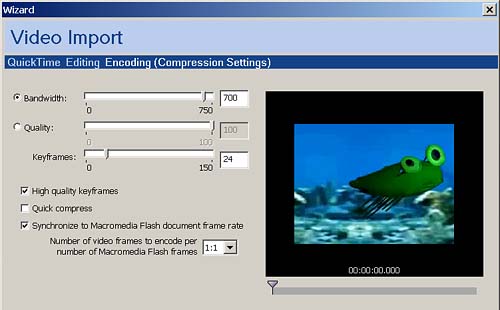
The basic encoding options are as follows : -
The Bandwidth slider specifies the bandwidth that the video will consume when downloading. Video quality may vary to keep bandwidth constant. -
The Quality slider specifies the quality at which the video will be exported, and is similar to the JPEG export settings. The quality range is from 0 to 100, although 60 is usually a minimum setting for acceptable output. To keep video quality the same, bandwidth requirements may vary. -
The Keyframes slider determines how often Sorenson Spark creates keyframes. Remember, complete frame data is stored only where keyframes occur. More keyframes result in larger file sizes. The number that you are setting here is the interval between keyframes, so lower values insert more keyframes. However, a setting of 0 inserts no keyframes. Experiment with this setting to find the best balance between image quality and file size. -
The High quality keyframes option, when selected, ensures consistent image quality in keyframes. If you've chosen the Bandwidth option at the top of the dialog, the quality of keyframes may be degraded if you do not choose this option. -
The Quick compress option enables you to speed up compression with the possible consequence of degraded image quality. -
Select Synchronize to Macromedia Flash document frame rate to match the playback speed of the imported video to the playback speed of the Main Timeline. You can also adjust the ratio of the video frame rate to the main Timeline frame rate, to drop frames from the imported video during playback. The default of 1:1 preserves the original frame rate of the imported video. Try not to go below a frame rate of 12fps, or the video may appear choppy. If possible, import video with a compatible frame rate and synchronize the embedded video with the Main Timeline. Incompatible rates can cause frames to be dropped or duplicated , resulting in noticeable discontinuities on playback. The most likely form of non-compatible video is NTSC video with a frame rate of 29.97 frames per second. Deselecting the Synchronize option prevents frames from being dropped in the embedded video and eliminates discontinuities. Advanced Encoding The Advanced Encoding dialog has three sections: Color, Dimensions, and Track options, as shown in Figure 18.43. Figure 18.43. The Advanced Encoding dialog for the Video Import Wizard. 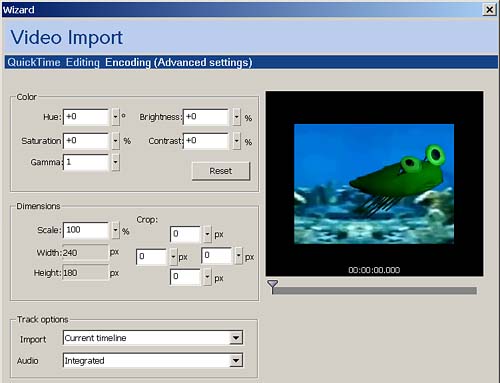
Color Options Color options allow you to set Hue, Saturation, Gamma, Brightness, and Contrast. Each of these can be set numerically or controlled by a slider, located at the right of the numerical input box. Hue lets you change the video's basic color, through all the colors of the rainbow (or "color wheel," if you want to sound professional). Values go from “180 to +180 . Saturation can make your colors look more intense or deeper, or it can "wash out" the colors until they are colorless and gray. Saturation is measured as a percentage of gray from “100% to +100%. Lower values make the colors more gray. Brightness lightens and darkens the video, all the way from pure white to pure black. It's measured from “100 to +100. Lower values make the image more black. Contrast measures the contrast between dark and light in the image, and can affect how distinct or sharp objects appear. It's measured as a percentage from “100% to +100%. Lower values mean less contrast. Gamma is a type of brightness adjustment that affects shadows, midtones, and highlights differently. For instance, it may be possible to lighten or darken the midtones without significantly changing the shadows and highlights, or to lighten the highlights without affecting the shadows. Values go from 0.1 to 1.8. A smaller value makes the image darker . Reset resets all Color options to their default values. Dimensions The Scale slider enables you to reduce the pixel dimensions of the imported video. The Output properties displayed below the slider update to reflect changes in the Scale setting. Values go from 0% to 100%. The default is 100%. Enlarging the video, which would degrade quality, is not possible. The Crop section enables you to reduce the image by any desired number of pixels on any side or combination of sides. Track Options The Import option enables you to import the video to the current Timeline, as a movie clip, or as a graphic. You can browse the video on a timeline and manipulate the movie clip or graphic in all the usual ways, as discussed in the next section. The Audio option enables you to import audio as a separate sound object, integrated with the video, or not at all. Working with Imported Video Embedded video instances can be transformed much like other objects. You can rotate, skew, apply color effects, mask, and even tween a video instance. Simply select the video instance and use the Free Transform tool to apply transformations. To mask a video, move the layer containing the video beneath a mask layer. To animate or apply color effects to a video instance, embed the video in a movie clip symbol and apply color effects or a tween to the symbol. Combine animation and video sparingly, though, as both can increase file size dramatically. After a video is imported, you can replace or update it like other symbols. To replace an embedded video clip, follow these steps: - Within the Library, click to select the embedded video clip.
- Click the upper-right corner of the Library panel to launch the Library Options pop-up menu, and choose Properties. The Embedded Video Properties dialog box appears.
- Click Import to import a new clip to replace the embedded clip.
To update a clip that has been edited externally since import into Flash, select the clip in the Library and access the Embedded Video Properties as outlined in the preceding steps. Instead of clicking Import, click Update. You can place video clips on the Stage and move them about like other objects. The Property inspector enables you to assign an instance name for a clip and to access its coordinates and dimensions. Controlling Video Playback After video is embedded, it can be controlled much like any other content that is on the Stage. Video frames are converted to Flash frames, and you can drag the playhead to scrub through the Timeline and preview video content. If your video content is lengthy, such as a presentation, it's a good idea to add buttons to allow users to control the playback of the video. You control video playback by using ActionScript to control the playback of the Timeline in which the video is placed. However, in Flash MX 2004, there's no longer any need to hand-code the ActionScript to control video. You can use the Embedded Video behaviors on the Behaviors panel to quickly apply the desired actions to buttons that look like VCR controls. You can find a selection of such buttons under Window, Other Panels, Common Libraries, Buttons. Flash movies start to play automatically, and the video should also begin to play as soon as it loads, assuming it's in the first frame. You can prevent the movie (and therefore the video) from automatically playing by inserting a stop(); action in frame 1. Similarly, looping can be stopped if you add a stop(); action in the last frame. |