| To help you draw with precision and create unified layouts, Flash provides several aids, including snapping, the drawing grid, guides, guide layers , and the Align panel. Snapping One way to align elements is to use snapping. Pixel snapping is particularly useful. Because Flash is vector based, you can easily and inadvertently place objects in between whole pixels. These seemingly insignificant pixel fractions can throw off alignment and create problems, particularly with text.  For more on pixel alignment for text, see "Displaying Clear, Sharp Text," page 368 , in Chapter 17, "Working with Text." For more on pixel alignment for text, see "Displaying Clear, Sharp Text," page 368 , in Chapter 17, "Working with Text."
When you drag an object by its registration point (which appears as a crosshair when the object is selected), pixel snapping forces the object into alignment with a grid that has one-pixel spacing between guidelines.  For more on the registration point, see "Registration," page 382 , in Chapter 18, "Animation, Interactivity, and Rich Media." For more on the registration point, see "Registration," page 382 , in Chapter 18, "Animation, Interactivity, and Rich Media."
In addition, with pixel snapping enabled (View, Snapping, Snap to Pixels), any object you create or place on the Stage will snap to a whole pixel coordinate, avoiding many alignment problems. Unfortunately, pixel snapping is off when you open a new Flash document; you have to remember to turn it on. NOTE At 400% magnification (View, Magnification, 400%), Flash displays the pixel snapping grid. To temporarily hide the grid, press and hold X. The grid reappears when you let go.
To temporarily disable pixel snapping, press and hold C. It reactivates as soon as you release C. Grids, Guides, and Guide Layers This section provides an overview of the drawing grid, guides, and guide layers, which help you to align elements within your layouts, helping to create an overall sense of order, intention , and unity.  For more instructions on accessing and implementing grids and guides, see the next section, "Sizing Shapes Precisely," page 355 . For more instructions on accessing and implementing grids and guides, see the next section, "Sizing Shapes Precisely," page 355 .
Grids and guides provide vertical and horizontal guidelines to which objects can be aligned or snapped. The grid option displays uniformly placed horizontal and vertical lines that cover the Stage, appearing behind any artwork. Guides are individual, manually placed horizontal and vertical lines. Guide layers allow you to create your own visual alignment aids. Neither grids, guides, nor guide layers are exported, so they are not visible in your final movie, nor do they increase in size . Guides are most useful for marking the alignment of recurring elements that give structure to your layout, such as menu bars or columns of text. To use the guides, you must show the rulers, which appear along the top and left side of the Stage. To add a horizontal guide, click on the horizontal ruler at the top of the Stage and drag down from it. Click and drag across from the vertical ruler on the left to create a vertical guide. To move a guide, click and drag it with the Selection tool. To remove a guide from the Stage, drag it with the Selection tool back to its originating ruler. Guide layers allow you to create irregular guides. Grids and guides produce guidelines that are horizontal and vertical and that extend from one end of the Stage to the other. What's special about guide layers is that they allow you to use any of the drawing tools to create your guides. With guide layers, you are not limited to perpendicular guidelines, or even to lines at all. In a guide layer, you could draw a diagonal line, or hexagonal shapes, to use for alignment. Click the Guide icon below the Timeline layers to create a guide layer. Draw your guide shapes and then use the Align panel to position elements on other layers to elements on your guide layers. Sizing Shapes Precisely With all of Flash's sophisticated drawing capabilities, you'd think you could specify that you want to draw a square that is 15 pixels by 15 pixels, but you can't. There are, however, a number of ways to achieve precise dimensions for your shapes ”using rulers, the drawing grid, guides, and the arrow keys. Here are your options: -
Use rulers ” Turn on rulers (View, Rulers) and use them as a reference as you draw. Zoom in as much as is convenient . You may not get 100% accuracy using rulers alone, but you can come close. -
Use guides ” Drag horizontal and vertical guides from the rulers onto the Stage. Turn them on (View, Guides, Show Guides). Turn snapping on for guides (View, Snapping, Snap to Guides) and other kinds of snapping off. Use arrow keys to move the guides. Lock the guides when you've got them where you want them (View, Guides, Lock Guides). -
Use the drawing grid ” Configure the grid to the desired size (View, Grid, Edit Grid), turn on the grid (View, Grid, Show Grid), and draw with grid snapping on (View, Snapping, Snap to Grid) and other kinds of snapping off. -
Set width and height numerically ” Draw a shape, approximating the desired size, then select and resize it by entering the correct width and height in the Property inspector or the Info panel. This approach is workable with squares, rectangles, and circles. However, if you try it with rectangles with rounded edges, for example, your curves can become distorted . -
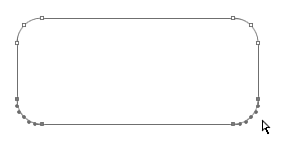
Use the arrow keys ” For rectangles with rounded corners, use the Subselection tool to select the anchor points around two adjacent corners, as shown in Figure 16.2, and nudge them with the arrow keys until the rectangle is the correct size. This approach preserves the corner radius of your rounded corners as you resize. Figure 16.2. You can use the Subselection tool to resize rectangles with rounded corners without distorting the corner radius. 
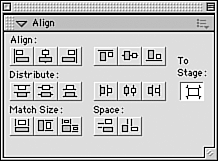
The Align Panel Using the Align panel (Window, Design Panels, Align), you can align objects to each other or to the Stage. First select two or more objects to align. To align objects to the Stage ”for example, to center them or to align them to the left side of the Stage ”select the To Stage button on the right side of the panel, as shown in Figure 16.3. To align objects to each other, deselect the To Stage button. Use the Align buttons to align the objects' right or left edges, centers, or tops or bottoms, or to center them vertically. The Distribute buttons distribute a series of objects evenly, measuring from their top or bottom edges, centers, left or right edges, or vertical centers. Figure 16.3. The Align panel aligns objects to each other or to the Stage. 
NOTE When Flash aligns objects to each other, it notes which edge you want to align and uses the edge farthest in that direction to align all selected objects.
|