| You may manage some sites entirely by yourself, but others you may need to manage with colleagues, friends , customers, vendors , volunteers, or some combination thereof. In this section, we take a look at two kinds of version control: the basic but effective kind that Dreamweaver provides via the check-in/ check-out facility, and two more sophisticated kinds to which Dreamweaver can connect. We also discuss how to synchronize a site between local and remote locations, an especially important activity when multiple people work on the same site. Setting Up a Remote Site Working as part of a design team presents additional challenges. You must learn to work with others to perform some tasks you've already learned to do on your own. The most common concern is maintaining control over files when multiple developers are working on the same pages. Communication is another critical factor so the project proceeds smoothly. When one member of the team opens a file, it must be locked to prevent others from editing the same file. Dreamweaver uses a minimal form of version control when Check In/Check Out are enabled. The remote server shows that a file is currently checked out and lists the name of the team member who currently has access to the file. Other developers can still access the file, but only in a read-only state. Let's take a look at that feature, then examine two other technologies for handling the multiple-developer scenario. (Incidentally, the Check In/Check Out feature is available for developers working with Flash MX 2004 and Fireworks MX 2004.) NOTE Speaking of collaborating: If you've set up a Web site that requires periodic content updating, you may want to look into a new product from Macromedia called Contribute . This package lets users who aren't Web designers update a site created in Dreamweaver. You can use Dreamweaver to create templates that limit what users can edit. The great benefit is that designers don't have to spend their time performing simple content edits. To learn more, search on "contribute" in the Dreamweaver MX 2004 help system.
Checking Files In and Out Even if your development team isn't using version control software, Dreamweaver has tools to keep your project running smoothly. When you set up the Remote Info in the Site Definition dialog box, there are options at the bottom of this box to enable Check In/Out. Check In is similar to the Put or upload command, whereas Check Out is similar to the Get or download command. The advantage of using these tools instead of the default Get and Put commands is that Check In/Out tracks which files are currently in use by other members of the team. If a file is in use, the Remote Site list of the Site window/panel shows that the file is checked out, designated by a check mark in the file list. Dreamweaver achieves this magic by creating *.LCK files, containing user contact information, on the server and the local computer when you check a file out. Dreamweaver deletes these files when you check the file back in. NOTE The Check In/Out options are useful for individual developers who work on multiple machines and platforms. If you forget to upload changes to the remote server, the file will appear as checked out when you try to retrieve it on another machine, thus enabling you to avoid having multiple copies of the same file, each with different revisions.
If you're using FTP in a team environment, it's important that every member of the team uses Dreamweaver's built-in FTP tools. If not, the Check In/Out features will be rendered ineffective . Dreamweaver will have no way of knowing when files are downloaded by an external FTP application. To enable Check In/Out, select the Enable File Check In and Check Out box in the Remote Info category of the Site Definition dialog box. When you select this option, additional selections appear in the dialog box (see Figure 11.7). Figure 11.7. When the Enable File Check In and Check Out option is selected, other options become available, as well. 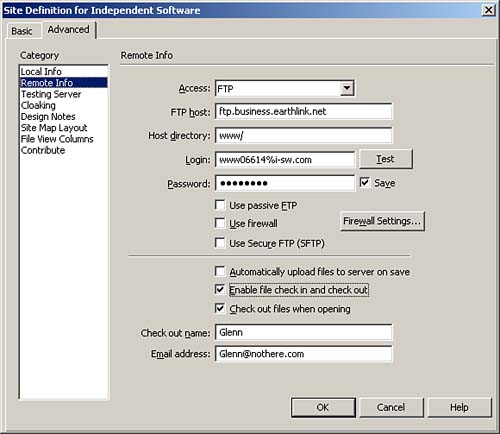
Select the Check Out Files when Opening option to automatically check out files when you double-click. To make the Check In/Out feature most effective, Dreamweaver needs to be capable of tracking who has checked out the files. This allows other members of the team to communicate directly with the person who's currently working on a file that might be needed by someone else. To enable this feature, fill in the Check Out Name field with a unique username. If you also enter an email address where indicated, team members can click the address in the Remote Site list to open an email addressed to the appropriate developer. After the Check In/Out options have been selected, their use is identical to the Get and Put commands. The same Get/Check Out and Put/Check In buttons are used to upload and download files.  | If you're having trouble with certain transfers, read "Checking the Transfer Log" in the "Troubleshooting" section later this chapter . |
Other Version Control Systems Larger development houses often use more sophisticated version control systems such as Visual SourceSafe and WebDAV. Not only do version control systems such as Visual SourceSafe and WebDAV protect against overwritten files, but they also keep a historical record for each file in the project. This enables you to revert to previous versions of a document. Microsoft Visual SourceSafe Microsoft Visual SourceSafe is a Windows-based version control system. To use SourceSafe as your method of interacting with the remote server, follow these steps: - Open the Site Definition dialog box for your site by using the Site, Manage Sites command to open the Edit Sites dialog box. Click the site name, then click Edit.
- Select the Remote Info category.
- In the Access drop-down menu, select SourceSafe Database.
- Click the Settings button to open the Open SourceSafe Database dialog box (see Figure 11.8).
Figure 11.8. The SourceSafe Database settings give Dreamweaver access to the project database. 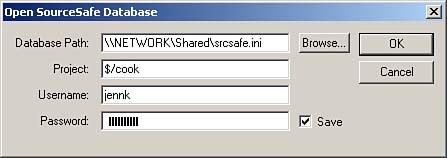
- In the Database Path field, enter the location of the SourceSafe database.
- In the Project field, enter the name of the project, as it's referenced by the SourceSafe database.
- Enter your username and password to access the project.
- Click OK.
WebDAV Web-Based Distributed Authoring and Versioning (WebDAV) is another version control system. Because it is an open standard, it has a growing audience. To set WebDAV as your method of access to the remote server, use the Site Definition dialog box (steps 1 and 2 in the previous procedure) to set the Access field to WebDAV. Click Settings to open the WebDAV Connection dialog box. Enter the URL of the WebDAV server and your username and password to access it. Version Control Limitations in Dreamweaver Version control software is useful, but it has its limitations. If you're using VSS or WebDAV with Dreamweaver, the Synchronize and Select Newer Files options are unavailable because Dreamweaver can't obtain an accurate timestamp from the remote server. Also, depending on how your collaborative environment is configured, it's still possible to overwrite an updated file with one that's outdated if your local folder isn't current. Cloaking Files and Folders Often when you're making changes to the content of pages, the images and other elements of the site remain the same. When you've completed revisions and are ready to synchronize the local folder with the remote server, it's a waste of time to re-upload the image folder or other folders if no changes have taken place to the contents of those folders. Cloaking allows you to specify that certain folders are exempt from site-wide operations. (You can't cloak individual files, by the way.) The Cloaking category of the Site Definition dialog box enables or disables cloaking for the site. After it is enabled, you can also set an entire file type to be cloaked, regardless of the directory in which it's located on the site. To cloak a folder, activate cloaking using Site, Cloaking in the Site window or Files panel. Synchronizing Sites As files are checked in and out by various developers, your local folders can quickly become outdated. To bring the local and remote sites back into sync, use the Synchronize tool: - From the Files panel or the site view window (but not the Document menu), select Site, Synchronize.
- In the Synchronize dialog box, choose to synchronize only selected local files or the entire site (see Figure 11.9).
Figure 11.9. The Synchronize dialog box determines the direction and scope of the synchronization process. 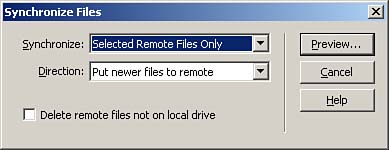
- Choose whether to replace only the files on the remote server with their updated local counterparts, to replace only the files in the local folders with their more recent remote counterparts, or to synchronize in both directions as needed.
- Decide whether to delete files that don't have a counterpart on the other server.
- Click Preview to begin the synchronization process.
- In the preview dialog box, verify which files should be uploaded, downloaded, or deleted. All files are selected by default for action. If you want to leave a particular file as is, deselect it.
- Click OK to complete the synchronization.
|