Enabling Security Features on a Linksys WAP11 802.11b Access Point
|
| < Day Day Up > |
|
The Linksys Wireless Access Point (WAP) 11 802.11b access point was one of the first access points deployed by a large number of people. The WAP11 was the wireless access point many users purchased that already had a home network with a router set up. The WAP11 requires a separate router in order to allow access to any non-wireless devices, to include Internet access. This section details the minimum steps you should take to configure the WAP11 securely. All of the steps outlined in this section should be done from a computer that is connected to your wired network. This is because as you make changes the access point will need to reset. When the access point resets, you will likely lose your wireless connection momentarily.
Setting a Unique SSID
The first step you need to take is to set a unique SSID for your access point. When you log in to your access point, by default there is no username assigned to the WAP11 and the password is admin. This brings up the initial setup screen (Figure 10.1).
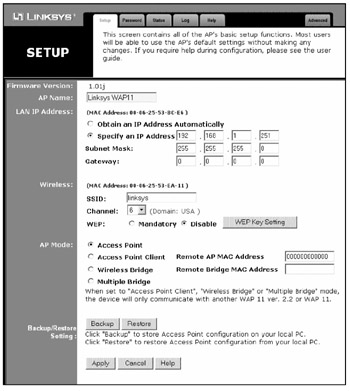
Figure 10.1: The Linksys WAP11 Initial Setup Screen
In the AP Name field, choose a name for your access point. This is NOT the SSID, but it is prudent to set this to a unique name. Many access points are named after the address of the owner or the company name, making them easier for an attacker to target. Next, replace “Linksys” with a unique SSID. This can be anything that you want, though it is not a good idea to use your address, phone number, social security number, or any other information that identifies you specifically. Figure 10.2 depicts the setup screen after a unique AP Name and SSID have been chosen.
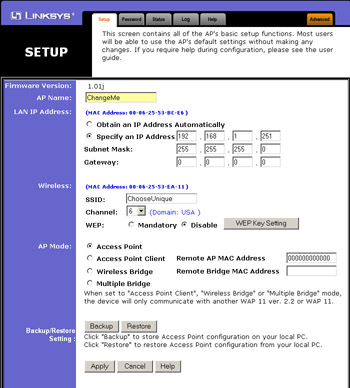
Figure 10.2: A Unique AP Name and SSID Are Set
Once these are set, click Apply and your changes are stored. Setting a unique SSID is a good first step for practicing security, but without taking additional steps it is relatively useless. A unique SSID will contain a combination of upper- and lowercase letters, numbers, and special characters. Additionally, using non-printable characters will cause some WarDriving applications to crash or identify the SSID incorrectly.
Disabling SSID Broadcast
After you have set a unique SSID on your access point, the next step is to disable the SSID broadcast. By default, access points transmit a beacon to let wireless users know that they are there. Active scanners such as NetStumbler rely on this beacon to find access points. By disabling the SSID broadcast, you have effectively placed your access point in stealth, also known as cloaked, mode.
To disable the SSID broadcast, first click the Advanced tab on the initial setup screen. This will take you to the screen shown in Figure 10.3.
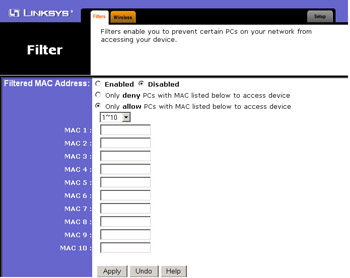
Figure 10.3: The Advanced Settings
Next, click the Wireless tab to bring up the advanced wireless settings, as shown in Figure 10.4.
Select the Disable radio button, and then click Apply to save your settings. Passive scanners, such as Kismet and AirSnort, have the ability to detect cloaked access points, but disabling SSID broadcast is one more step toward an effective overall security posture.
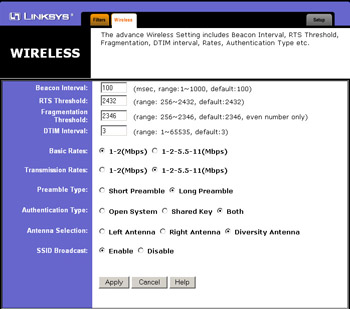
Figure 10.4: The Advanced Wireless Settings
Enabling WEP
After you have set a unique SSID and disabled SSID broadcast, the next step is to enable WEP encryption. The flaws associated with WEP have been widely publicized and discussed. Inasmuch, because it is possible to crack WEP keys, you should not rely on WEP alone, but use WEP as a part of your overall security posture.
Although WEP is flawed, actually cracking the WEP key is not a simple process on a home network, for two primary reasons.
-
The amount of traffic that must be generated in order to successfully crack the WEP key.
-
Vendors have taken steps to eliminate or reduce the number of Weak Initialization Vectors (IVs) that are transmitted.
In Chapter 9, “Attacking Wireless Networks,” we learned that it usually requires at least 1200 Weak IVs be collected before a WEP key is cracked. On a home network it can take days, weeks, or even months to generate enough traffic to capture that many Weak IVs. It is highly unlikely that an attacker will invest that amount of time into attacking a simple home network; especially when there are so many networks that don’t have WEP enabled.
Many vendors have also developed firmware upgrades that reduce or eliminate the number of Weak IVs that are generated. This further increases the amount of time it takes to successfully crack a WEP key.
To enable WEP on the Linksys WAP11, on the main setup screen select the Mandatory radio button, as shown in Figure 10.5.

Figure 10.5: Making WEP Mandatory on the Linksys WAP11
Next, click WEP Key Setting to open the WEP Key Setting window, as shown in Figure 10.6.
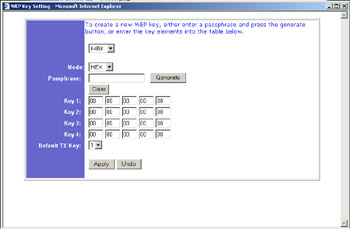
Figure 10.6: The WEP Key Setting Window
In the WEP Key Setting window, change 64Bit to 128Bit in the drop-down box (as shown in Figure 10.7) to require 128-bit WEP keys. As the number of bits implies, 128-bit WEP provides a stronger, harder to crack key than 64-bit.
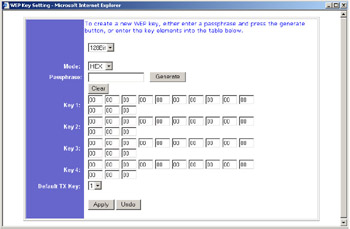
Figure 10.7: Select 128-Bit WEP
Leave the Mode set to HEX and choose a strong passphrase to generate your keys. A strong passphrase consists of a combination of upper- and lowercase letters, numbers, and special characters. Once chosen, enter your passphrase in the Passphrase text box and click Generate. This will create four WEP keys. See Figure 10.8.
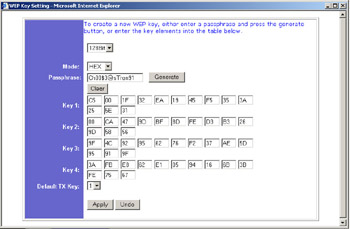
Figure 10.8: Generating WEP Keys
Since four keys are generated, you need to decide which one your client should use. Set the Default TX Key to the number (1–4) that you want to use on your network. Once you have generated your WEP keys and chosen the key to transmit, click Apply to save your settings.
Information on configuring your client software is provided later in the “Configuring Security Features on Wireless Clients” section of this chapter.
Filtering by Media Access Control (MAC) Address
Once you have set a unique SSID, disabled SSID broadcast, and required the use of WEP encryption, you should take at least one more step: filtering by Media Access Control (MAC) address. To enable MAC address filtering on the Linksys WAP11, from the main setup screen click the Advanced tab to display the advanced wireless settings (Figure 10.9). Click the Enabled radio button to enable MAC address filtering. Next, select the radio button for Only Allow PCs With MAC Listed Below To Access Device. Finally, in the text boxes labeled MAC 1 thru MAC 10, list the MAC addresses of any wireless clients that are allowed to access your wireless network. Click Apply to save and enable your settings. Instructions for finding the MAC address of your card are provided in the “Tools & Traps” sidebar in this chapter.
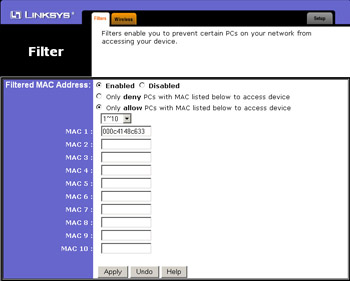
Figure 10.9: Enable MAC Address Filtering
Finding the Media Access Control (MAC) Address of Wireless Cards
Finding the Media Access Control (MAC) address of your wireless card is a simple process. The easiest way is to look at the back of the card itself, as every wireless card has a label on the back that provides information like: the FCC ID, the encryption standard that is supported, and the MAC address. Figure 10.10 shows this label.
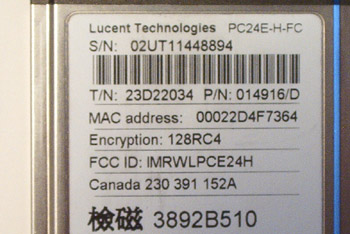
Figure 10.10: Finding the MAC Address on the Card Label
Windows 2000 and XP users can find the MAC address using the ipconfig /all command.
The Physical Address highlighted in Figure 10.11 is the MAC address for the wireless card. Linux users can determine the MAC address of their card using the ifconfig <interface> command.
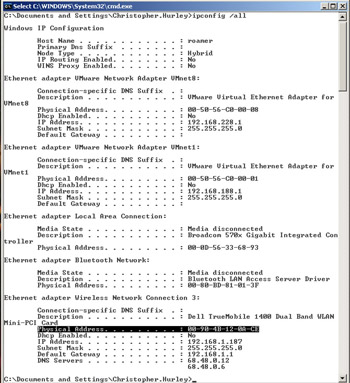
Figure 10.11: Using ipconfig /all in Windows to Determine the MAC Address
The highlighted HWaddr shown in Figure 10.12 is the MAC address of the wireless card.
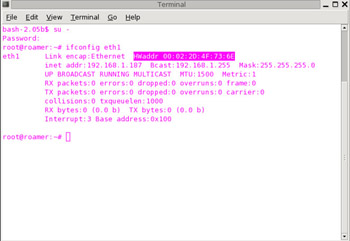
Figure 10.12: Using ifconfig to Determine the MAC Address in Linux
|
| < Day Day Up > |
|
EAN: 2147483647
Pages: 125