Testing in Visual Studio 2005
Testing in Visual Studio 2005
Visual Studio 2005 provides many types of tests for testing your application's functional and operational requirements. This section examines some of these types in detail.
Authoring Tests
Creating a test in Visual Studio 2005 begins by invoking the new Add New Test Wizard, which can be launched from various windows, including Test Manager, Test View, and even the code window. Figure 7-5 shows the Add New Test Wizard and test types available to a C# Test Project. Any new test can be associated with an existing test project or be placed in a new C#, Microsoft Visual Basic®, or C++ test project.
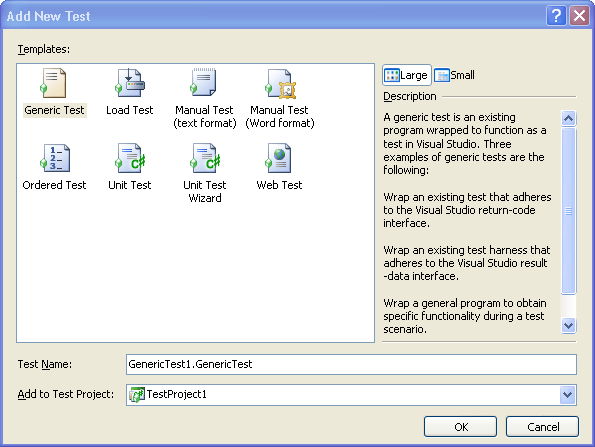
Figure 7-5 The Add New Test Wizard, which presents various test types to add to your test projects
Visual Studio 2005 Team Edition for Testers supports many types of tests:
Unit—a programmatic test that calls class methods and verifies the return values (discussed in Chapter 6)
Manual—used by a test engineer rather than automated by Visual Studio
Generic—allows existing testing applications to be wrapped up in Visual Studio
Web—makes calls to any HTTP application to verify its functionality
Load—executes simultaneous and repeated tests for any automated test, such as unit, web, generic, or ordered
Ordered—allows you to set up an ordered list of tests to be executed sequentially
Each test type has an associated designer, and in some cases a wizard, to guide you through the creation steps.
Manual Tests
Integration and system testing are generally performed by testers in a Quality Assurance (QA) group. Integration and system tests typically consist of scripted instructions that a tester follows to exercise specific features and integration points within an application. These scripts usually take the form of text documents stored in some repository. They are called “manual” tests because a human tester must manually execute each step in the script and record the results. Because the tools and repositories used for manual testing are typically separate from those used for automated unit testing, developers and testers end up learning and managing two separate processes for running tests and tracking bugs. Visual Studio 2005 Team System solves this disparity by treating manual tests as first-class project artifacts and fully integrates them into the test-running and defect-tracking systems.
Manual tests are implemented as either plain text files or Microsoft Office Word documents. Figure 7-6 shows the default Word document provided for new tests. You can choose not to use the default document, though, and create your own templates instead. Visual Studio 2005 automatically launches Word when a new manual test is created so that test writers can work with a tool they're familiar with. In addition, you can apply the importing features in Word to ease migration of existing test scripts into Team System.

Figure 7-6 The basic Word document provided by Team System for use with manual tests
If you decide to create a text-based manual test instead of using Microsoft Word, you will be presented with this template to edit:
To the Test Author This template provides a structure you can use to create a manual test. ** What is a manual test? ** A manual test is a description of test steps that a tester performs. Typically, manual tests are used when the test steps are difficult or time-consuming to automate, or cannot be automated—-for example, to determine a component's behavior when network connectivity is lost. Visual Studio 2005 Team Edition for Software Testers treats manual tests the same as automated tests. For example, it displays manual tests in the Team Test windows. It also tracks manual test results the same way it tracks automated test results, and displays them in the Test Results window. ** Using this template ** Modify the "Test Title" text to provide a two- to three-word description of your test. Under the "Test Details" heading, describe what this manual test will verify. For "Test Target", describe the specific functionality that this test will exercise. In the "Test Steps" table, describe exactly what steps to take, and in what order, to complete the test. For each step, state the result that the tester should expect. The "Revision History" table lists the changes made to the test, who made the changes (an e-mail alias is often used), and when each change was made. ---------- Test Title: (Enter the test name here.) Test Details: (Provide the tester with detailed information about what this test exercises or validates.) Test Target: (Describe the functionality that is being tested.) Test Steps: (Provide the tester with step-by-step instructions that explain how to complete the manual test.) Step No. Step Description Expected Result Revision History: (Record the revisions that you and others make to this test.) Author Change Description Time/Date modified
Testers begin the process of executing a manual test by running it from within Test Manager, just as with any other type of test. Visual Studio launches the manual test runner, which displays the test script and provides input options to record the results of the test. (See Figure 7-7.) The test run result information is maintained in the Team Foundation Server database separate from, but associated with, the test script. The status of the test remains Pending until the tester saves the results with either Pass or Fail. Upon completion of the process, a work item can be created for a failed test result and assigned to a developer.
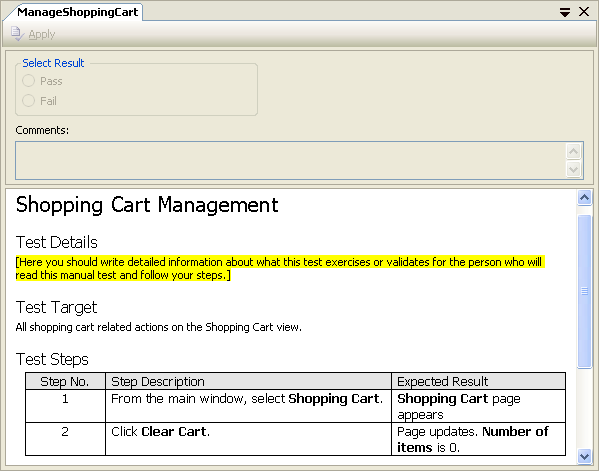
Figure 7-7 Running a manual test in Test Manager to ensure that test status and results are captured by Team System and included in team and managerial reports
Generic Tests
Generic tests provide a mechanism to integrate with existing automated testing technologies or any other technologies that do not integrate directly into Visual Studio 2005. For example, you might have an existing tool for automating user interface testing. Although Visual Studio 2005 Team System does not provide its own mechanism for Windows Forms testing, you can create generic tests that wrap your existing testing tool. This feature allows you to execute the tests and record the results in Visual Studio with the rest of your tests.
There are three categories of tools that you can wrap up into generic test:
A test that adheres to the Visual Studio return code interface
A test harness that adheres to the Visual Studio result data interface
A generic program to obtain specific functionality during a test scenario
One scenario where generic tests can be useful is in the automated testing of install and uninstall scripts. You could create a generic test that invokes the installation program with a particular set of parameters. If the test passes, you know the program installed successfully. A second generic test could run the uninstall program. If the test passes, you know the uninstall program ran without error. You could then run a third test, either unit or generic, that verifies that the application was fully uninstalled by checking registry entries, directory structures, and so on.
Figure 7-8 shows the Generic Test Designer. At a minimum, you must provide the executable to invoke. There are many other optional settings, such as command-line arguments, additional files to deploy with the test, and environment variables.
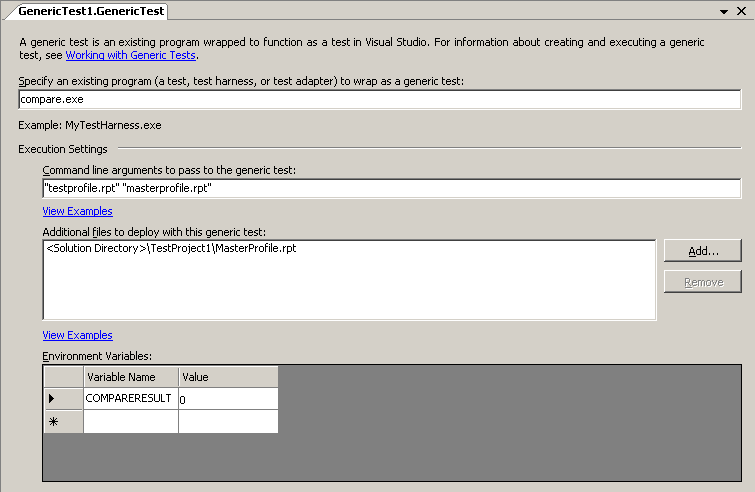
Figure 7-8 The Generic Test Designer, which provides many options for defining how to invoke the external resource
In addition, you can specify some interesting behaviors of the generic test. For example, you can set the working directory, capture the redirection of the test's standard output/error streams, choose to display the testing application, set time-outs, and specify a summary results file. Figure 7-9 shows these additional settings.

Figure 7-9 Additional settings that you can specify for a generic test
This example shows a test that will execute an application that compares two files and returns their differences. The wrapped-up application, compare.exe, is a hypothetical third-party tool that specializes in comparing text files. A previous report creation test created the testprofile.rpt file, and we expect the testprofile.rpt file to be identical to our masterprofile.rpt file that is part of the solution and deployed with the test. When the test runs, any output from compare.exe will be included in the test results and any return code other than 0 will be recorded as a failure.
Figure 7-10 shows the results of a failed generic test that used ping.exe to attempt to ping an irresolvable Host. All results are captured in the Team Foundation Server database and automatically made available to the developer assigned to fix the defect, as well as other team members who have the appropriate permissions.
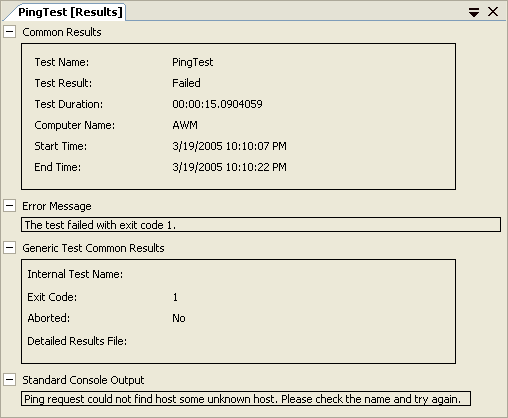
Figure 7-10 Test output from a failed generic test (Notice that both the standard error and output information were redirected to the test harness and captured by Visual Studio.)
Web Tests
Without an automated system, when a tester wants to test a specific page of a Web site, such as a search page, he or she would have to follow a manual script to navigate to the search page, enter a query value into a field, submit the page, and evaluate that the return page contains the expected results. Each time changes are made to the search system, a tester will need to manually re-execute the test. A Team System Web test allows you to automate the testing of Web-based interfaces by recording browser sessions into editable scripts. You can then add value to the scripts with features such as validation and data binding. These scripts become persistent tests that can be run at any time, individually, in groups, or as part of a load test.
NOTE
If you used the Application Center Test (ACT) that shipped with Microsoft Visual Studio 2003, the Web test should be familiar to you.
When you create a new Web test, Visual Studio launches the Web Test Recorder, which is simply Microsoft Internet Explorer extended with a utility that records each HTTP request sent to the Web server as the tester interacts with the application. Figure 7-11 shows the Web Test Recorder in the middle of a session where the user is testing the search feature of a Web site. You can pause the recorder if you need to perform an action that should not be captured as part of the script. You can end the recording session by clicking the Stop button, at which point Visual Studio will open the test in the Web Test Designer.
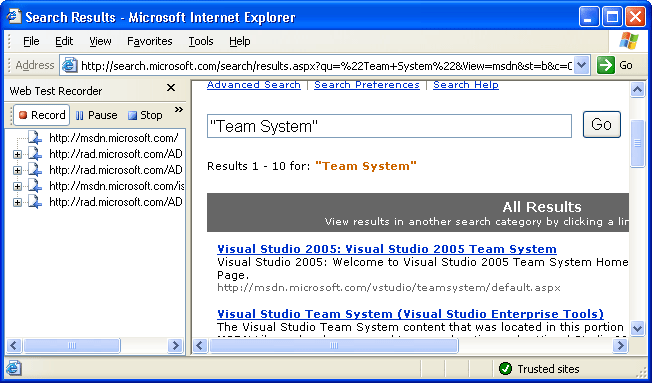
Figure 7-11 The Web Test Recorder, which automatically captures all requests in a browser session
The Web Test Designer allows you to examine and modify a Web test by exposing the details of each HTTP request, including its headers, query string parameters, and post parameters. You can even create and insert entirely new requests from scratch, as well as get (query string) or post (form) parameters, file upload parameters, transactions, validation rules, and comments. Taken together, these features let you modify your test as requirements change, without forcing you to re-record the entire script. Figure 7-12 shows the Web Test Designer for the recorded test described earlier with some of the various nodes expanded.
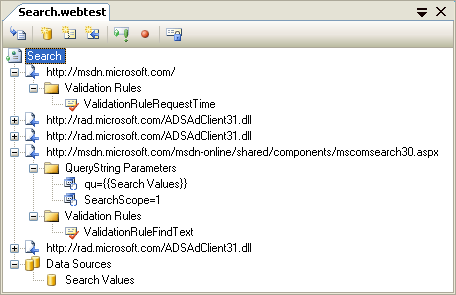
Figure 7-12 The Web Test Designer, which provides access to the details of each request and allows you to add validation and data binding
Typically, you write tests, especially Web tests, not just to test the load of the system but to validate that the execution provided the expected results. Web tests allow you to validate your results by attaching validation rules to requests. Although these rules appear in the designer attached to HTTP requests, they're actually used during execution to validate the HTTP response returned for that request. In Figure 7-12, you can see that validation rules have been applied to two requests. The first rule verifies that a response is received within a specified amount of time. The second rule verifies that the response contains some expected value or expression. You configure validation rules through the Properties window.
Visual Studio 2005 Team Edition for Testers provides the following built-in validation rules:
ValidationRuleFindText—verifies the response contains (or doesn't contain) some specific text; supports regular expressions and case sensitivity
ValidationRuleRequestTime—verifies the response is received in a specified amount of time
ValidationRuleRequiredAttributeValue—verifies that an attribute of a tag is a certain value; supports case sensitivity
ValidateRuleRequiredTag—verifies that a certain tag exists; supports a minimum occurrences value as well
In Figure 7-12, you can also see a Data Sources node at the bottom. Web tests support the ability to data-bind request parameters, such as query-string parameters or form-post parameters, to data sources so that the test uses different values each time it's executed. For example, if you were to run this search test multiple times, perhaps as part of a load-testing scenario, it would be much more valuable if different search terms were used with each execution. You can enable exactly this behavior by defining a data source that points to a column in a database table and binding the appropriate request parameter to that data source. In Figure 7-12, you can see that the “qu” query string parameter on the request to the search component is bound to the “Search Values” data source. Each time this test is executed, the runner will select another value from the data source to use as the search term. You can configure the binding to retrieve values randomly or sequentially.
The Web Test Runner, shown in Figure 7-13, displays the results of executing a Web test. For each top-level request, the list view displays its validation status, HTTP status, response time, and transferred bytes. You can drill into each request to view the details of all dependent requests, or you can select a request and view its details in the tabs on the bottom half of the screen. The Web Browser tab displays the response as rendered in Internet Explorer, and the Details tab displays information regarding any validation rules and exception information. You can see in Figure 7-13 that the first request failed to return a response in the time defined by the validation rule. Also notice that there are links for defining client characteristics such as browser type and network bandwidth. We'll discuss client profiles in more detail in the Load Tests section.
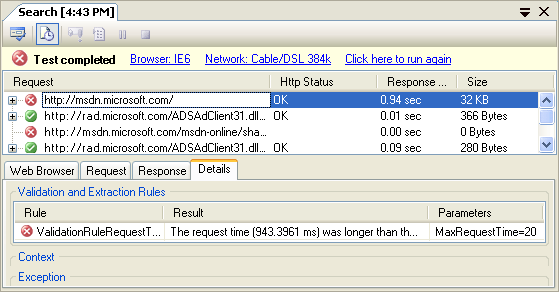
Figure 7-13 The Web Test Runner, which provides convenient access to all the details of a test run
Load Tests
Load tests allow you to simulate an environment where multiple users are interacting with an application simultaneously. The primary purpose of load testing is to discover performance and scalability bottlenecks in your application prior to deployment. It also enables you to record baseline performance statistics that you can compare future performance against as the application is modified and extended. Of course, to analyze performance trends over time you must have a repository in which to store all the performance data. Visual Studio 2005 Team Edition for Testers provides robust design tools, a high-performance execution engine, and a reliable repository for creating, running, and analyzing load tests.
The creation of a load test starts with you running the New Load Test Wizard. This wizard steps you through the process of defining a load test scenario. A scenario includes definitions of the load profile, test mix, user profile, browser mix, network mix, counter sets, and run settings. An example of the results of running the New Load Test Wizard is displayed in Figure 7-14.
The test mix defines which tests are included in the load and how the load should be distributed among them. These tests must have already been created by this point. You can include any automated test type—that is, anything other than manual tests. You then define what percentage of the total load should be executing each test.
The load profile defines how the runner should apply the load to the application. For example, you can select Constant Load, in which case the runner immediately starts with a full load as defined by the maximum user count setting. This option is useful for testing peak usage and system stability scenarios, but it does not help in examining a system's scalability. For scalability scenarios, you can select Stepped Load, which allows you to specify a starting user count, step interval, step user count, and a maximum user count. The runner will increase the load by the step user count after each step interval until the maximum load is reached. With a stepped load, you can examine how performance of various parts of the system changes as user load increases over time.
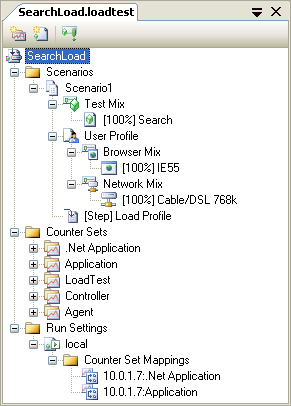
Figure 7-14 The Load Test Designer, which allows you to modify the results of running the New Load Test Wizard
For Web tests, User Profile allows you to define the browser and network types the runner should simulate. Again, you can define multiple types and assign a distribution percentage to each. Browser types include various versions of Internet Explorer, Netscape/Mozilla, Pocket Internet Explorer, and smartphone profiles. The available network types range from various dial-up speeds through LAN connections.
After defining your profiles, you have to decide which information is important for you to collect during the load test and which machines to collect it from. You do this by creating Counter Sets, which are a collection of Microsoft Windows® performance counters, and applying them to specific machines. Advanced users can even define threshold rules and apply them to specific counters. This feature allows the runner to show threshold violations in the test result data. Creating these sets can be a complicated task, as it requires a thorough understanding of the various platform counters: .NET, IIS, and SQL. However, Team System provides some default Counter Sets to simplify the creation of basic tests.
The final step in defining your load test is to specify the test's Run Settings. These settings govern how the runner will execute the test, such as how often it will sample the performance counter data, how it will handle errors, and log test results. You can also specify the total run duration and the maximum number of errors to log details for. These settings are also where you specify which database or XML file the test results should be saved in.
When you run a load test, Visual Studio will display the performance counter data in real time in the Load Test Runner. Figure 7-15 shows a load test in progress. You can add and remove counters from the graph as the test is executing. The Counter's tree view will also display warning and error indicators when a threshold is passed on a particular counter. In Figure 7-15, you can see that a counter in the Overall group has passed a threshold that represents some key performance indicator. All the data captured by the runner is then logged to a database and made available through Team Services reports to managers and team members.
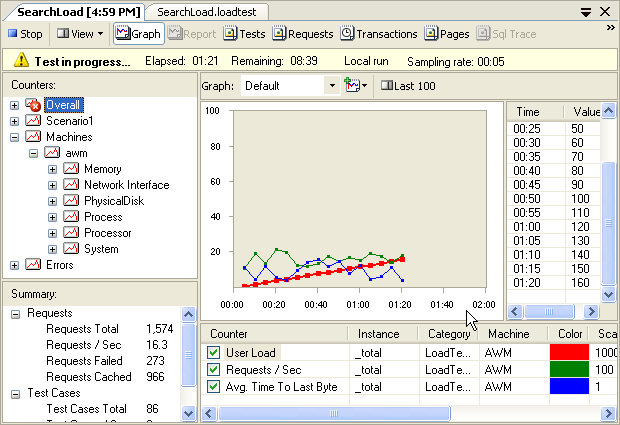
Figure 7-15 The Load Test Runner displaying load test results in real time
Visual Studio 2005 Team Edition for Software Testers Load Agent
Microsoft sells a separate product, apart from the Visual Studio 2005 Team Edition for Testers, to enable organizations to simulate more users and more accurately test the performance of the Web applications and servers. The Load Agent is licensed per processor and is used to generate load on a Web farm and simulate as many as 1,000 users per processor.
The Load Agent is composed of two pieces:
Team Test Load Agent—the load front end
Team Test Load Controller—the controller, running remotely, and called by the front-end
Ordered Tests
An ordered test is simply a container that holds a list of other tests and guarantees a specific execution order. You can create and execute ordered tests.
Before creating an ordered test, you must have other tests available to include in the ordered test. After selecting the test(s) you wish to group together, you can change their execution order by using the up/down arrows on the far right side of the designer. (See Figure 7-16.) You can add the same test multiple times to the same ordered test. When you do this, the test will be run as many times as it appears in the ordered test, in the order listed.

Figure 7-16 The Ordered Test Designer being used to create a QA test run
TIP
Ordered tests can contain other ordered tests. You can use this to your advantage by constructing smaller, more focused ordered tests and then chaining them together in a specific order to test broader functionality.
EAN: 2147483647
Pages: 97