| Having dealt with the facilities appearing in a pop-down menu, the next step is to create the calendar used to book a time. -
If you haven't already done so, download the Chapter 13 files to your desktop. Select File, Import to Library. When the Import dialog box appears, navigate to the Chapter 13 Exercise folder and import the datepad.fh11 file into the movie. -
Drag the file from the Library into frame 1 of the Layout layer. Add a frame in frame 5 of the Layout layer. Select the file on the stage, and in the Property Inspector, use the following values: Width: 550 pixels Height: 400 pixels X: Y: 80.3 This will set the date pad to fit the stage and sit on the left edge and bottom edge of the stage. -
To add the time markers along the side of the calendar in the Layout layer, select the Text tool and click once on the stage. Enter 9:00 a.m . Select all the text with the Text tool and set the font to Arial, the weight to bold, the point size to 16 points, and the alignment to centered. Drag the text to the top area of the date pad and align it to the thin line so that it is approximately at the midpoint of the text box. Repeat this step until you have hours that run from 9:00 a.m. to 6:00 p.m. (Figure 13.8). Figure 13.8. The date book starts to take form with the addition of text to the layout. 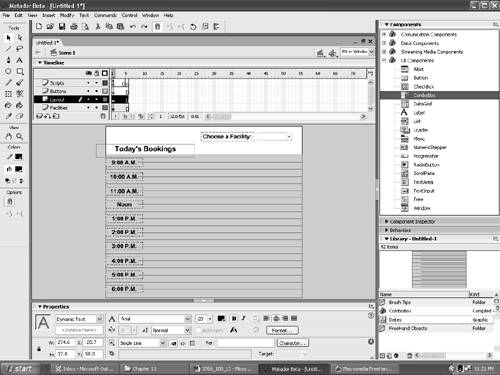 Tip Select the first time marker, press the Option/Alt and Shift keys, and drag the text down to the next slot. Change the number and repeat for the remaining times. -
Select the Text tool, click once on the stage, and enter Choose a Facility: . Use the same font, weight, point size, and alignment as the text in the previous step. Drag it to the left of the ComboBox. -
Select the Text tool, click once on the stage, and enter Today's Bookings . Use the same font, weight, and alignment as the text in the previous step. Change the point size to 20 points. Drag it to the left of the ComboBox. When finished, your screen should resemble Figure 13.8. Building the Booking Movie Clip When a user chooses to book a tennis court , that facility is chosen from the list in the ComboBox. When that happens, the calendar changes to show the time slots that have already been reserved. The user simply clicks on an open time slot to reserve the chosen time. This happens through the use of a movie clip. Here's how to do it: -
Add a frame to frame 5 of the Buttons layer. -
Select the Rectangle tool and draw a rectangle that covers the entire area for the 9:00 a.m. time slot, as shown in Figure 13.9. Figure 13.9. The booking strip is actually a movie clip named Rectangle Button. 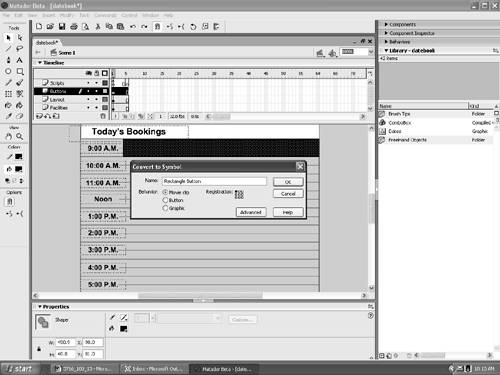 -
Select the rectangle on the stage and right-click (PC) or Control-click (Mac) the rectangle to open the Context menu. Select Convert to Symbol, and when the Create Symbol dialog box opens, name the symbol Rectangle Button and select Movie Clip as its behavior. Click OK to close the dialog box and add the symbol to the Library. -
Select the Rectangle Button movie clip on the stage and press the delete key. -
An obvious question is, "If you delete the movie clip, how does it connect to the booking.as script if it isn't on the stage?" One of the most popular features of Flash is the capability to actually pull movie clips from the Library and add them to the stage while the movie is playing. To connect the movie clip to the booking.as script, select the Rectangle Button movie clip in the Library. Open the Library Options menu and select Linkage. When the Linkage Properties dialog box opens, click the Export for ActionScript button and make sure the name in the Identifier area exactly matches the name of the symbol in the Library, as shown in Figure 13.10. Click OK to close the dialog box. Figure 13.10. The movie clip is linked to the booking.as script by selecting Export for ActionScript in the Linkage properties. 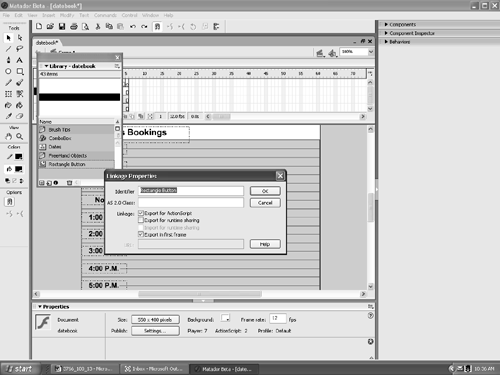 -
Double-click the symbol to open the Edit Symbol window. Select the object on the stage. Select Window, Design Panels, Align to open the Align Dialog box. Click To Stage. Click the Align Left Edge button in the Align choices and click the Distribute Top Edge button in the Distribute choices. Close the Align dialog box and return to scene 1 of the movie. This sets the movie clip's registration point to the top-left corner of the rectangle. This is extremely important because the ActionScript pointing to it in the book.as script is going to move it into position based on its registration point. -
Drag the movie clip onto the stage and put it in its final position. Note the x and y coordinates of the clip in the Property Inspector and delete the movie clip from the stage. -
Open the booking.as script in Dreamweaver MX 2004 and locate the following code at the start of the script: timeSlot_x = 100; timeSlot_y = 53; -
Enter the previously noted values into the timeslots x and y. For example, ours would be: timeSlot_x = 97.8; timeSlot_y = 80.3; Save the script and quit Dreamweaver MX 2004. The Technical Side of the Rectangle Button Movie Clip Having a black box used to hold black text and then deleting that movie clip from the stage may be unfamiliar territory to many of you, and to others, it just doesn't make sense. We asked Jordan to explain what is going on: When the movie is running, the rectangles are put on the stage, and the booking.as file makes the clip totally transparent. When it gets placed on the stage, we use its vertical position, the _y coordinate, to determine its location on the stage. The _y coordinate relies on the height of the button as well as the base timeSlot_y. The formula is: [View full width] [View full width] _root["booking" + loop]._y = (loop *parseInt(_root["booking" +  loop]._height)) + timeSlot_y; loop]._height)) + timeSlot_y; where loop = the number of buttons we have already put on the stage and timeSlot_y = our base _y coordinate. The movie clip is deleted because it doesn't need to be present on the stage. It simply needs to be in the Library. It gets pulled from the Library using the following ActionScript: [View full width] [View full width] _root.attachMovie( "Rectangle Button", "booking" + loop, 100 + loop ); Since Flash 5, a movie doesn't need to exist on the stage in order to appear in the movie. As long as the movie is made attachable to ActionScript (Export for ActionScript in the Linkage dialog box) in the Library, it will be exported along with all the other used assets. It gets pulled from the Library using attachMovie and is given an instance name (in this case, "booking" + loop ) when placed on the stage. I will admit that attachMovie is one of my favorite ActionScript routines. I have used it for creating random stars in the sky, moving cartoon clouds, and falling snowflakes . |
Finishing Up Being able to show the day is fine. What about moving forward and backward in time? For example, today is July 18. I want to book a tennis court on July 20. Right now, there is no way to accomplish this. Let's assume, for a moment, that I can see July 20, but the courts are all booked. I have time on the 19th and want to see what is available. Again, I can't do that because there is nothing that enables me to go back by one day. Follow these steps to enable a user to move forward and backward in the calendar: -
Select the Text tool and draw an empty text box at the top of the stage. In the Property Inspector, set the text type to Dynamic Text and name the instance dateDisp. The booking.as script will find that instance name and add the date to the text box. Enter Jan. 1, 2000 in the text box and set the font to a style, point size, and alignment of your choosing. We used Arial, Bold, 16 point, Flush Left. Be sure to leave some space in the box to accommodate months with longer names . -
To move forward and backward, we are going to use a couple of buttons that come packaged with Flash. Select Window, Other Panels, Common Libraries, Buttons. The Button Library will open. Double click the Circle Buttons Folder icon in the Library to open a selection of circular buttons. Drag a copy of Circle Button-Next into the Buttons layer and place it to the right of the date text. In the Property Inspector, name the instance tomorrowBtn. Drag a copy of the Circle Button-Previous to the Buttons layer and place it to the left of the date text. Name the instance of this button yesterdayBtn. Your movie should now resemble Figure 13.11. Figure 13.11. The booking calendar is assembled and ready to go. Note the text properties for the date in the Property Inspector. 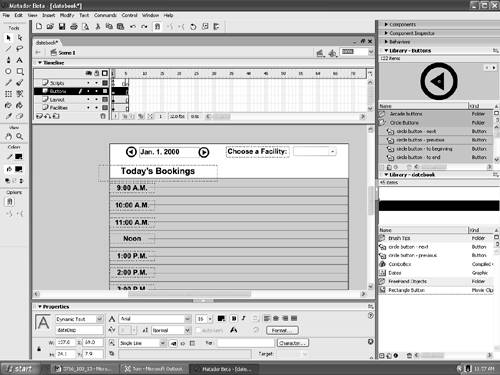 -
Publish the movie, being sure to save the .swf file in the Oakbridge folder that holds the book.as script and the ColdFusion Component. Quit Flash. -
Launch Dreamweaver MX 2004 and open the BookPage.htm file in your Chapter 13 Exercise Folder. When it opens, save the page to the Oakbridge folder containing the scripts and the .swf file. -
Add a layer by using Insert, Layer objects to add an empty layer over the blank area in the middle of the page. Click inside the layer. Open the Files panel and drag the datebook .swf from the panel into the new layer. The file will be much larger than the area permitted. To scale the .swf file, click once on the .swf inside the layer. Handles will appear around the file. Drag the bottom-right corner handle diagonally up towards the upper-left corner. When you have it sized properly, click on the layer and move it inside the layout area as well. Click the Play Button on the Property Inspector, and you will see your booking page as shown in Figure 13.12. Save the file. Figure 13.12. The booking application is placed in a Dreamweaver page. 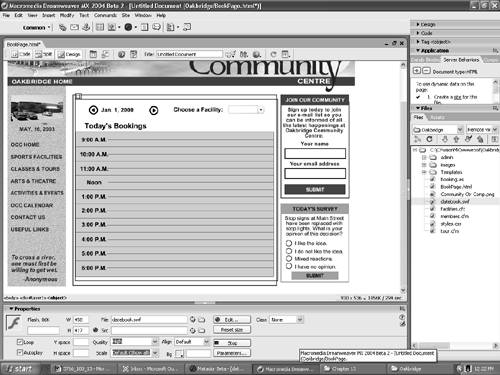 Here is how the whole thing works: When the movie starts, the user selects a facility to book. When he chooses the facility, its name appears in the ComboBox, and the times it is in use appear in the calendar. This information comes from the selected records in the booking table within the database. Each time slot for that day is checked against the retrieved Recordset, and if a time slot falls within the time indicated on a given record (done by converting each time to a UNIX timestamp and comparing the timestamps), then the time slot is marked as in use. Assume 11:00 a.m. is availableif the user wants to book that slot, he simply clicks on the rectangle in the time slot. The button then triggers the object to send a request to the database to reserve the time. After the time is marked off, the booking movie is then instructed to refresh itself to show which times are now reserved. It should be noted that, for purposes of this book, this is a very simplified booking procedure. A more complex booking procedure could involve anything from requiring a membership number to book a facility to an e-commerce engine to pay for the booking, as well as an automated engine that refreshes itself as other people use the same utility to book time. Figure 13.13. The Booking page when viewed through a browser. Note the user wants to book a baseball diamond. 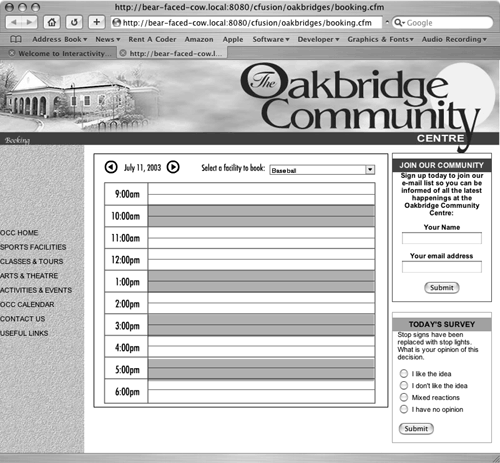  |