| With the plan in place, follow these steps to construct a meeting room for the Oakbridge Community Centre: -
Download the Chapter 18 Exercise File from the book's web site to your desktop. -
Create a folder named ch18 in your Flash Communication Server Applications folder. Open your Chapter 18 Exercise folder and copy the chatroom script in the Exercise folder to the folder just created. The chatroom.as script is what makes the whole thing function. The code in the script is: [View full width] [View full width] // ActionScript Document // Chat Room Application... // Joining a Room // Modifying the RoomList Component to Join a Room without going to a new page (which is  the current behaviour of the RoomList Component) FCRoomListClass.prototype.joinRoom = function() { var selectedRoom = this.rooms_lb.getSelectedItem().data; // Put our selected room data in a global variable _global.activeRoom = this.so.data[selectedRoom]; this.so.data[selectedRoom].users++; // add a user to the room enterRoom(); // call our local function } // Initialization _global.session = new Object(); _global.ourURL = "rtmp://10.0.1.21/ch18/"; // CHANGE THE URL TO MATCH YOUR FlashComm Server!!! // Create our NetConnection objects to be used by our two areas loginArea = new NetConnection(); chatArea = new NetConnection(); // Main Login Handler - called when the login button is clicked (simplified for the context of our book) // login = function() loginBtn.onRelease = function() { _global.session.username = loginDisp.text; // get our text from our text box - will be used globally loginArea.connect( ourURL + "login", session.username ); // make the connection with our username gotoAndPlay( "rooms" ); // we're in - so select a room to chat in } // Logout Handler -- we're leaving when this button is clicked // logout = function() logoutBtn.onRelease = function() { loginArea.close(); // close our connection gotoAndPlay( "login" ); } // Leave a Chat Room Handler -- called when we choose to leave a chat room // leaveRoom = function() leaveRoomBtn.onRelease = function() { if( chatArea.isConnected ) { chatArea.close(); // only close the connection if we are in a room } _root.gotoAndPlay( "rooms" ); } // called from our "rooms" Frame on the timeline mainLobby = function() { if( !loginArea.isConnected ) { loginArea.connect( ourURL + "login", session.username ); // re-connect if we disconnected before } meetingRooms.connect( loginArea ); // connect our rooms list component and display our rooms if( activeRoom != undefined ) { meetingRooms.so.data[activeRoom.id].users--; _global.activeRoom = undefined; } } // Enter Room Handler -- called when a room is selected from our component enterRoom = function() { loginArea.close(); // close our connect to the login / room selection area for now chatArea.connect( ourURL + activeRoom.id, session.username ); // connect to our chat room! _root.gotoAndPlay( "chat" ); // and start chatting away } the current behaviour of the RoomList Component) FCRoomListClass.prototype.joinRoom = function() { var selectedRoom = this.rooms_lb.getSelectedItem().data; // Put our selected room data in a global variable _global.activeRoom = this.so.data[selectedRoom]; this.so.data[selectedRoom].users++; // add a user to the room enterRoom(); // call our local function } // Initialization _global.session = new Object(); _global.ourURL = "rtmp://10.0.1.21/ch18/"; // CHANGE THE URL TO MATCH YOUR FlashComm Server!!! // Create our NetConnection objects to be used by our two areas loginArea = new NetConnection(); chatArea = new NetConnection(); // Main Login Handler - called when the login button is clicked (simplified for the context of our book) // login = function() loginBtn.onRelease = function() { _global.session.username = loginDisp.text; // get our text from our text box - will be used globally loginArea.connect( ourURL + "login", session.username ); // make the connection with our username gotoAndPlay( "rooms" ); // we're in - so select a room to chat in } // Logout Handler -- we're leaving when this button is clicked // logout = function() logoutBtn.onRelease = function() { loginArea.close(); // close our connection gotoAndPlay( "login" ); } // Leave a Chat Room Handler -- called when we choose to leave a chat room // leaveRoom = function() leaveRoomBtn.onRelease = function() { if( chatArea.isConnected ) { chatArea.close(); // only close the connection if we are in a room } _root.gotoAndPlay( "rooms" ); } // called from our "rooms" Frame on the timeline mainLobby = function() { if( !loginArea.isConnected ) { loginArea.connect( ourURL + "login", session.username ); // re-connect if we disconnected before } meetingRooms.connect( loginArea ); // connect our rooms list component and display our rooms if( activeRoom != undefined ) { meetingRooms.so.data[activeRoom.id].users--; _global.activeRoom = undefined; } } // Enter Room Handler -- called when a room is selected from our component enterRoom = function() { loginArea.close(); // close our connect to the login / room selection area for now chatArea.connect( ourURL + activeRoom.id, session.username ); // connect to our chat room! _root.gotoAndPlay( "chat" ); // and start chatting away } Essentially, the scriptfully commentedis composed of a number of functions designed to dictate what happens when the movie starts and a user enters a particular room. One of the key lines is in the Initialization section of the script. Don't forget to change the RTMP address to match that of your server. -
Open Dreamweaver MX 2004. Select File, New to open the New Document dialog box. Select Other from the Categories column and ActionScript Communications document from the list of pages presented. Click Create, and a blank code page will open. Note We have seen far too many books that become glorified typing lessons. This is why we have supplied the script in the Exercise folder. You want to build stuff, not spend an inordinate amount of time entering code. Still, study the code. You never know when you might need to write a function that closes a login area. -
Enter the following script into the new page: // ActionScript Communications Document // This file gets loaded up to the Flash Communications Server area load( "components.asc" ); application.onConnect = function( client, newUserName ) { gFrameworkFC.getClientGlobals(client).username = newUserName; // Our FlashCom Server puts the user name in the client's username variable application.acceptConnection(client); // allow the user to proceed } The first line of this script is the one we have been using throughout this section of the book. The next two lines simply put the user's name into a global variable in the client's iteration of the meeting room app and enable the user to move to the various rooms in the facility. -
Save the file to the ch18 folder created in Step 2 and name the file main.asc . Quit Dreamweaver MX 2004. -
Open Flash MX 2004. When a new blank stage opens, add two layers to the timeline. Name the three layers , from the top layer to the bottom layer: -
Labels -
Actions -
Components Select Frame 20 in each of the layers and select Insert, Timeline, Frame. This lengthens the movie to 20 frames . Tip You don't have to select frame 20 in each layer to insert a frame. Click and drag through frame 20 to select the frame in each layer. Press the F5 key to add the frame. This can also be accomplished by selecting Insert, Timeline, Frame. -
In the Labels layer, add keyframes at frames 2, 7, and 12. Using the Property Inspector, name the frames as follows : -
Frame 2: login -
Frame 7: rooms -
Frame 12: chat -
Select frame 1 of the Actions layer, press the F9 key to open the Actions panel, and enter the following line of code into the input area: #include "chatroom.as" -
Add keyframes at frames 6, 11, and 16 of the actions layer. Add the following script to each key frame: stop(); When finished, your timeline should resemble that shown in Figure 18.1. Figure 18.1. The meeting room is "wired up" and awaiting placement of the Communications Components.  Adding the Communication Components With the navigation elements added to the movie and the various scripts in place, you can now turn your attention to adding the Communication Components to the movie. Follow these steps: -
Open the Components PanelControl-F7(PC) or Command-F7 (Mac). Select frame 1 of the Components layer and drag a copy of the Text Input component to the stage. In the Property Inspector, name the instance of the component loginDisp and set the width to 200 pixels. -
Drag a copy of the Button component to stage. In the Property Inspector, name the button loginBtn . With the button still selected, click the Parameters tab in the Property Inspector and enter the following values (see Figure 18.2): Figure 18.2. The Log In is constructed , and the button will place the "call" to the login function in the chat.as script.  The instance name, loginBtn, is the "hook" into the login function in the chatroom.as file. -
Insert a blank key frame in frame 6 of the Components layer to ensure the Log In button doesn't appear in the lobby. Add a keyframe to frame 7 of the Components layer. Drag a copy of the RoomList component to the stage and name its instance meetingRooms in the Property Inspector. Leave the Application Path in the Component Parameters on the Property Inspector blank. We are going to override this with ActionScript because this component's default behavior is to create a new browser window, which we don't want. -
Drag a button from the Components panel to the bottom of the stage. Name the instance of the button logoutBtn in the Property Inspector. Click the Parameters tab and enter Log Out as the button's label (Figure 18.3). Figure 18.3. The RoomList Component and a Log Out button are added to the movie.  -
The stage is about to get really crowded. Click once on the stage and click the size button on the Property Inspector. Set the stage dimensions to 640 pixels wide by 300 pixels high. -
Add a keyframe to frame 12, drag the following Communications Components to the top of the stage, and give them the instance names indicated in the Property Inspector: -
Chat component (name: chatRoom) -
UserColor component (name: chatColor) -
ConnectionLight component (name: connectionLED) -
SetBandWidth component (name: bandWidth_mc) -
PeopleList component (name: peopleList_mc) -
3 AVPresence components (names: me_mc, p1_mc, p2_mc) -
Select the Text tool and click once on the stage. Select Dynamic Text in the Property Inspector and name the instance userDisp . Feel free to change the font and point size at this stage. Create another Dynamic text box and name it chatRomDisp . -
Drag a Button component to the stage. Give it an instance name of leaveRoomBtn and enter Log Out of Room in the button's label parameter. At this stage, you may need to resize a couple of the components or move things around. Figure 18.4 shows our final layout. Figure 18.4. The meeting room is composed of Communication Components, dynamic text boxes, and a Button component. 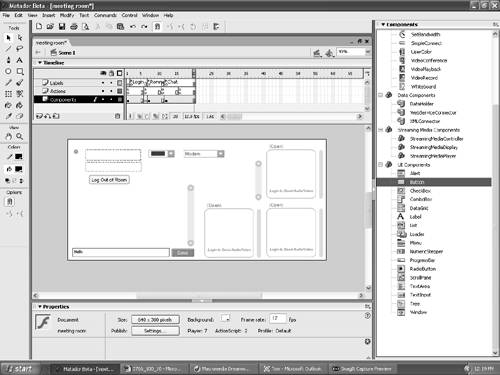 Adding the Scripts All that is left to do is to connect the rooms to the various functions in the chatroom.as script. To do that, follow these steps: -
Click once in frame 7 of the Actions layer and add a keyframe. Press the F9 key to open the Actions panel and enter the following: mainLobby(); -
Click once in frame 12 of the Actions layer and add a keyframe. Press the F9 key to open the Actions panel and enter the following: chatroom.connect( chatArea ); chatColor.connect( chatArea ); connectionLED.connect( chatArea ); bandwidth_mc.connect( chatArea ); peopleList_mc.connect( chatArea ); me_mc.connect( chatArea ); me_mc.setUserName( session.username ); p1_mc.connect( chatArea ); p1_mc.setUserName( session.username ); p2_mc.connect( chatArea ); p2_mc.setUserName( session.username ); userDisp.text = session.username; // show our user name chatRoomDisp.text = activeRoom.room; // and chat room The main purpose of this script is to wire all our components to our connection named "chatArea." In addition, the script also gets our user's name and the chat room we are in from the global variables and puts them in the text boxes. -
Save the file and publish it to the ch18 folder. Open Dreamweaver MX 2004 and add the .swf file to the Oakbridge Meeting page located in your Chapter 18 Exercise folder. Save this file to you ch18 folder. -
Send a friend the URL, connect a camera to your computers, and have fun. Figure 18.5 shows the meeting facility "in action." Figure 18.5. The online meeting facility is being used by a couple Oakbridge Community Centre members . One of them looks suspiciously like one of the authors, and the other resembles his son.   |