Using Network Configuration Tools
| If you add or replace networking hardware after your initial installation, you must configure the new hardware. You can do so using either the command line or the graphical configuration tools. To configure a network client host using the command line, you can use a combination of commands or edit specific files under the /etc directory. To configure the hardware through a graphical interface, you can use Ubuntu's graphical tool for X called network-admin. This section introduces command-line and graphical software tools you can use to configure a network interface and network settings on your Ubuntu system. You'll see how to control your NIC and manage how your system interacts with your network. Using the command-line configuration tools can seem difficult if you are new to Linux. For anyone new to networking, the network-admin graphical tool is the way to go. Both manual and graphical methods require root access to work. If you do not have root access, get it before trying any of these actions. You should not edit any scripts or settings files used by graphical network administration tools on your system. Your changes will be lost the next time the tool, such as network-admin, is run! Either use a manual approach and write your own network setup script, or stick to using graphical configuration utilities. Command-Line Network Interface ConfigurationYou can configure a network interface from the command line using the basic Linux networking utilities. You configure your network client hosts with the command line by using commands to change your current settings or by editing a number of system files. Two commands, ifconfig and route, are used for network configuration. The netstat command displays information about the network connections. /sbin/ifconfigifconfig is used to configure your network interface. You can use it to
You can change as many or as few of these options as you'd like with a single command. The basic structure for the command is as follows: ifconfig [network device] options Table 18.1 shows a subset of ifconfig options and examples of their uses.
The ifconfig man page shows other options that enable your machine to interface with a number of network types such as AppleTalk, Novell, IPv6, and others. Again, read the man page for details on these network types. Note Promiscuous mode causes the NIC to receive all packets on the network. It is often used to sniff a network. Multicasting mode enables the NIC to receive all multicast traffic on the network. If no argument is given, ifconfig displays the status of active interfaces. For example, the output of ifconfig, without arguments and one active and configured NIC, looks similar to this: $ ifconfig eth0 Link encap:Ethernet HWaddr 00:0F:EA:B2:53:85 inet addr:192.168.2.5 Bcast:192.168.2.255 Mask:255.255.255.0 inet6 addr: fe80::20f:eaff:feb2:5385/64 Scope:Link UP BROADCAST RUNNING MULTICAST MTU:1500 Metric:1 RX packets:471 errors:0 dropped:0 overruns:0 frame:0 TX packets:695 errors:0 dropped:0 overruns:0 carrier:0 collisions:0 txqueuelen:1000 RX bytes:160637 (156.8 KiB) TX bytes:86193 (84.1 KiB) Interrupt:185 Base address:0x6000 lo Link encap:Local Loopback inet addr:127.0.0.1 Mask:255.0.0.0 inet6 addr: ::1/128 Scope:Host UP LOOPBACK RUNNING MTU:16436 Metric:1 RX packets:19 errors:0 dropped:0 overruns:0 frame:0 TX packets:19 errors:0 dropped:0 overruns:0 carrier:0 collisions:0 txqueuelen:0 RX bytes:1336 (1.3 KiB) TX bytes:1336 (1.3 KiB) The output is easily understood. The inet entry displays the IP address for the interface. UP signifies that the interface is ready for use, BROADCAST denotes that the interface is connected to a network that supports broadcast messaging (ethernet), RUNNING means that the interface is operating, and LOOPBACK shows which device (lo) is the loopback address. The maximum transmission unit (MTU) on eth0 is 1500 bytes. This determines the size of the largest packet that can be transmitted over this interface (and is sometimes "tuned" to other values for performance enhancement). MeTRic is a number from 0 to 3 that relates to how much information from the interface is placed in the routing table. The lower the number, the smaller the amount of information. The ifconfig command can be used to display information about or control a specific interface using commands as listed in Table 18.1. For example, to deactivate the first Ethernet device on a host, use the ifconfig command, the interface name, and the command down like so: $ sudo ifconfig eth0 down You can also configure and activate the device by specifying a hostname or IP address and network information. For example to configure and activate ("bring up") the eth0 interface with a specific IP address, use the ifconfig command like this: $ sudo ifconfig eth0 192.168.2.9 netmask 255.255.255.0 up If you have a host defined in your system's /etc/hosts file (see the section "Network Configuration Files" later in this chapter), you can configure and activate the interface according to the defined hostname like this: $ sudo ifconfig eth0 dogdog.hudson.com up Read the next section to see how to configure your system to work with your LAN. /sbin/route The second command used to configure your network is the route command. route is used to build the routing tables (in memory) implemented for routing packets as well as displaying the routing information. It is used after ifconfig has initialized the interface. route is normally used to set up static routes to other networks via the gateway or to other hosts. The command configuration is like this: $ route [options] [commands] [parameters] To display the routing table, use the route command with no options. The display will look similar to this: $ route Kernel IP routing table Destination Gateway Genmask Flags Metric Ref Use Iface 192.168.2.0 * 255.255.255.0 U 0 0 0 eth0 default . 0.0.0.0 UG 0 0 0 eth0 In the first column, Destination is the IP address (or, if the host is in /etc/hosts or /etc/networks, the hostname) of the receiving host. The default entry is the default gateway for this machine. The Gateway column lists the gateway that the packets must go through to reach their destination. An asterisk (*) means that packets go directly to the host. Genmask is the netmask. The Flags column can have several possible entries. In our example, U verifies that the route is enabled and G specifies that Destination requires the use of a gateway. The Metric column displays the distance to the Destination. Some daemons use this to figure the easiest route to the Destination. The Ref column is used by some UNIX flavors to convey the references to the route. It isn't used by Linux. The Use column indicates the number of times this entry has been looked up. Finally, the Iface column is the name of the interface for the corresponding entry. Using the -n option to the route command will give the same information, substituting IP addresses for names and asterisks (*), and looks like this: # /sbin/route -n Kernel IP routing table Destination Gateway Genmask Flags Metric Ref Use Iface 192.168.2.0 0.0.0.0 255.255.255.0 U 0 0 0 eth0 0.0.0.0 192.168.2.1 0.0.0.0 UG 0 0 0 eth0 The route command can add to the table using the add option. With the add option, you can specify a host (-host) or a network (-net) as the destination. If no option is used, the route command assumes that you are configuring the host issuing the command. The most common uses for the route command are to add the default gateway for a host, for a host that has lost its routing table, or if the gateway address has changed. For example, to add a gateway with a specific IP address, you could use the following: $ sudo route add default gw 149.112.50.65Note that you could use a hostname instead of an IP address if desired. Another common use is to add the network to the routing table right after using the ifconfig command to configure the interface. Assuming that the 208.59.243.0 entry from the previous examples was missing, replace it using the following command: $ sudo route add -net 208.59.243.0 netmask 255.255.255.0 dev eth0You also can use route to configure a specific host for a direct (point-to-point) connection. For example, say that you have a home network of two computers. One of the computers has a modem through which it connects to your business network. You typically work at the other computer. You can use the route command to establish a connection through specific hosts using the following command: $ sudo route add -host 198.135.62.25 gw 149.112.50.65The preceding example makes the computer with the modem the gateway for the computer you are using. This type of command line is useful if you have a gateway or firewall connected to the Internet. There are many additional uses for the route command, such as manipulating the default packet size. See the man page for those uses. /bin/netstatThe netstat command is used to display the status of your network. It has several parameters that can display as much or as little information as you prefer. The services are listed by sockets (application-to-application connections between two computers). You can use netstat to display the information in Table 18.2.
Several other options are available for this command, but they are used less often. As with the route command, the man page can give you details about all options and parameters. Network Configuration FilesAs previously stated, five network configuration files can be modified to make changes to basic network interaction of your system. The files are
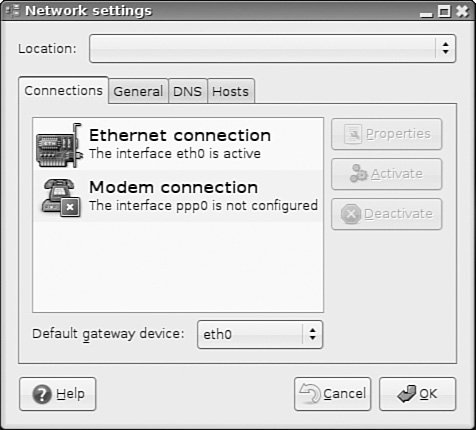
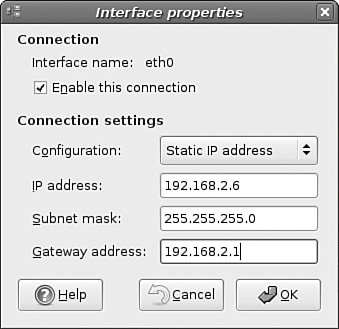
After these files are modified, the changes are active. As with most configuration files, comments can be added with a hash mark (#) preceding the comment. All of these files have a man page written about them for more information. Adding Hosts to /etc/hostsThe /etc/hosts file is a map of IP to hostnames. If you are not using DNS or another naming service, and you are connected to a large network, this file can get quite large and can be a real headache to manage. A small /etc/hosts file can look something like this: 127.0.0.1 localhost 127.0.1.1 optimus # The following lines are desirable for IPv6 capable hosts ::1 ip6-localhost ip6-loopback fe00::0 ip6-localnet ff00::0 ip6-mcastprefix ff02::1 ip6-allnodes ff02::2 ip6-allrouters ff02::3 ip6-allhosts The first entry is for the loopback entry. The second is for the name of the machine. If no naming service is in use on the network, the only host that myhost will recognize by name is yourhost. (IP addresses on the network can still be used.) Service Settings in /etc/servicesThe /etc/services file maps port numbers to services. The first few lines look similar to this (the /etc/services file can be quite long, more than 500 lines): # Each line describes one service, and is of the form: # # service-name port/protocol [aliases ...] [# comment] tcpmux 1/tcp # TCP port service multiplexer tcpmux 1/udp # TCP port service multiplexer rje 5/tcp # Remote Job Entry rje 5/udp # Remote Job Entry echo 7/tcp echo 7/udp discard 9/tcp sink null discard 9/udp sink null systat 11/tcp users Typically, there are two entries for each service because most services can use either TCP or UDP for their transmissions. Usually after /etc/services is initially configured, you will not need to change it. Using /etc/nsswitch.conf After Changing Naming ServicesThis file was initially developed by Sun Microsystems to specify the order in which services are accessed on the system. A number of services are listed in the /etc/nsswitch.conf file, but the most commonly modified entry is the hosts entry. A portion of the file can look like this: passwd: compat group: compat shadow: compat hosts: files dns mdns networks: files protocols: db files services: db files ethers: db files rpc: db files netgroup: nis This tells services that they should consult standard Unix/Linux files for passwd, shadow, and group (/etc/passwd, /etc/shadow, /etc/group, respectively) lookups. For host lookups, the system checks /etc/hosts and if there is no entry, it checks DNS. The commented hosts enTRy lists the possible values for hosts. Edit this file only if your naming service has changed. Setting a Name Server with /etc/resolv.conf/etc/resolv.conf is used by DNS, the domain name service. (DNS is covered in detail in Chapter 27, "Using Perl".) The following is an example of resolv.conf: nameserver 192.172.3.8 nameserver 192.172.3.9 search mydomain.com This sets the nameservers and the order of domains for DNS to use. The contents of this file will be set automatically if you use Dynamic Host Configuration Protocol, or DHCP (see the section on "Dynamic Host Configuration Protocol" later in this chapter). Setting DNS Search Order with /etc/host.confThe /etc/host.conf file lists the order in which your machine will search for hostname resolution. The following is the default /etc/host.conf file: order hosts, bind In this example, the host checks the /etc/hosts file first and then performs a DNS lookup. A couple more options control how the name service is used. The only reason to modify this file is if you use NIS for your name service or you want one of the optional services. The nospoof option can be a good option for system security. It compares a standard DNS lookup to a reverse lookup (host-to-IP then IP-to-host) and fails if the two don't match. The drawback is that often when proxy services are used, the lookup fails, so you want to use this with caution. Using Graphical Configuration ToolsAs mentioned earlier, if you are new to networking or still becoming proficient with the command line, the graphical configuration tool is your best method for configuring new hardware in Ubuntu. Like most graphical tools, network-admin allows you to fill in the blanks; press the proper buttons, and the tool modifies the required files and issues the proper commands. Remember, you must be root to run network-admin. There are two ways to start network-admin: from the command line of an X11 terminal window with the command network-admin, using the panel's Run Application menu item, or by clicking the Networking option under the System, Administration menu (In either case, you are prompted to enter the root password.) After it is started, you will see the screen shown in Figure 18.1. Figure 18.1. Use network-admin to configure your network devices. Click the DNS tab to configure your system's DNS settings, hostname, or DNS search path. Click the Hosts tab, and then either click the Add or Properties button (after selecting a host) to create or edit an entry in your system's /etc/hosts file, for example, to add the IP addresses, hostnames, and aliases of hosts on your network. See Figure 18.2 for an example of editing a host entry. Figure 18.2. Highlight an existing entry, and then click the Properties button to change /etc/hosts entries in the Hosts tab of the Network Configuration screen. Ubuntu does a great job of detecting and configuring your network interfaces, leaving you with very little work to do. However, you may need to assign a static IP address, which you do by selecting the appropriate network interface in the Connections tab and clicking the Properties button. This is shown in Figure 18.3, and you can see that you can elect to have a static IP address. Just make sure you enter in all the details and everything should work when you click OK. Figure 18.3. Assign a static IP address to a network interface. Note Bootp is the initial protocol that DHCP was built on, and it has mostly been replaced by DHCP. You can also assign locations to your computer, especially handy if you are on a laptop and move between several networks each requiring different configurations. Just select the gray bar at the top of the network-admin window and select Create Location. Enter a meaningful name, such as Home and then repeat this again to create another location, Work. Each time you switch between locations, Ubuntu detects that it needs to use configurations specific to those locations, so for instance you might want to use DHCP at work, but not at home. Simple; just select the Home location, configure your ethernet connection to use a Static IP and you are all set to switch between your home and corporate networks. |

EAN: 2147483647
Pages: 318
- Chapter VII Objective and Perceived Complexity and Their Impacts on Internet Communication
- Chapter XI User Satisfaction with Web Portals: An Empirical Study
- Chapter XIII Shopping Agent Web Sites: A Comparative Shopping Environment
- Chapter XIV Product Catalog and Shopping Cart Effective Design
- Chapter XV Customer Trust in Online Commerce