Graphics Manipulation
| < Day Day Up > |
| If you have ever wished you could change a photograph slightly red eyes returned to their normal color, dark areas lightened, funny Uncle Bert removed and longed for a way to accomplish that task, you have been granted your wish. Now, you can accomplish all of these tasks with the tools provided with Fedora (and a digital image from a digital camera or from a scanner). This section of the chapter discusses The GIMP, a powerful graphics manipulation tool. (You learned about the other graphics tools that Fedora provides in Chapter 9.) In this section of the chapter, you also learn about graphic file formats supported by Fedora, as well as some tools you can use to convert them if the application you want to use requires a different format. The GNU Image Manipulation ProgramOne of the best graphics clients is The GIMP. The GIMP is a free, GPLed image editor with sophisticated capabilities that can import and export more than 30 different graphics formats, including files created with Adobe Photoshop. It is often compared with Photoshop, and The GIMP represents one of the GNU Projects' first significant successes. You will see many images in Linux that have been prepared with The GIMP. The GIMP can be started by clicking a desktop panel menu item or by using the command line, like this: $ gimp & You will see an installation dialog box when The GIMP is started for the first time, and then a series of dialog boxes that display information regarding the creation and contents of a local GIMP directory. This directory can contain personal settings, preferences, external application resource files, temporary files, and symbolic links to external software tools used by the editor.
After the initial configuration has finished, The GIMP's main windows and toolboxes appear. The GIMP's main window contains tools used for selection, drawing, movement, view enlargement or reduction, airbrushing, painting, smudging, copying, filling, and color selection. Depending on the version installed on your system, the toolbox can host more than 25 different tools. The toolbox's File, Xtns, and Help menus are used for file operations (including the ability to send the current image by electronic mail), image acquisition or manipulation, and documentation, respectively. If you right-click an open image window, you'll see the wealth of The GIMP's menus, as shown in Figure 10.5. Figure 10.5. Right-click on an image window to access The GIMP's cascading menus.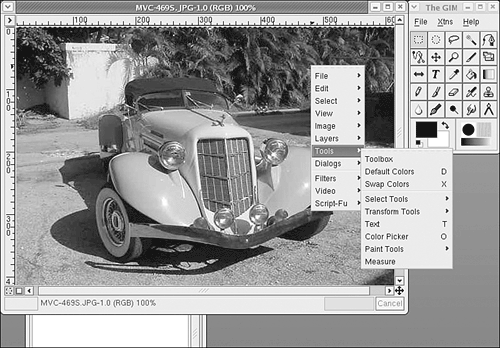 Working with Graphics FormatsImage file formats are developed to serve a specific technical purpose (lossless compression, for example, where the file size is reduced without sacrificing image quality) or to meet a need for a proprietary format for competitive reasons. Many file formats are covered by one or more patents. For example, the GIF format has fallen into disfavor with the open-source crowd because the patent holder has only recently decided to begin enforcing his patent rights. If you want to view or manipulate an image, you need to identify the file format in order to choose the right tool for working with the image. The file's extension is your first indicator of the file's format. The graphics image formats supported by the applications included with Red Hat include
An extensive list of image file extensions can be found in the man page for ImageMagick, an excellent application included with Fedora, which you learn more about in upcoming sections of this chapter. TIP Fedora includes dozens of graphics conversion programs, and there are few, if any, graphics file formats that cannot be manipulated when using Linux. These commands can be used in Perl scripts, shell scripts, or command-line pipes to support many types of complex format conversion and image manipulation tasks. See the manual pages for the ppm, pbm, pnm, and pgm families of commands. Also see the man page for the convert command, which is part of a suite of extremely capable programs included with the ImageMagick suite. Often, a file you want to manipulate in some way is in a format that cannot be used by either your graphics application or the final application. The solution is to convert the image file sometimes through several formats. The convert utility from ImageMagick is useful as are the netpbm family of utilities. If it is not already installed, ImageMagick can be installed with the Add Remove Software GUI found in the System Settings menu; the netpbm tools are always installed by default. The convert utility converts between image formats recognized by ImageMagick. Color depth and size also can be manipulated during the conversion process. You can use ImageMagick to append images, surround them with borders, labels, rotate and shade them, and perform other manipulations well-suited to scripting. Commands associated with ImageMagick include display, animate, identify, and import. The application supports more than 130 different image formats (all listed in the man page for ImageMagick).
The netpbm tools are installed by default because they compose the underpinnings of graphics format manipulation. The man page for each image format lists related conversion utilities; the number of those utilities gives you some indication of the way that format is used and shows how one is built on another:
Capturing Screen ImagesYou can use graphics manipulation tools to capture images that are displayed on your computer screen. Although this technique was used for the production of this book, it has broader uses; there is truth to the cliché that a picture is worth a thousand words. Sometimes, it is easier to show an example than it is to describe it. A captured screen image (also called a screen grab or a screenshot) can be used to illustrate an error in the display of an application (a font problem, for example) or an error dialog that is too complex to copy down by hand. You might just want to share an image of your beautifully crafted custom desktop configuration with your friends or illustrate your written documents. In this section, you learn how to capture screen images for these and other purposes. When using the GNOME desktop, you can take advantage of the built-in screenshot mechanism (gnome-panel-screenshot). Access this tool by pressing the Print Screen key. (Alt+Print Screen takes a screenshot of only the window that has "focus" on a desktop.) Captured images are saved in .png format. You also can capture screen images from a remote computer using tools supported by Red Hat Linux. The import command (one of ImageMagick's commands) was used to take the screenshots for this book, for example, using a local computer and a remote computer on a LAN. First, we ran $ xhost + on the remote computer to allow another computer access to the X server on the remote machine; the command to take the screenshot is run on our local machine like this: $ import -window root -display 192.168.2.4:0 12fig07.jpg This utility made a difficult task easy because the publisher required the screenshots be done from an 800 x 600 screen (too small to comfortably work in) to accommodate their printing and production equipment. We could also have used the classic Unix tool xwd to take screenshots. The command would have looked similar to that of import: $ xwd -root -display 192.168.2.4:0 -out 12fig07.jpg Although the screenshots could have been taken with The GIMP and saved in the appropriate format, we would have had to be running The GIMP on that computer and navigating the menus every time we captured an image the remote option of import was very convenient. We did not use Ksnapshot (not included in the menus, but available from the command line) because it does not support the .pcx format the publisher used to use and it must be run locally, but it can take screenshots easily and is our preferred tool for use on a single machine.
|
| < Day Day Up > |
EAN: 2147483647
Pages: 361