Using X11R6
| X11R7 is the X server that is used with Fedora. The base Xorg distribution consists of 30 RPM packages (almost 120MB), which contain the server, along with support and development libraries, fonts, various clients, and documentation. An additional 1,000 or more X clients, fonts, and documentation are also included with Fedora. Note A full installation of X and related X11R7 files can consume moreusually much morethan 170MB of hard drive space. This is because additional clients, configuration files, and graphics (such as icons) are under the /usr/bin and /usr/share directory trees. You can pare excessive disk requirements by judiciously choosing which X-related packages (such as games) to install on workstations. However, with the increased capacity of most desktop PC hard drives today, the size requirements are rarely a problem, except in configuring thin-client desktops or embedded systems. The /usr directory and its subdirectories contain the majority of Xorg's software. Some important subdirectories are
The main components required for an active local X session are installed on your system if you choose to use a graphical desktop. These components are the X server, miscellaneous fonts, a terminal client (that is, a program that provides access to a shell prompt), and a client known as a window manager. Window managers, which are discussed later in this chapter (see the section "Selecting and Using Window Managers"), administer onscreen displays, including overlapping and tiling windows, command buttons, title bars, and other onscreen decorations and features. Elements of the xorg.conf FileThe most important file for Xorg is the xorg.conf configuration file, which can be located in the /etc/X11 directory. This file contains configuration information that is vital for X to function correctly, and is usually created during the installation of Fedora. Should you need to change anything post-install, you should use the system-config-display application, which we will cover later in this chapter. Information relating to hardware, monitors, graphics cards, and input devices is stored in the xorg.conf file, so be careful if you decide to tinker with it in a text editor! Of course, we would not send you in blindly to edit such an important file. Let us take a look at the contents of the file so that you can get an idea of what X is looking for. The components, or sections, of the xorg.conf file specify the X session or server layout, along with pathnames for files that are used by the server, any options relating directly to the server, any optional support modules needed, information relating to the mouse and keyboard attached to the system, the graphics card installed, the monitor in use, and of course the resolution and color depth that Fedora uses. Of the 12 sections of the file, these are the essential components:
The following sections provide short descriptions of these elements; the xorg.conf man page contains full documentation of all the options and other keywords you can use to customize your desktop settings. The ServerLayout SectionAs noted previously, the ServerLayout section of the xorg.conf file defines the display and screen layouts, and it names the input devices. A typical ServerLayout section from an automatically configured xorg.conf file might look like this: Section "ServerLayout" Identifier "single head configuration" Screen 0 "Screen0" 0 0 InputDevice "Mouse0" "CorePointer" InputDevice "Keyboard0" "CoreKeyboard" InputDevice "DevInputMice" "AlwaysCore" EndSection In this example, a single display is used (the numbers designate the position of a screen), and two default input devices, Mouse0 and Keyboard0, are used for the session. The Files SectionThe Files section of the xorg.conf file might look like this: Section "Files" RgbPath "/usr/lib/X11/rgb" FontPath "unix/:7100" EndSection This section lists available session colors (by name, in the text file rgb.txt) and the port number to the X font server. The font server, xfs, is started at boot time and does not require an active X session. If a font server is not used, the FontPath entry could instead list each font directory under the /usr/X11R6/lib/X11/fonts directory, as in this example: FontPath "/usr/lib/X11/fonts/100dpi" FontPath "/usr/lib/X11/fonts/misc" FontPath "/usr/lib/X11/fonts/75dpi" FontPath "/usr/lib/X11/fonts/type1" FontPath "/usr/lib/X11/fonts/Speedo" ... These directories contain the default compressed fonts that are available for use during the X session. The font server is configured by using the file named config under the /etc/X11/fs directory. This file contains a listing, or catalog, of fonts for use by the font server. By adding an alternate-server entry in this file and restarting the font server, you can specify remote font servers for use during X sessions. This can help centralize font support and reduce local storage requirements (even though only 25MB is required for the almost 5,000 fonts installed with Fedora and X). The Module SectionThe Module section of the xorg.conf file specifies loadable modules or drivers to load for the X session. This section might look like this: Section "Module" Load "dbe" Load "extmod" Load "fbdevhw" Load "glx" Load "record" Load "freetype" Load "type1" Load "dri" EndSection These modules can range from special video card support to font rasterizers. The modules are located in subdirectories under the /usr/lib/modules directory. The InputDevice SectionThe InputDevice section configures a specific device, such as a keyboard or mouse, as in this example: Section "InputDevice" Identifier "Keyboard0" Driver "kbd" Option "XkbModel" "pc105" Option "XkbLayout" "us" EndSection Section "InputDevice" Identifier "Mouse0" Driver "mouse" Option "Protocol" "IMPS/2" Option "Device" "/dev/input/mice" Option "ZAxisMapping" "4 5" Option "Emulate3Buttons" "yes" EndSection You can configure multiple devices, and there might be multiple InputDevice sections. The preceding example specifies a basic keyboard and a two-button PS/2 mouse (actually, a Dell touchpad pointer). An InputDevice section that specifies use of a USB device could be used at the same time (to enable mousing with PS/2 and USB pointers) and might look like this: Section "InputDevice" Identifier "Mouse0" Driver "mouse" Option "Device" "/dev/input/mice" Option "Protocol" "IMPS/2" Option "Emulate3Buttons" "off" Option "ZAxisMapping" "4 5" EndSection Note If you change your computer's pointing device, you should then run Fedora's system-config-mouse client, which automatically updates your system's xorg.conf file. Caution From Fedora Core 3 onward, the location for the mouse device changed from /dev/mouse to /dev/input/mice. Unfortunately, when system-config-display writes the xorg.conf file, it sometimes gets a little confused and still maps the mouse to /dev/mouse rather than /dev/input/mice. This is where a little knowledge of vi comes in handy! The Monitor SectionThe Monitor section configures the designated display device as declared in the ServerLayout section, as shown in this example: Section "Monitor" Identifier "Monitor0" VendorName "Monitor Vendor" ModelName "Monitor Model" DisplaySize 300 220 HorizSync 31.5-48.5 VertRefresh 50-70 Option "dpms" EndSection Note that the X server automatically determines the best video timings according to the horizontal and vertical sync and refresh values in this section. If required, old-style modeline entries (used by distributions and servers prior to XFree86 4.0) might still be used. If the monitor is automatically detected when you configure X (see the "Configuring X" section, later in this chapter), its definition and capabilities are inserted in your xorg.conf file from the MonitorsDB database. This database contains more than 600 monitors and is located in the /usr/share/hwdata directory. The Device SectionThe Device section provides details about the video graphics chipset used by the computer, as in this example: Section "Device" Identifier "Videocard0" Driver "radeon" VendorName "Videocard vendor" BoardName "ATI Radeon Mobility M6" EndSection This example identifies an installed video card as using an ATI Mobility M6 graphics chipset. The Driver entry tells the Xorg server to load the radeon_drv.o module from the /usr/lib/modules/drivers directory. Different chipsets have different options. For example, here's the entry for a NeoMagic video chipset: Section "Device" Identifier "NeoMagic (laptop/notebook)" Driver "neomagic" VendorName "NeoMagic (laptop/notebook)" BoardName "NeoMagic (laptop/notebook)" Option "externDisp" Option "internDisp" EndSection In this example, the Device section specifies the driver for the graphics card (neomagic_drv.o) and enables two chipset options (externDisp and internDisp) to allow display on the laptop's LCD screen and an attached monitor. The Xorg server supports hundreds of different video chipsets. If you configure X11 but subsequently change the installed video card, you need to edit the existing Device section or generate a new xorg.conf file, using one of the X configuration tools discussed in this chapter, to reflect the new card's capabilities. You can find details about options for some chipsets in a companion man page or in a README file under the /usr/lib/_X11/doc directory. You should look at these sources for hints about optimizations and troubleshooting. The Screen SectionThe Screen section ties together the information from the previous sections (using the Screen0, Device, and Monitor Identifier entries). It can also specify one or more color depths and resolutions for the session. Here's an example: Section "Screen" Identifier "Screen0" Device "Videocard0" Monitor "Monitor0" DefaultDepth 24 SubSection "Display" Viewport 0 0 Depth 16 Modes "1024x768" "800x600" "640x480" EndSubSection EndSection In this example a color depth of thousands of colors and a resolution of 1024x768 is the default, with optional resolutions of 800x600 and 640x480. Multiple Display subsection entries with different color depths and resolutions (with settings such as Depth 24 for millions of colors) can be used if supported by the graphics card and monitor combination. You can also use a DefaultDepth entry (which is 24, or thousands of colors, in the example), along with a specific color depth to standardize display depths in installations. You can also specify a desktop resolution larger than that supported by the hardware in your monitor or notebook display. This setting is known as a virtual resolution in the Display subsection. This allows, for example, an 800x600 display to pan (that is, slide around inside) a virtual window of 1024x768. Note If your monitor and graphics card support multiple resolutions and the settings are properly configured, you can use the key combination of Ctrl+Alt+Keypad+ or Ctrl+Alt+Keypad- to change resolutions on the fly during your X session. Configuring XAlthough the Fedora installer can be used to configure X during installation, problems can arise if the PC's video card is not recognized. If you are unable to configure X during installation (refer to Chapter 3, "Installing Fedora"), do not specify booting to a graphical configuration and skip the X configuration portion of the installation. Note that some installs, such as for servers, don't require that X be configured for use to support active X sessions, but might require installation of X and related software to support remote users and clients. You can use the following configuration tools, among others, to create a working xorg.conf file:
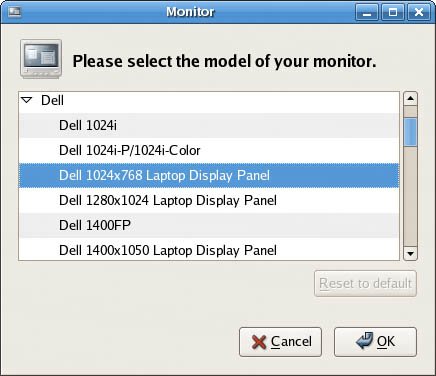
The following sections discuss how to use each of these software tools to create a working xorg.conf file. Configuring X with the system-config-display ClientYou can use the system-config-display client to create or update an xorg.conf file. You can start by clicking the Display menu item from the desktop panel's System Settings menu if you are already running X, but you can also begin, as root, by starting the client from the command line during a console session, like this: # system-config-displayThe screen clears, and system-config-display attempts to start an X session. If you start this client during an X session, its main window appears, as shown in Figure 6.1. Figure 6.1. The system-config-display client provides a graphical configuration interface for creating or updating a system's xorg.conf file. Here you see the Display Settings main screen, offering resolution and color-depth settings.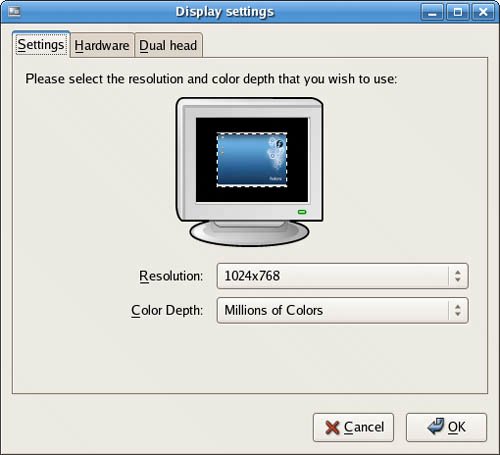 The Display Settings main screen is a dialog showing the current monitor and video card settings (if configured). You can change the resolution (horizontal and vertical pixels) and color depth (number of supported colors) by clicking one or the other of the drop-down menus. Click the OK or Cancel button to save or cancel any change. If you click the Hardware tab, other configuration options become available, as shown in Figure 6.2. Figure 6.2. system-config-display's Hardware settings are used to configure a monitor and video card (and multihead video card) for X11R7.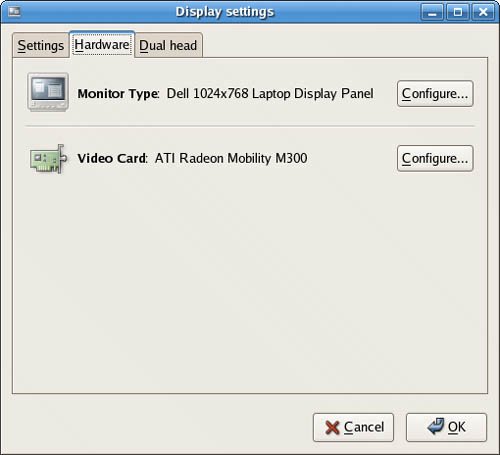 Click the Configure button in the Monitor Type area of the Hardware tab dialog to change your Monitor settings, as shown in Figure 6.3. You can use this dialog to configure a different monitor or to change current monitor settings. Figure 6.3. You can scroll to select a new monitor to use for your X sessions. First, scroll through the list of monitor brands (from the MonitorDB database), and then click the small triangle to the left of the name of the manufacturer or type. You will then see a list of model names. Click to select one, and when you are finished, click the OK button to use the new settings or click the Cancel button to abort changes. To configure a video card, you can click the Video Card area's Configure button in the Hardware tab dialog. The Video Card dialog appears, as shown in Figure 6.4. Figure 6.4. Use the Hardware tab's Video Card Configure button to choose a new video card for your X sessions.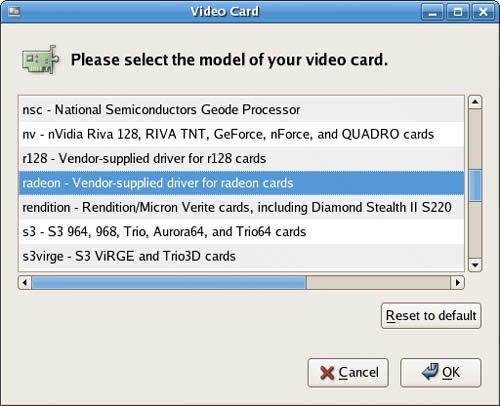 You can scroll through the list of video cards. You can click one to select it and when you are finished, click the OK button to finalize your selection. If your video card supports the use of two or more monitors, you can use the Dual head tab to configure multiple monitor support. Xorg supports multiple displays using a feature named Xinerama. This feature enables multiple monitors to appear as a single display, and each display can be located in any quadrant of a screen's layout. To use Xinerama for your desktop sessions, you must start the Xorg server with its +xinerama option. Your xorg.conf file must also have proper settings, and each display must be capable of supporting identical color depth (usually 16bpp or thousands of colors). Details about using Xinerama with Xorg can be found in the Xorg man page and in the Xinerama HOWTO at http://www.tldp.org/HOWTO/Xinerama-HOWTO/. When you have finished your changes to your X server settings, click the OK button. You will then see a dialog advising that you have to log out and then log back in (or exit your X session and restart X) to use the new settings. The new settings will be stored in a new xorg.conf file under the /etc/X11 directory. If you find that the new settings do not work, you can simply copy the backup xorg.conf file named xorg.conf.backup to xorg-conf in the same directory to revert to your original settings. Using Xorg to Configure XYou can create the xorg.conf file manually by typing one from scratch using a text editor, but you can also create one automatically by using the Xorg server or configuration utilities (as discussed in the previous sections). As the root operator, you can use the following on the server to create a test configuration file: # X -configure After you press Enter, a file named xorg.conf .new is created in root's home directory, the /root directory. You can then use this file for a test session, like this: # X -config /root/xorg.conf.new |
EAN: 2147483647
Pages: 362