| If you want to update the kernel from new source code you have downloaded or you have applied a patch to add new functionality or hardware support, you will have to compile and install a new kernel to actually use that new functionality. Compiling the kernel involves translating the kernel's contents from human-readable code to binary form. Installing the kernel involves putting all the compiled files where they belong in /boot and /lib and making changes to the bootloader. The process of compiling the kernel is almost completely automated by the make utility, as is the process of installing. By providing the necessary arguments and following the steps covered next, you can recompile and install a custom kernel for your use. Here is a checklist of steps to compile and configure the kernel: | | 1. | Verify a working bootdisk for the old kernel to be able to reboot your system in case something goes wrong with the new kernel.
Caution Before making any changes to your current, working kernel, make sure that you have a backup copy on a floppy disk. This will allow you to boot into your system with a known working kernel in case something goes wrong during configuration. The command to do this is as follows: # mkbootdisk --device /dev/fd0 'uname -r'
This assumes that your floppy drive is /dev/fd0. (Here is a good shell script tip: The ' character tells the shell to execute what is within ' first and then returns that output as part of the input of the mkbootdisk command.) On this machine, the result is # mkbootdisk --device /dev/fd0 2.6.7-1
This command will not be echoed to your screen, but it is what the system will execute. | 2. | Apply all patches, if any, so that you have the features you desire. See the previous section for details.
| 3. | Back up the .config file, if it exists, so that you can recover from the inevitable mistake. Use the following cp command:
# cp .config .config.bak
Note If you are recompiling the Fedora default kernel, the /usr/src/kernels/linux-2.6/configs directory contains several versions of configuration files for different purposes. Fedora provides a full set of .config files in the subdirectory configs, all named for the type of system they were compiled for. For example, kernel-2.6.7-i686-smp.config is a configuration file for a multiprocessor Pentium-class computer. If you want to use one of these default configurations as the basis for a custom kernel, simply copy the appropriate file to /usr/src/kernels/linux-2.6 and rename it .config. | 4. | Run the make mrproper directive to prepare the kernel source tree, cleaning out any old files or binaries.
| 5. | Restore the .config file that the command make mrproper deleted, and edit the Makefile to change the EXtrAVERSION number.
Note If you want to keep any current version of the kernel that was compiled with the same code tree, manually edit the Makefile with your favorite text editor and add some unique string to the EXtrAVERSION variable. You can use any description you prefer, however. | 6. | Modify the kernel configuration file using make config, make menuconfig, or make xconfigwe recommend the latter, but read the text following these numbered instructions for more details.
| | | 7. | Run make dep to create the code dependencies used later in the compilation process.
Tip If you have a multiprocessor machine, you can use both processors to speed the make process by inserting -jx after the make command, where as a rule of thumb, x is one more than the number of processors you have. You might try a larger number and even try this on a single-processor machine (we have used -j8 successfully on an SMP machine); it only loads up your CPU. For example, # make -j3 bzImage
All the make processes except make dep work well with this method of parallel compiling. | 8. | Run make clean to prepare the sources for the actual compilation of the kernel.
| 9. | Run make bzImage to create a binary image of the kernel.
Note Several choices of directives exist, although the most common ones are as follows: zImage This directive compiles the kernel, creating an uncompressed file called zImage.
bzImage This directive creates a compressed kernel image necessary for some systems that require the kernel image to be under a certain size for the BIOS to be able to parse them; otherwise, the new kernel will not boot. It is the most commonly used choice. However, the Fedora kernel compiled with bzImage is still too large to fit on a floppy, so a smaller version with some modules and features removed is used for the boot floppies. Fedora recommends that you boot from the rescue CD-ROM.
bzDisk This directive does the same thing as bzImage, but it copies the new kernel image to a floppy disk for testing purposes. This is helpful for testing new kernels without writing kernel files to your hard drive. Make sure that you have a floppy disk in the drive because you will not be prompted for one.
| 10. | Run make modules to compile any modules your new kernel needs.
| 11. | Run make modules_install to install the modules in /lib/modules and create dependency files.
| 12. | Run make install to automatically copy the kernel to /boot, create any other files it needs, and modify the bootloader to boot the new kernel by default.
| 13. | Using your favorite text editor, verify the changes made to /etc/lilo.conf or /boot/grub/grub.conf; fix if necessary and rerun /sbin/lilo if needed.
| 14. | Reboot and test the new kernel.
| 15. | Repeat the process if necessary, choosing a configuration interface.
|
Over time, the process for configuring the Linux kernel has changed. Originally, you configured the kernel by responding to a series of prompts for each configuration parameter (this is the make config utility described shortly). Although you can still configure Linux this way, most users find this type of configuration confusing and inconvenient; moving back through the prompts to correct errors, for instance, is impossible. The make config utility is a command-line tool. The utility presents a question regarding kernel configuration options. The user responds with a Y, N, M, or ? (it is not case sensitive). Choosing M configures the option to be compiled as a module. A response of ? displays context help for that specific option, if available. (If you choose ? and no help is available, you can turn to the vast Internet resources to find information.) We recommend that you avoid the make config utility, shown in Figure 39.1. Figure 39.1. The make config utility in all its Spartan glory. 
If you prefer to use a command-line interface, you can use make menuconfig to configure the Linux kernel. menuconfig provides a graphical wrapper around a text interface. Although it is not as raw as make config, menuconfig is not a fancy graphical interface either; you cannot use a mouse, but must navigate through it using keyboard commands. The same information presented in make config is presented by make menuconfig, but as you can see in Figure 39.2, it looks a little nicer. Now, at least, you can move back and forth in the selection process in case you change your mind or have made a mistake. Figure 39.2. The make menuconfig utility, a small improvement over make config. 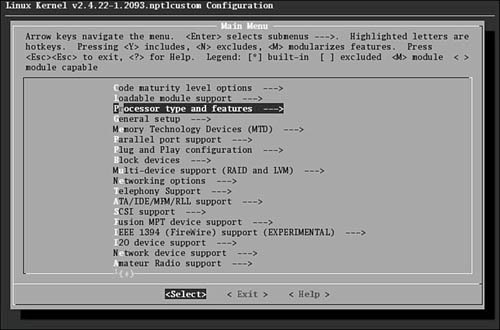
In make menuconfig, you use the arrow keys to move the selector up and down and the spacebar to toggle a selection. The Tab key moves the focus at the bottom of the screen to either Select, Exit, or Help. If a graphical desktop is not available, menuconfig is the best you can do. However, both menuconfig and xconfig (see later discussion) offer an improvement over editing the .config file directly. If you want to configure the kernel through a true graphical interfacewith mouse support and clickable buttonsmake xconfig is the best configuration utility option. To use this utility, you must have the X Window System running. The application xconfig is really nothing but a Tcl/Tk graphics widget set providing borders, menus, dialog boxes, and the like. Its interface is used to wrap around data files that are parsed at execution time. Figure 39.3 shows the main menu of xconfig for the 2.6.7 kernel. Figure 39.3. The much nicer make xconfig GUI interface. We recommend that you use this interface if you are able. 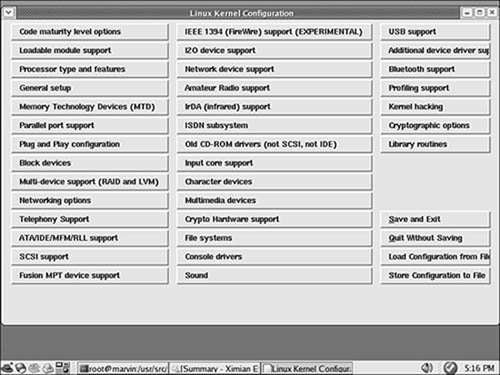
After loading this utility, you use it by clicking on each of the buttons that list the configuration options. Each button you click opens another window that has the detail configuration options for that subsection. Three buttons are at the bottom of each window: Main Menu, Next, and Prev(ious). Clicking the Main Menu button closes the current window and displays the main window. Clicking Next takes you to the next configuration section. When configuring a kernel from scratch, click the button labeled Code Maturity Level Options, and then continue to click the Next button in each subsection window to proceed through all the kernel configuration choices. When you have selected all options, the main menu is again displayed. The buttons on the lower right of the main menu are for saving and loading configurations. Their functions are self-explanatory. If you just want to have a look, go exploring! Nothing will be changed if you elect not to save it. If you are upgrading kernels from a previous release, it is not necessary to go though the entire configuration from scratch. Instead, you can use the make oldconfig directive; it uses the same text interface that make config uses, and it is noninteractive. It just prompts for changes for any new code. Using xconfig to Configure the Kernel For simplicity's sake, during this brisk walkthrough, we assume that you are using make xconfig. Prior to this point, we also assume that you have completed the first five steps in our kernel compilation checklist shown previously. As you learned in the preceding section, you configure the kernel using make xconfig by making choices in several configuration subsection windows. Each subsection window contains specific kernel options. With hundreds of choices, the kernel is daunting to configure. We cannot really offer you detailed descriptions of which options to choose because your configuration will not match your own system and setup. Table 39.1 provides a brief description of each subsection's options so that you can get an idea of what you might encounter. We recommend that you copy your kernel's .config file to /usr/src/kernels/linux-2.6 and run make xconfig from there. Explore all the options. As long as you do not save the file, absolutely nothing will be changed on your system. Table 39.1. Kernel Subsections for ConfigurationName | Description |
|---|
Code maturity level options | Enables development code to be compiled into the kernel even if it has been marked as obsolete or as testing code only. This option should only be used by kernel developers or testers because of the possible unusable state of the code during development. | General setup | Contains several different options covering how the kernel talks to the BIOS, whether it should support PCI or PCMCIA, whether it should use APM or ACPI, and what kind of Linux binary formats will be supported. Contains several options for supporting kernel structures necessary to run binaries compiled for other systems directly without recompiling the program. | Loadable module support | Determines whether the kernel enables drivers and other nonessential code to be compiled as loadable modules that can be loaded and unloaded at runtime. This option keeps the basic kernel small so that it can run and respond more quickly; in that regard, choosing this option is generally a good idea. | Processor type and features | Several options dealing with the architecture that will be running the kernel. | Power management | options Options dealing with ACPI and APM power management features. Bus options Configuration options for the PCMCIA bus found in laptops and PCI hotplug devices. | Memory Technology | Options for supporting flash memory devices, such as EEPROMS. | Devices (MTD) | Generally, these devices are used in embedded systems. | Parallel port support | Several options for configuring how the kernel will support parallel port communications. | Plug and Play configuration | Options for supporting Plug and Play PCI, ISA, and plug-and-play BIOS support. Generally, it is a good idea to support plug-and-play for PCI and ISA devices. | Block devices | Section dealing with devices that communicate with the kernel in blocks of characters instead of streams. This includes IDE and ATAPI devices connected via parallel ports, as well as enabling network devices to communicate as block devices. | ATA/IDE/MFM/RLL support | Large collection of options to configure the kernel to communicate using different types of data communication protocols to talk to mass storage devices, such as hard drives. Note that this section does not cover SCSI. | SCSI support | Options for configuring the kernel to support Small Computer Systems Interface. This subsection covers drivers for specific cards, chipsets, and tunable parameters for the SCSI protocol. | Old CD-ROM drivers(not SCSI, not IDE) | Configuration options to support obscure, older CD-ROM devices that do not conform to the SCSI or IDE standards. These are typically older CD-ROM drivers that are usually a proprietary type of SCSI. | Multi-device support (RAID and LVM) | Options for enabling the kernel to support RAID devices in software emulation and the different levels of RAID. Also contains options for support of a logical volume manager. | Fusion MPT device support | Configures support for LSI's Logic Fusion Message Passing Technology. This technology is for high performance SCSI and local area network interfaces. | IEEE1394 (FireWire) support | Experimental support for FireWire devices. | I20 device support | Options for supporting the Intelligent Input/Output architecture. This architecture enables the hardware driver to be split from the operating system driver, thus enabling a multitude of hardware devices to be compatible with an operating system in one implementation. | Networking options | Several options for the configuration of networking in the kernel. The options are for the types of supported protocols and configurable options of those protocols. | Amateur radio support | Options for configuring support of devices that support the AX25 protocol. | IrDA (infrared) support | Options for configuring support of the Infrared Data Association suite of protocols and devices that use these protocols. | Bluetooth support | Support for the Bluetooth wireless protocol. Includes options to support the Bluetooth protocols and hardware devices. | ISDN subsystem | Options to support Integrated Services Digital Networks protocols and devices. ISDN is a method of connection to a large area network digitally over conditioned telephone lines, largely found to connect users to ISPs. | Telephony support | Support for devices that enable the use of regular telephone lines to support VOIP applications. This section does not handle the configuration of modems. | Input core support | Options for configuring universal serial bus (USB) human interface devices (HIDs). These include keyboards, mice, and joysticks. | Character devices | Configuration options for devices that communicate to the server in sequential characters. This is a large subsection containing the drivers for several motherboard chipsets. | Multimedia devices | Drivers for hardware implementations of video and sound devices such as video capture boards, TV cards, and AM/FM radio adapter cards. | Graphics support | Configures VGA text console, video mode selection, and support for frame buffer cards. | Sound | Large subsection to configure supported sound card drivers and chipset support for the kernel. | USB support | Universal Serial Bus configuration options. Includes configuration for USB devices, as well as vendor-specific versions of USB. | File systems | Configuration options for supported file system types. Refer to Chapter 38 for a description of the file systems supported by the kernel. | Additional device driver support | Third-party patches. | Profiling support | Profiling kernel behavior information to aid in debugging and development. | Kernel hacking | Determines whether the kernel will contain advanced debugging options. Most users will not want to include this option in their production kernels because it increases the kernel size and slows performance by adding extra routines. | Security options | Determines whether NSA Security Enhanced Linux (SELinux) is enabled. | Cryptographic options | Support for cryptography hardware (Fedora patches not found in the vanilla kernel sources). | Library routines | Contains zlib compression support. |
After you select all the options you want, you can save the configuration file and continue with step 7 in the kernel compiling checklist shown earlier. Creating an Initial RAM Disk Image If you require special device drivers to be loaded in order to mount the root file system (for SCSI drives, network cards or exotic file systems, for example), you must create an initial RAM disk image named /boot/initrd.img. For most users, it is not necessary to create this file, but if you are not certain, it really does not hurt. We covered the initrd.img in Chapter 38. To create an initrd.img file, use the shell script /sbin/mkinitrd. The format for the command is the following: /sbin/mkinitrd file_name kernel_version
where file_name is the name of the image file you want created. mkinitrd looks at /etc/fstab, /etc/modprobe.conf, and /etc/raidtab to obtain the information it needs to determine which modules should be loaded during boot. For our system, we use # mkinitrd initrd-2.6.7-1.img 2.6.7-1
|