Using FTP Clients
| The FTP protocol allows users to connect to a server, read directories and filenames, and download and upload data. If the correct access rights are set, users can also create new folders and set access permissions on them. However, using FTP poses a security risk: Usernames and passwords are transmitted unencrypted across a LAN or the Internet. To stop users from taking the risk of giving their authentication details to anyone listening on the wire, many sites enable only anonymous FTP login and file retrieval. Many Linux users have turned to more secure alternatives, such as sshd and sftp or scp, included with the OpenSSH suite. The following sections discuss the different types of newer and traditional interfaces to FTP and their usage. Because they are part of the larger OpenSSH collection, the sftp and scp commands are covered in Chapter 19, "Remote Access with SSH and Telnet." The FTP Client InterfaceUsing the text-based FTP interface helps you understand what each action in a graphical FTP session does. This understanding can be handy when, for example, the graphic client does not automatically detect the file type being transferred. In this situation, a binary file is transferred as an ASCII file and is therefore useless. Conversely, an ASCII file transferred as a binary prints the ^M control character at the end of each line. This error typically occurs when transferring files from older Microsoft Windows operating systems to Linux because the Windows FTP client defaulted to ASCII, not binary transfers. Using the Text-Based FTP Client InterfaceSome of the following common commands may be used in a typical FTP session:
These are just some of the commands available during an FTP session. By typing help, the user can see a full list of valid commands. Typing help command-name displays a brief description of what that command does. Listing 24.1 shows the help output. Listing 24.1. The Commands Listed by help in an FTP Session
A Typical FTP Session Using the ftp CommandConnecting to a remote FTP server can require a username and password, but many servers also provide anonymous access. A properly configured remote FTP server responds quickly to FTP requests, and displays shared directories and files. This section shows a sample FTP session with a typical server found at many Internet sites (in this case, running the wu-ftpd server). You connect to a remote FTP server by using the ftp command along with either the IP address or hostname of the remote computer, like so: $ ftp pheniox Connected to pheniox. 220 pheniox FTP server (Version wu-2.6.1-18) ready. Name (pheniox:tdc): anonymous 331 Guest login ok, send your complete e-mail address as password. Password: 230 Guest login ok, access restrictions apply. Remote system type is UNIX. Using binary mode to transfer files. ftp> In this example, ftp is used to connect and then log in using anonymous access. This is done by entering the word anonymous at the Name prompt. After you press Enter, a password prompt is displayed. When using anonymous access, it is considered good form to enter your email address as a courtesy. There is no validation of the address entered, but many FTP servers are configured to accept only a valid email address form (that is, user@somewhere.com) if any text is typed at the prompt. Tip Many FTP servers accept a simple press of the Enter key at the password prompt if accessed anonymously. Now that a connection has been established and authenticated to the server, you can set up your FTP session to work the way you want it to. As mentioned in the previous section, the ftp command has many different built-in commands, which you can view by typing a question mark at the ftp> prompt. These commands can affect the session display, set the type of file transfer, or obtain information about the remote server. ftp> hash Hash mark printing on (1024 bytes/hash mark). ftp> prompt Interactive mode off. ftp> bin 200 Type set to I. In this example, you have told ftp to print a hash (#) character for every 1024 bytes that are transferred, turn off prompting, and set the transfer type to binary (which should be on by default). The hash character display provides a visual indicator of the progress of your downloads and uploads. Turning off prompting allows you to send and retrieve multiple files without the need to confirm each transfer. Setting the transfer type to binary ensures that binary files are transferred in the proper format instead of text, which means that executable files and pictures transfer correctly. Next, you ask the server to show a listing of what directories and files are available on the server: ftp> ls 200 PORT command successful. 150 Opening ASCII mode data connection for directory listing. total 32 d--x--x--x 2 root root 4096 Aug 31 07:15 bin d--x--x--x 2 root root 4096 Aug 31 07:15 etc d--x--x--x 2 root root 4096 Aug 31 04:44 lib d--x-x---x 2 root 50 4096 Sep 3 07:34 pub 226 Transfer complete.If directory permissions in the FTP repository are set correctly, the pub directory should be the only directory that shows any files under it. To verify this, change directories to etc and list the contents: ftp> cd etc 250 CWD command successful. ftp> ls 200 PORT command successful. 150 Opening ASCII mode data connection for directory listing. total 0 226 Transfer complete. By setting the permissions to execute only on the directories bin, lib, and etc, a system administrator can restrict users from seeing any files in those directories. Good security dictates that remote users be denied information about a system because any information could aid in hacking attempts. Now that you see the server is relatively secure, change directories to pub and list its contents: ftp> cd pub 250-Please read the file README 250- it was last modified on Sun Sep 2 19:25:47 2001 - 1 day ago 250 CWD command successful. ftp> ls 200 PORT command successful. 150 Opening ASCII mode data connection for directory listing. total 552 -rw-r--r-- 1 root 50 100 Sep 2 19:25 README -rw-r--r-- 1 root 50 8 Sep 3 07:33 configuration -rw-r--r-- 1 root 50 8 Sep 3 07:33 temp.txt -rw-r--r-- 1 root 50 15798 Sep 3 10:29 tftp-0.17-14.i386.rpm -rw-r--r-- 1 root 50 26011 Sep 3 10:30 tftp- server-0.17-14.i386.rpm -rw-r--r-- 1 root 50 219332 Sep 3 10:29 wu-ftpd- 2.6.1-22.i386.rpm226 Transfer complete. To transfer all the RPM files to your local machine, issue the mget *.rpm command: ftp> mget *.rpm local: tftp-0.17-14.i386.rpm remote: tftp-0.17-14.i386.rpm 200 PORT command successful. 150 Opening BINARY mode data connection for tftp-0.17-14.i386.rpm (15798 bytes).############### 226 Transfer complete. 15798 bytes received in 0.974 secs (16 Kbytes/sec) local: tftp-server-0.17-14.i386.rpm remote: tftp-server-0.17- 14.i386.rpm 200 PORT command successful. 150 Opening BINARY mode data connection for tftp-server-0.17- 14.i386.rpm (26011 bytes). ######################### 226 Transfer complete. 26011 bytes received in 2.5 secs (10 Kbytes/sec) local: wu-ftpd-2.6.1-22.i386.rpm remote: wu-ftpd-2.6.1- 22.i386.rpm 200 PORT command successful. 150 Opening BINARY mode data connection for wu-ftpd-2.6.1- 22.i386.rpm (219332 bytes). ################################################################# ################################################################# ################################################################# ################### 226 Transfer complete. 219332 bytes received in 50.3 secs (4.3 Kbytes/sec)As described before, the mget command transferred all files with the .rpm extension to our local machine. Furthermore, it did not prompt us to confirm each file because we turned off prompting. The ftp client printed a # for each 1024 bytes transferred to our machine. This is helpful when transferring over a slow connection because you get a visual reminder that your connection is still active. Tip After every action, the FTP server returns a status code and brief message showing the result of the command you issued. You can find a listing of all status codes and their corresponding messages in Request for Comments 959; you can access a copy of this listing at http://www.ietf.org/rfc/rfc959.txt. Now you are finished with this session; you can issue the command quit or bye to end the session. The FTP server informs you of how many bytes your session transfers, how many files, and the total transferred data (in bytes) between your local machine and the server. ftp> bye 221-You have transferred 503818 bytes in 5 files. 221-Total traffic for this session was 506422 bytes in 7 transfers. 221 Thank you for using the FTP service on pheniox.This is a simple example, but average FTP sessions are similarly trivial. Several other commands are available during an FTP session, but they are rarely used. FTP has the capability to take scripted input and define macros that allow for a much more complicated session. Tip The FTP info pages are much like the man (manual) pages shipped with almost every command in Linux. More detailed information may be found in the command's source code package. Using the lftp Command for File TransfersThe lftp command can be used for file transfers using FTP, HTTP, and various secure protocols such as HTTPS and HFTP if a remote proxy is enabled. Two great features of this command are the ability to restart a stalled download in the middle of a file transfer, as well as to start and run multiple downloads in a single session (with job control). For example, here is a simple session showing an HTTP retrieval from a remote computer running the Apache web server: $ lftp http://192.168.2.37 cd ok, cwd=/ lftp 192.168.2.37:/> ls -rw-r--r-- -- manual/mod/core.html -rw-r--r-- -- manual/index.html -rw-r--r-- -- icons/apache_pb.gif -rw-r--r-- -- poweredby.png lftp 192.168.2.37:/> get poweredby.png 1154 bytes transferred lftp 192.168.2.37:/> bye The lftp command can also be used as a traditional FTP client, but with some interesting features: $ lftp 192.168.2.67 -u phudson Password: lftp phudson@192.168.2.67:~> cd /d2/isos/redhat/limbo cd ok, cwd=/d2/isos/redhat/limbo lftp phudson@192.168.2.67:/d2/isos/redhat/limbo> mget disc1 & [0] mget *disc1* & lftp phudson@192.168.2.67:/d2/isos/redhat/limbo> jobs [0] mget *disc1* 'limbo-i386-disc1.iso' at 56436448 (8%) 1.08M/s eta:9m [Receiving data] lftp phudson@192.168.2.67:/d2/isos/redhat/limbo> bye [1843] Moving to background to complete transfers... $ ps aux | fgrep lftp phudson 1843 7.6 1.0 5456 2404 ? S 19:09 0:02 lftp 192.168.2.67 A username (and password) can be passed on the command line using the -u option. You can use this feature to reduce the amount of interactive typing required when retrieving remote files, as an aid when using lftp in shell scripts, and when retrieving files with lftp as a background process. By using an ampersand (&), the retrieval is conducted in the background, as shown in the preceding example. The jobs command is used to show current transfers. If a user logs out of the session (using the bye command), the file transfer continues as a background process if it has not completed. (This is verified by using the ps command.) The lftp client has many additional features that can make the job of transferring files easier than using other FTP clients. Note Another handy text-based file transfer utility included with Fedora is curl, which supports HTTP for file retrieval. Using the wget Command for File TransfersThe wget command is used for file transfers using FTP, HTTP, and various secure protocols such as HTTPS and HFTP if a remote proxy is enabled. However, wget supports only noninteractive transfers, unlike other FTP clients. This is actually a feature because wget can be used to download files as a background process and to recursively replicate remote file directories. The command also supports download completion of partially downloaded files, which can save a lot of time during periods of intermittent connectivity or broken connections. For example, here is a simple invocation showing FTP retrieval from a remote computer using wget and an FTP URL: $ wget ftp://phudson:mypasswd@stinky/mp3/* --13:13:28- - ftp://phudson:*password*@stinky/mp3/* => '.listing' Resolving stinky... done. Connecting to stinky[192.168.2.33]:21... connected. Logging in as phudson ... Logged in! ==> SYST ... done. ==> PWD ... done. ==> TYPE I ... done. ==> CWD /home/paul/mp3 ... done. ==> PORT ... done. ==> LIST ... done. [ <=> ] 648 632.81K/s 13:13:28 (632.81 KB/s) - '.listing' saved [648] Removed '.listing'. --13:13:28- - ftp://phudson:*password*@stinky/mp3/C31821-01A.mp3 => 'C31821-01A.mp3' ==> CWD not required. ==> PORT ... done. ==> RETR C31821-01A.mp3 ... done. Length: 5,172,089 60% [=====================> ] 3,123,680 264.80K/s ETA 00:07In this example, the user retrieves all files in a directory named mp3 (under /home/paul) on the remote host named stinky. The wget command first retrieves a directory listing, and then proceeds to download the specified files (all marked with * in this example). Note that you can specify a username and password (mypasswd in the example) on the command. This generally is not a good idea. A better, but still not really secure, approach is to save the password in a file named .wgetrc in your home directory. See the wget man page for more information, or check the only documentation at http://www.gnu.org/software/wget/manual/wget-1.8.1/html_mono/wget.html. Tip Another popular use for wget is downloading complete copies of websites for offline reading, although it is not very friendly toward website owners who have to pay for all the bandwidth! To download an entire site, you need to specify the --mirror, --convert-links, and -p parameters, followed by the URL of the site to download. The first parameter tells wget to download all the pages and pictures from the site, following links as it can. The second tells it to rewrite the HTML so that it works when browsed locally. The last parameter, -p, tells wget to download all the files referenced in the HTML, such as sounds, CSS files, and other related documents. You might also want to specify the -w parameter, which allows you to specify a number of seconds between individual wget requests; this stops your download from overloading the web server. So, the complete command to download a website (for example, www.example.com) would be wget --mirror --convert-links -p -w 2 http://www.example.com/. Using Graphical FTP ClientsMany graphical FTP clients are available for Linux. Fedora includes the graphical gFTP client and network-aware browsers included with GNOME and KDE. These browsers feature built-in drag-and-drop capability, thus ensuring FTP functionality. Other graphical interface clients that can be used for FTP include the Mozilla web browser, KDE's Konqueror, GNOME's Epiphany, and the Nautilus file manager. Using the gFTP InterfaceThe GNOME gFTP client provides all the typical features of FTP, including the capability to save profiles of common connections. Figure 24.1 shows a typical gFTP session in action. On the left panel is the local host, and on the right panel is the remote server. A connection is initiated by typing the address of the host into the host field, a specific port if not the standard FTP port (21), a valid username for the server, and a password. After the information is entered, clicking the icon that looks like a monitor starts the connection to the server. The bottom panel displays session information, such as changing directories, as shown in Figure 24.1. Figure 24.1. A typical gFTP session.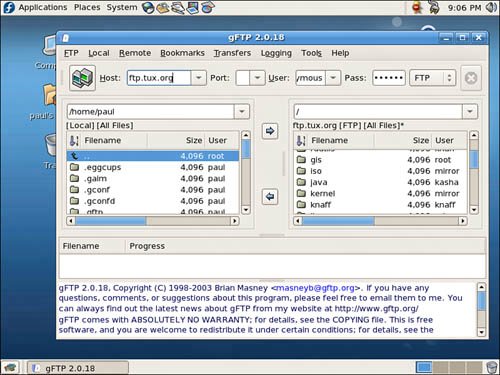 gFTP sets the file type as binary by default, which can be changed by clicking ASCII in the FTP drop-down menu. To upload a file to the server, the user clicks a filename in the left panel and clicks the right arrow icon. The file is then transferred to the server, and the right panel is updated to reflect this new file being added to the server. Similarly, to download a file from the server, the user selects the correct file type from the drop-down menu, selects the file to be downloaded, and clicks the left arrow icon. The left panel is then updated to show the result of the transfer, with logging information shown in the bottom panel. After all files are uploaded or downloaded, you must close the session. Do this by clicking the red button on the top right of the application window to issue the quit command. gFTP displays the session summary information in the log panel at the bottom of the application. You can also close the session simply by exiting gFTP. FTP Sessions with Konqueror and NautilusBoth KDE and GNOME file browsers have integrated FTP functionality built in. Use an ftp:// URL followed by a server name or IP address to start an anonymous FTP session. The drag-and-drop feature of KDE and the GNOME window manager allows users to select remote files and drag them to the desktop. KDE's Konqueror web browser is capable of handling a number of networking and file transfer protocols, including FTP. You can configure various settings for this browser, such as the appearance of the browser's toolbar, but one of Konqueror's best features is its flexibility for file transfers. Start the browser by clicking its icon on the KDE's kicker desktop panel or by typing the following at the command line: $ konqueror &After launching the client, you can use the ftp:// URL form to access remote servers, as shown in Figure 24.2. Figure 24.2. KDE's Konqueror web browser can access remote FTP servers.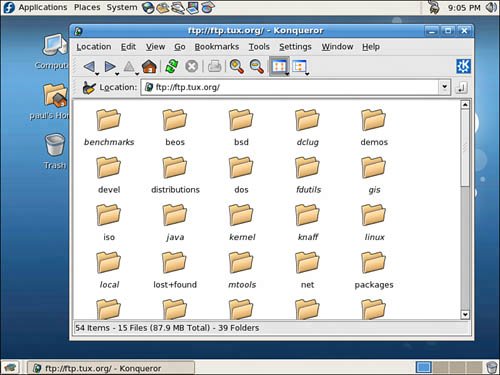 If your window manager does not support drag and drop, you can use Konqueror's Copy Files feature to retrieve a file. First, you type in an FTP URL (such as ftp://ftp.tux.org). Next, navigate to a desired directory and click to select a desired file. You then click the Edit menu's Copy Files menu item (or press F7). A Save dialog appears, and you can select your home directory to save the file. After you press Enter, a file download progress dialog is displayed while the file is being retrieved. You can also use the Nautilus browser to retrieve files from a remote server. Figure 24.3 shows an anonymous login to a remote FTP server using Nautilus. Browse to a remote FTP server by going to the File menu, and then selecting Connect to Server (Public FTP is the default server type). Simply click to select a file, select Copy from the Edit menu (or press Ctrl+C), click to go to your home directory (using the icon in the Nautilus toolbar), and then click Paste (or press Ctrl+V) to retrieve and save the file. Figure 24.3. The Nautilus file browser can be used for FTP sessions.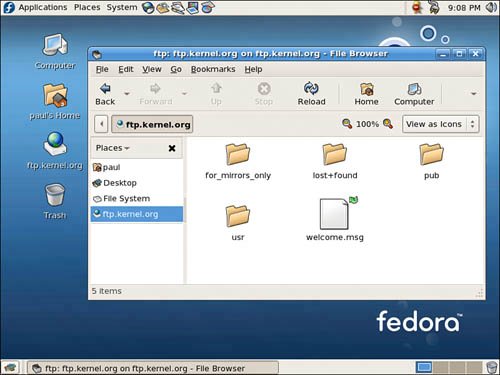 These types of intuitive features can shield users from needing to know the details of how FTP works or memorizing various commands. |
EAN: 2147483647
Pages: 362