Creating Network Printers
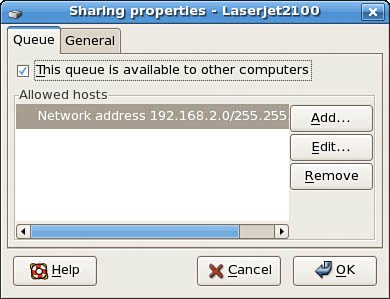
| Setting up remote printing service involves configuring a print server and then creating a remote printer entry on one or more computers on your network. This section introduces a quick method of enabling printing from one Linux workstation to another Linux computer on a LAN. You also learn about SMB printing using Samba and its utilities. Finally, this section discusses how to configure network-attached printers and use them to print single or multiple documents. Enabling Network Printing on a LANTo set up printing from one Linux workstation to another across a LAN, you need root permission and access to both computers, but the process is simple and easy to perform. First, log in or ssh to the computer to which the printer is attached. This computer will be the printer server. Use the hostname or ifconfig commands to obtain the hostname or IP address and write down or note the name of the printer queue. If the system uses LPRng instead of CUPS, you need to edit the file named /etc/lpd.perms. Scroll to the end of the file and look for the remote permission entry: # allow local job submissions only REJECT SERVICE=X NOT SERVER Remote printing is not enabled by default, so you must comment out the service reject line with a pound sign (#): # allow local job submissions only #REJECT SERVICE=X NOT SERVER Save the file, and then restart the lpd daemon. This enables incoming print requests with the proper queue name (name of the local printer) from any remote host to be routed to the printer. After you finish, log out and go to a remote computer on your LAN without an attached printer. Tip LPRng, like CUPS, can be configured to restrict print services to single hosts, one or more specific local or remote users, all or part of a domain, or a LAN segment (by specifying an IP address range). An entry in /etc/lpd.perms, for example, to allow print requests only from hosts on 192.168.2.0, would look like this: ACCEPT SERVICE=X REMOTEIP=192.168.2.0/255.255.255.0 The lpd.perms man page (included as part of the LPRng documentation) contains an index of keywords you can use to craft custom permissions. Don't forget to restart the lpd daemon after making any changes to /etc/lpd.perms (or /etc/lpd.conf). If the computer with an attached printer is using Fedora and you want to set up the system for print serving, again use the system-config-printer client. You can create a new print queue, but the easiest approach is to edit settings for an existing queue and enable sharing of the printer. To enable sharing, start system-config-printer, and then click the name of the printer to be shared over your network. Click Sharing from the Action menu to open the dialog box shown in Figure 23.7. Figure 23.7. Sharing allows you to offer a locally attached printer as a remote printer on your network. Click the check box in the dialog box to allow sharing of the printer. By default, all remote hosts will be allowed access, but you can edit the settings to add, remove, or specify host access to your printer. Click the Edit button to specify access over a network interface (such as eth0, eth1, and so on), a range of IP addresses, or a specific host. Tip If you will share your CUPS-managed printer with other Linux hosts on a LAN using the Berkeley-type print spooling daemon, lpd, check the Enable LPD Protocol item under the Sharing dialog box's General tab. Next, check that the file cups-lpd under the /etc/xinetd.d directory contains the setting disable = no and then restart xinetd. This enables CUPS to run the cups-lpd server and accept remote print jobs sent by lpd from remote hosts. Do not forget to save your changes and restart CUPS! When finished, click the OK button and then select Quit from the Action menu to exit. To create a printer queue to access a remote UNIX print server, use system-config-printer to create a printer but select the Networked UNIX (LPD) type. Click Forward and enter a printer name and description; you are then asked to enter the hostname (or IP address) of the remote computer with a printer, along with the printer's queue name, as shown in Figure 23.8. Figure 23.8. Enter the hostname or IP address of the remote computer with a printer, along with the remote printer's queue name.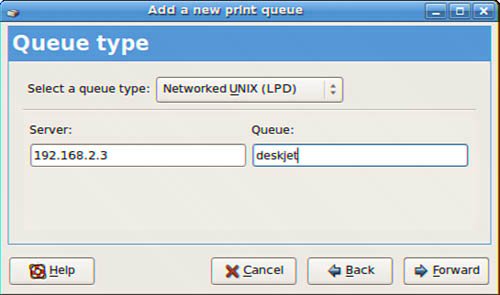 Note Browse to http://www.faqs.org/rfcs/rfc1179.html to read more about using the Strict RFC1179 Compliance option when configuring Fedora to be able to print to a remote UNIX printer. This 13-year-old Request For Comments (RFC) document describes printing protocols for the BSD line-printer spooling system. The option is used to allow your documents to print to remote servers using the older print system or software conforming to the standard. Click the Forward button after entering this information; then continue to configure the new entry as if the remote printer were attached locally (use the same print driver setting as the remote printer). When finished, do not forget to save the changes! You can also test the new remote printer by clicking the Tests menu item and using one of the test page items, such as the ASCII or PostScript test pages. The ASCII test page prints a short amount of text to test the spacing and page width; the PostScript test page prints a page of text with some information about your printer, a set of radia lines one degree apart, and a color wheel (if you use a color printer). Session Message Block PrintingPrinting to an SMB printer requires Samba, along with its utilities such as the smbclient and associated smbprint printing filter. You can use the Samba software included with Fedora to print to a shared printer on a Windows network or set up a printer attached to your system as an SMB printer. This section describes how to create a local printer entry to print to a remote shared printer using SMB. Setting up an SMB or shared printer is usually accomplished under Windows operating systems through configuration settings using the Control Panel's Network device. After enabling print sharing, reboot the computer. In the My Computer, Printers folder, right-click the name or icon of the printer you want to share and select Sharing from the pop-up menu. Set the Shared As item, and then enter a descriptive shared name, such as HP2100, and a password. You must enter a shared name and password to configure the printer when running Linux. You also need to know the printer's workgroup name, IP address, and printer name and have the username and password on hand. To find this information, select Start, Settings, Printers; then right-click the shared printer's listing in the Printers window and select Properties from the pop-up window. On your Fedora system, use system-config-printer to create a new local printer queue and assign it a name; then select the Networked Windows (SMB) type in the Add a New Print Queue dialog box. Click the drop-down list by the name of any active Samba server on your LAN (mini in the example shown in Figure 23.9). SMB printers offered by the server appear in the drop-down list and can be selected for use, or you can click the Specify button and create your own entry. When you click Forward, you are asked to enter a username and password for the remote share if passwords are required. Figure 23.9. Create a shared remote printer using required information for Windows.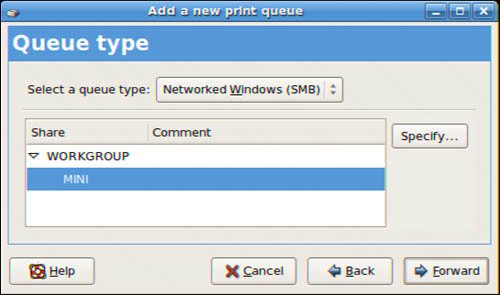 Click Forward, and then create a printer queue with characteristics that match the remote printer. (For example, if the remote printer is an HP 2100 LaserJet, select the driver listed for that device in your configuration.) Network-Attached Printer Configuration and PrintingFedora supports other methods of remote printing, such as using a Novell NetWare-based print queue or using a printer attached directly to your network with an HP JetDirect adapter. Some manufacturers even offer Linux-specific drivers and help. For example, HP/Compaq provides graphical printer configuration tools and software drivers for other Linux distributions at http://h20000.www2.hp.com/bizsupport/TechSupport/Home.jsp. You can set up network-attached printing quickly and easily using a variety of devices. For example, NETGEAR's PS101 print server adapter works well with Linux. This tiny device (a self-hosted print server) is an adapter that directly attaches to a printer's Centronics port, eliminates the use of a parallel-port cable, and enables the use of the printer over a network. The PS101 offers a single 10Mbps ethernet jack and, after initial configuration and assignment of a static IP address, can be used to print to any attached printer supported by Fedora. A JetDirect- or UNIX-based configuration using system-config-printer can be used to allow you to print to the device from Fedora or other remote Linux hosts. To see any open ports or services on the device, use the nmap command with the print server adapter's IP address like this: $ nmap 192.168.2.52 Starting nmap V. 2.54BETA22 ( www.insecure.org/nmap/ ) Interesting ports on (192.168.2.52): (The 1536 ports scanned but not shown below are in state: closed) Port State Service 21/tcp open ftp 23/tcp open telnet 80/tcp open http 139/tcp open netbios-ssn 515/tcp open printer 9100/tcp open jetdirect Nmap run completed -- 1 IP address (1 host up) scanned in 10 secondsTo configure printing, select system-config-printer's JetDirect option; then specify the device's IP address (192.168.2.52 in the example) and port 9100 (as shown previouslyyou are clued that this is the right port by the Service entry, which states jetdirect in the example). Alternatively, you can configure the device and attached printer as a UNIX-based print server, but you need to use PS1 as the name of the remote printer queue. Note that the device hosts a built-in web server (HTTP on port 80); you can administer the device by browsing to its IP address (such as http://192.168.2.52 in the example). Other services, such as FTP and Telnet, are supported but undocumented: $ telnet 192.168.2.52 Trying 192.168.2.52... Connected to 192.168.2.52 (192.168.2.52). Escape character is '^]'. Welcome to Print Server PS>monitor (P1)STATE: Idle TYPE: Parallel PRINTER STATUS: On-Line PS>exit Connection closed by foreign host. Tip Curiously, NETGEAR does not promote the PS101 as Linux-supported hardware even though it works. Other types of network-attached print devices include Bluetooth-enabled printers and 802.11b wireless ethernet print servers such as TRENDnet's TEW-PS3, HP/Compaq's parallel-port-based WP 110, and the JetDirect 380x with USB. As always, research how well a product, such as a printer or print server, works with Linux before purchasing! |
EAN: 2147483647
Pages: 362