System Rescue
| There will come a time when you need to engage in system rescue efforts. This need arises when the system will not even start Linux so that you can recover any files. This problem is most frequently associated with the boot loader program or partition table, but it could be that critical system files have been inadvertently deleted or corrupted. If you have been making backups properly, these kinds of system failures are easily, although not quickly, recoverable through a full restore. Still, valuable current data might not have been backed up since the last scheduled backup, and the backup archives are found to be corrupt, incomplete, or missing. A full restore also takes time you might not have. If the problem causing the system failure is simply a damaged boot loader, a damaged partition table, a missing library, or misconfiguration, a quick fix can get the system up and running and the data can then be easily retrieved. In this section, we will first examine a way to back up and restore the boot loader itself or, having failed to do that, restore it by hand. Then we will look at a few alternatives to booting the damaged system so that we can inspect it, fix it, or retrieve data from it. The Fedora Rescue DiscFedora provides a rescue disc hidden in the installation DVD. To use it, insert the disc and reboot the computer, booting from the DVD just as you did when you installed Fedora originally. At the intro screen, press the F1 key to see all the available choices, but simply enter linux rescue at the LILO boot prompt to enter rescue mode like so: boot: linux rescue You will learn more about the rescue mode later in this section, but feel free to explore it at any time. A graphical interface is not available, so you will need to bone up on your command-line skills. If necessary, you can perform all the operations discussed in this section from rescue mode. Backing Up and Restoring the Master Boot RecordThe Master Boot Record (MBR) is the first 512 bytes of a hard disk. It contains the boot loader code in the first 446 bytes and the partition table in the next 64 bytes; the last two bytes identify that sector as the MBR. The MBR can become corrupted, so it makes sense to back it up. This example uses the dd command as root to back up the entire MBR. If the boot loader code changes from the time you make this image and restore the old code, the system will not boot when you restore it all; it is easy enough to keep a boot floppy disk handy and then rerun LILO if that is what you are using. To copy the entire MBR to a file, use this: # dd if=/dev/hda of=/tmp/hdambr bs=512 count=1 To restore the entire MBR, use this: # dd if=/tmp/hdambr of=/dev/hda bs=512 count=1 To restore only the partition table, skipping the boot loader code, use this: # dd if=/tmp/hdambr of=/dev/hda bs=1 skip=446 count=66 Of course, it would be prudent to move the copy of the MBR to a floppy disk or other appropriate storage device. (The file is only 512 bytes in size.) You will need to be able to run dd on the system to restore it (which means that you will be using the Fedora rescue disc, as described later, or any equivalent to it). Manually Restoring the Partition TableA different way of approaching the problem is to have a printed copy of the partition table that can then be used to restore the partition table by hand using the Fedora rescue disc and the fdisk program. We can create a listing of the printout of the partition table with fdisk using the -l option (for list), as follows: # fdisk /dev/hda -l > /tmp/hdaconfig.txt or send the listing of the partition table to the printer: # fdisk /dev/hda -l | kprinter We could also copy the file /tmp/hdaconfig.txt to the same backup floppy disk as the MBR for safekeeping. Now that we have a hard copy of the partition table (as well as having saved the file itself somewhere), it is possible to restore the MBR by hand at some future date. Use the Fedora Rescue Disc for this process. After booting into rescue mode, you have the opportunity to use a menu to mount your system read/write, not to mount your system, or to mount any found Linux partitions as read-only. If you plan to make any changes, you will need to have any desired partitions mounted with write permission. After you are logged on (you are root by default), start fdisk on the first drive: # fdisk /dev/had Use the p command to display the partition information and compare it to the hard copy you have. If the entries are identical, you have a problem somewhere else; it is not the partition table. If there is a problem, use the d command to delete all the listed partitions. Now use the n command to create new partitions that match the partition table from your hard copy. Make certain that the partition types (ext2, FAT, swap and so on) are the same. If you have a FAT partition at /dev/hda1, make certain that you set the bootable flag for it; otherwise, Windows or DOS will not boot. If you find that you have made an error somewhere along the way, just use the q command to quit fdisk without saving any changes and start over. Without specifically telling fdisk to write to the partition table, no changes are actually made to it. When the partition table information shown on your screen matches your printed version, write the changes to the disk with the w command; you will be automatically exited from fdisk. Restart fdisk to verify your handiwork, and then remove the rescue disc and reboot. It helps to practice manually restoring the partition table on an old drive before you have to do it in an emergency situation. Booting the System from the Rescue DiscFor advanced Linux users, you can use the rescue disc to boot the system (rather than boot the rescue operating system on the DVD) if the boot loader code on your computer is damaged or incorrect. To use the Rescue DVD to boot your system from /dev/hda1, for example, first boot the disc and press the F1 key. At the LILO prompt, enter something similar to this example. Note that you are simply telling the boot loader what your root partition is. boot: linux rescue root=/dev/hda1Booting the System from a Generic Boot Floppy DiskIf you failed to make a boot floppy disk or cannot locate the one you did make, any Linux boot floppy disk (a slightly older version or one borrowed from a friend) can be pressed into service as long as it has a reasonably similar kernel version. (The major and minor numbers matchfor example, 2.6.5 would likely work with any 2.6 system, but not with a 2.4 system.) You would boot your system by manually specifying the root and boot partitions as described previously. Although you are almost guaranteed to get some error messages, you might at least be able to get a base system running enough to replace files and recover the system. Tip In both preceding cases, it is assumed that you do not need any special file system or device drivers to access the root partition. If you do, add the initrd= argument to the LILO line pointing to the appropriate initrd file on your system. If you do not know the exact name of the initrd file, you are out of luck with LILO, so learn to use a GRUB boot floppy disk as well. Using a GRUB Boot Floppy DiskThe GRand Unified Boot (GRUB) loader can attempt to boot a system from a floppy disk without a viable custom-made boot floppy disk. The image for the floppy disk can be downloaded from ftp://alpha.gnu.org/gnu/grub/grub-0.95-i386-pc.ext2fs and copied to a floppy disk using dd. (rawrite.exe would be used on a Microsoft system.) Or, if you have a boot floppy disk from an existing system using GRUB, that one will work as well. GRUB has its own command shell, file system drivers, and search function (much like command completion in the bash shell). It is possible to boot using the GRUB floppy disk, examine the drive partitions, and search for the kernel and initrd image as well, using them to boot the system. Worthy of a chapter all its own, the GRUB documentation is extensive: In addition to info grub (the info system is similar to the man system for documentation), the GRUB documents contain a tutorial worth reading. The flexibility and power of GRUB are what influenced Red Hat to make it the default boot loader for Fedora. The GRUB loader is shown in Figure 17.5. Figure 17.5. The GRUB loader gives you incredible flexibility in booting even unfamiliar systems.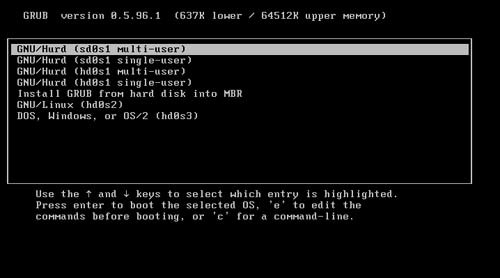 Using the Recovery Facility from the Installation DiscAs in the previous example, use the linux rescue command at the LILO boot prompt (:) to launch the DVD in rescue mode. Rescue mode runs a version of Fedora from the DVD that is independent of your system. It permits you to mount your root partition for maintenance. This alternative is useful when your root partition is no longer bootable because something has gone wrong. Fedora is constantly improving the features of the Recovery Facility. On beginning the rescue mode, you get your choice of language and keyboard layouts. You are given an opportunity to configure networking in rescue mode and are presented with a nice ncurses-based form to fill in the information. The application attempts to find your existing partitions and offers you a choice of mounting them read-write, readonly (always a wise choice the first time), or skip any mounting and drop to a command prompt. With multiple partitions, you must then indicate which is the root partition. That partition is then mounted at /mnt/sysimage. When you are finally presented with a command prompt, it is then possible to make your system the root file system with # chroot /mnt/sysimage To get back to the rescue file system, type exit at the prompt. To reboot, type exit at the rescue system's prompt. The rescue function does offer support for software RAID arrays (RAID 0, 1, and 5), as well as IDE or SCSI partitions formatted as ext2/3. After asking for input if it is unsure how to proceed, you eventually arrive at a command shell as root; there is no login or password. Depending on your configuration, you might or might not see prompts for additional information. If you get lost or confused, you can always reboot. (It helps to practice the use of the rescue mode.) In rescue mode, a number of command-line tools are available for you, but no GUI tools are provided. For networking, you have the ifconfig, route, rcp, rlogin, rsh, and ftp commands. For archiving (and restoring archives), gzip, gunzip, dd, zcat, and md5sum commands are there. As for editors, vi is emulated by BusyBox and pico, jmacs, and joe are provided by the joe editor. There are other useful system commands. A closer look at these commands reveals that they are all links to a program called BusyBox (home page at http://www.busybox.net/). BusyBox provides a reasonably complete POSIX environment for any small or embedded system. The utilities in BusyBox generally have fewer options than their full-featured GNU cousins; however, the included options "provide the expected functionality and behave very much like their GNU counterparts." This means that you should test the rescue mode first to see whether it can restore your data and check which options are available to you because the BusyBox version will behave slightly different from the full GNU version. (Some options are missing; some options do not work quite the sameyou need to know whether this will affect you before you are in an emergency situation.) There are a few useful tricks to know when using rescue mode. If your system is functional, you can use the chroot command to change the root file system from the CD to your system in this manner: # chroot /mnt/sysimage You will find yourself at a new command prompt with all your old files inhopefullythe right place. Your familiar toolsif intactshould be available to you. To exit the chrooted environment, use the exit command to return to the rescue system prompt. If you use the exit command again, the system will reboot. The rescue environment provides a nice set of networking commands and network-enabled tools such as scp, sftp, and some of the rtools. It also provides rpm, which can fetch packages over a network connection. Installing them is tricky because you want them installed in the file system mounted at /mnt/sysimage, not at /. To accomplish that, use the --root argument to set an alternative path to root: # rpm -ivh --root /mnt/sysimage ftp://location/package.rpm
|
EAN: 2147483647
Pages: 362