| If you are a Flash MX 2004 or Director MX user, have edited video or audio, or worked with other applications that have a time-based focus, you are quite used to working with a timeline. In simple terms, a timeline gives you a graphical overview of the time used by each object on a slide. Moving objects on the timeline affect when they appear on the slide, and lengthening or shortening their size on the timeline affects how long they remain visible. This is exactly the way the Captivate timeline operates. To open and close the timeline 1. | Open a Captivate movie and open a slide in the Edit View panel.
| 2. | Click the Splitter at the top of the Edit View panel (Figure 4.1).
Figure 4.1. Click the Splitter button of a slide in the Edit View panel to open the Captivate Timeline. 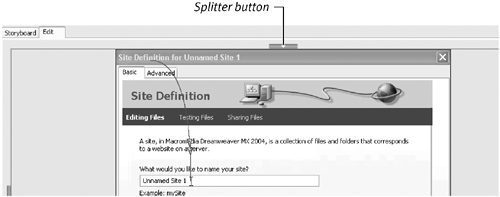
The Captivate timeline opens.
| 3. | Click the Splitter again to close the timeline.
|
Touring the Captivate timeline Though it may look a little complicated, at first glance, the Captivate timeline (Figure 4.2) is actually quite intuitive. Each object in a slide is contained in its own layer. The length of the strip indicates the duration of the object; objects with longer strips are visible for longer than objects with shorter strips. Figure 4.2. The Captivate Timeline. 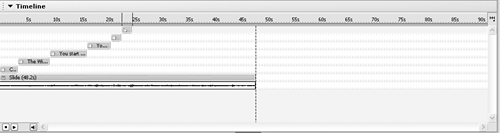
Rolling the mouse over an object on the timeline displays a tool tip that shows the start and end time of the object and, in the case of a caption, the caption text. There will be occasions where you want an object to appear at a particular point in time. You can do this using the playhead. You can also drag the playhead across the timeline. This technique, called scrubbing, lets you test a slide to ensure everything on the slide is where it is supposed to be and appear when it is supposed to appear. The object type of each element on the slide is indicated by an icon. Mouse objects have mouse icons, captions have caption icons, sounds show the waveform, and so on. The order of appearance is determined by the object's location in the timeline. Objects on the left side of the timeline appear before objects on the right side. You can move objects, in their layer, to right or the left, but you can't move them up or down to other layers in the timeline. You can only move the layer. Also, you can delete objects from the timeline which also removes the object's layer from the timeline. For precise positioning on the timeline, you can expand or contract the timeline view. Selecting an object on the timeline also selects it in the Edit View panel. To collapse or open the timeline view 1. | With the timeline open, click the down arrow beside the word Timeline at the top of the timeline. The timeline closes (Figure 4.3).
Figure 4.3. The timeline can be collapsed or opened by clicking the arrow beside the word "Timeline." 
| 2. | Click the arrow again to expand the timeline.
|
 Tip Tip
To expand or contract the timeline view 1. | With the timeline open, click the Timeline View button once.
The "Timeline view options" menu (Figure 4.4) opens.
Figure 4.4. Click the Timeline View button (A) and choose which view is appropriate. 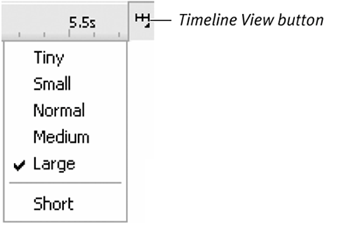
| 2. | Make selections using the following options:
Select Tiny to shorten the timeline view to increments of 5 seconds. Select Small to increase the view to 1-second increments. Select Normal (the default) to add increments of one-tenth of a second to the timeline. Select Medium to view the timeline in half-second increments. Select Large to view the timeline in one-tenth-of-a-second increments. Select Short to compress the height of the layers in the timeline. This is useful if there are a lot of objects contained in the slide.
|
Once you make your choice, the timeline changes to the view selected. To move objects on the timeline 1. | Select the object on the timeline.
The cursor changes to a grabber hand when it is over the object.
| 2. | Drag the object to the right or the left.
| 3. | Release the mouse.
|
In Figure 4.5, you can see the value of being able to drag objects on the timeline and place them in different locations. The "step" pattern indicates the appearance of the objects as the slide plays. The object that is the bottom step will have played and disappeared before the object in the next step. Figure 4.5. Objects are placed in their own layer and can be moved to the right or left on the timeline. They can't be moved to other layers in the same timeline. 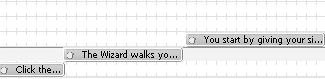
To change the duration of a slide 1. | Open a slide in the Edit view and open the timeline.
| 2. | If necessary, scroll to the end of the timeline or change the slide view to Tiny or Small.
The dotted line indicates the end of the slide.
| 3. | Roll the cursor over the right edge of the slide object on the timeline.
Your cursor will change to a split cursor (Figure 4.6).
Figure 4.6. You can change the duration of a slide on the timeline when you see the split cursor. 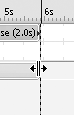
| 4. | Click and drag the split cursor to the right to decrease the slide duration or to the left to increase the slide duration.
|
Tips
To change the duration of an object 1. | Open a slide in the Edit View panel and open the timeline.
| 2. | Roll the cursor over the left side or the right side of an object on the timeline.
Your cursor changes to a split cursor (Figure 4.7).
Figure 4.7. You can change the duration of an object by dragging an edge inward or outward on the timeline. 
| 3. | If your split cursor is on the right side of the object, click and drag the split cursor to the right to increase the object's duration or to the left to decrease duration. If your split cursor is on the left side of the object, click and drag the split cursor to the right to decrease the object's duration or to the left to increase the duration.
|
Tip
To align objects to the playhead 1. | Drag the playback head to the 2-second mark on the timeline.
| 2. | Right-click the object to be moved.
The context menu opens.
| 3. | Select Align to Playhead (Figure 4.8).
Figure 4.8. You can align objects on the timeline to the position of the playhead. 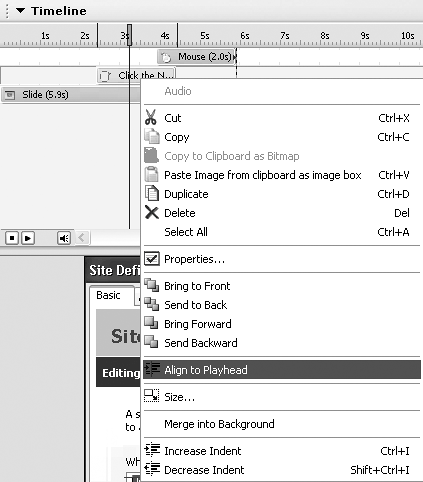
The selected object will snap to the right side of the playhead on the timeline.
|
|