Working with Files and Directories
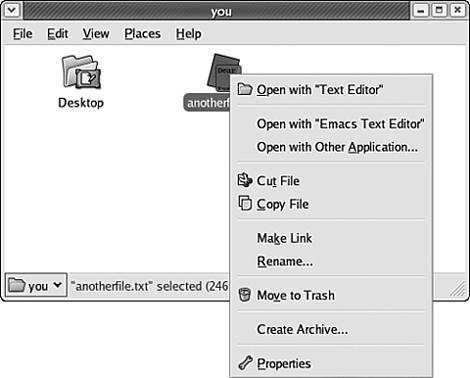
| You've learned to make your way around the file system now; it's time to get to work. To open, copy, cut, move, or otherwise operate on files you see in the file manager, you use the context menua menu that shows all the things that you can do to the file in question. To show the context menu for a given file, right-click the file's icon (position your cursor over the icon and click the button on the right of the mouse or trackball). The context menu often changes from file to file because it always displays only the actions that you can perform on the file you clicked; if you right-click a text file, for example, you see options associated with text files and the text editor. To see a context menu in action, right-click anotherfile.txt. This action displays the context menu shown in Figure 5.10. Figure 5.10. The context menu for text files is displayed when you right-click the file anotherfile. txt.
You can choose any option in a context menu by clicking it. Here's what the options in the context menu do:
You learn more about using these and other menu options in the sections that follow.
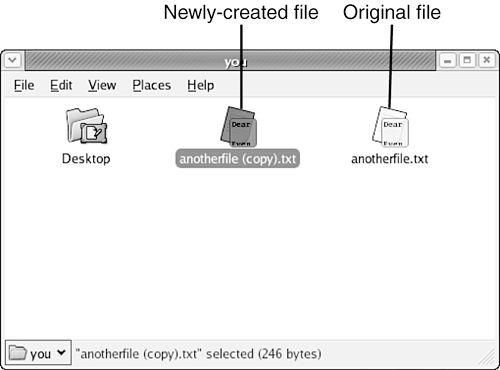
Opening an Existing FileTo reopen the file anotherfile.txt for editing in the text editor application, simply double-click its icon in the file manager window or right-click its icon and select the first option, Open with Text Editor. The text editor opens, the file is loaded, and you can now edit and save the file again at your discretion. The Open with Other Application option displays a list of other programs that can be used to open the file. These other programs include the much more powerful OpenOffice applications suite, similar to Microsoft Office in many ways; you learn more about OpenOffice in Chapters 8 through 10. Cutting, Copying, and Pasting FilesIf you have worked extensively in Word, WordPerfect, or other common word processing programs, you may be familiar with the cut, copy, and paste functions. If not, you won't have any trouble learning to use these functions; they provide a simple way to move text in a document, but you can also use them to move files from one directory or location to another in the Fedora Core 4 file manager. You can use the Copy File command to copy a file to another directory without removing the file from its original location. To duplicate a file, right-click it to produce the context menu and then choose Copy File. Navigate to the directory where you want the file's duplicate to appear and right-click any empty space in the window. In the context menu that appears, choose Paste Files. A duplicate of the file is created in the currently displayed directory using the same filename as the original. You also can use the context menu to remove a file from its current location and place it in a new directory. To move a file, right-click its icon and then choose Cut File. The file manager window displays a notice at the bottom of the window indicating that the file will be moved when you select the Paste Files command. Navigate to the directory where you want to place the file, right-click in empty window space, and choose Paste Files from the context menu. The file is copied to the currently displayed directory and then deleted from its original location. You can also use this functionality to duplicate an existing file. To do so, simply copy it and then paste it again in the same directory. A new copy of the file will be created, as shown in Figure 5.11. Figure 5.11. When you create a duplicate file, the new file is stored with the same name and the word "copy" in parentheses.
Selecting Multiple FilesMany of the context menu and drag-and-drop operations discussed here can be performed on a number of files simultaneously. Simply use the file manager to select more than one file at a time and then click, drag, or right-click on any one of the selected files to perform the same operation simultaneously on all of them. There are two ways of selecting multiple files at once. The first and easiest, commonly referred to as using a rubber band, is accomplished by clicking the left button on your pointing device in an empty area of the file manager window, dragging the pointer and enlarging the rubber band to enclose a number of files, and then releasing the button. Selected files are highlighted to show that they have been selected. This process is shown in Figure 5.12. Figure 5.12. Using the rubber band to select two files simultaneously in /home/you. The selected files are highlighted. The other way to select multiple files is to hold down the Ctrl key while single- clicking each file you want to select, one by one. Each file you select remains highlighted and is added to the group of selected files, as long as the Ctrl key is held down. This method enables the selection of noncontiguous groups of icons. Renaming an ItemYou can use the Rename command in the context menu to change a file's or directory's name. After you choose Rename from the context menu, the icon's filename appears in a text box, as shown in Figure 5.13. You just type a new name for the file and press Enter to save the name and exit the text box. Figure 5.13. The file anotherfile (copy).txt is ready to be renamed; when the filename text box is active, as shown here, you can type to replace the current name. Press Enter to save the new name.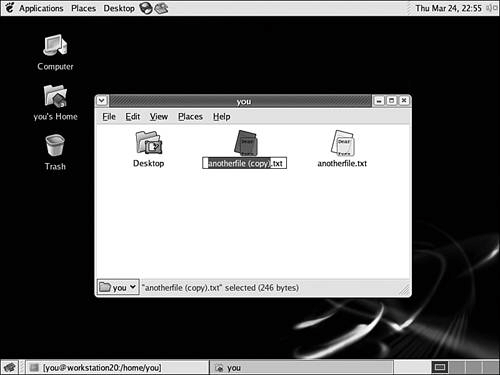
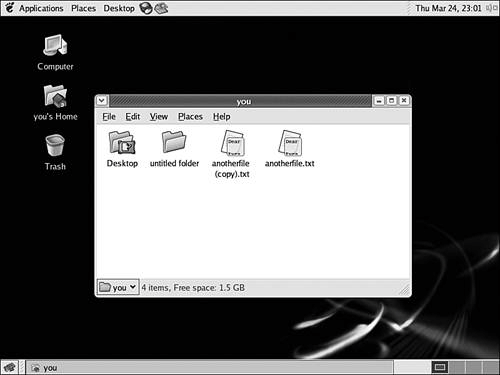
Deleting ItemsTo delete a file or directory, choose the Move to Trash option from the context menu. The selected item disappears from the currently displayed directory and is moved to the trash can. Double-click the Trash icon on the Fedora Core 4 Desktop to view, restore, or permanently delete trashed items (see "Working with Trash Contents," later in this chapter). Creating a New DirectoryTo create a new directory in the currently displayed path, right-click an area of empty space within the file manager window. A context menu for the currently displayed path appears. Choose the Create Folder item from the context menu to create a new directory in the currently displayed directory, as shown in Figure 5.14. The new directory appears with the name untitled folder, in a selected text box; type a new name and press Enter to name your new folder. Figure 5.14. The newly created directory is given the name untitled folder. Type a new name to name your folder or simply press Enter to accept the default name.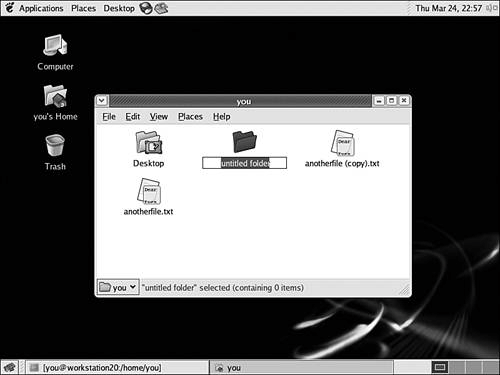
Rearranging or Sorting IconsThe icons in the currently displayed directory can be rearranged and re-sorted by right-clicking an empty area of the file manager window to display a context menu and then choosing Arrange Items. The submenu shown in Figure 5.15 is displayed. Figure 5.15. The Arrange Items submenu enables you to dictate the way in which the file manager organizes the display of files and directories in the current directory. A dot is shown next to the current arrangement style.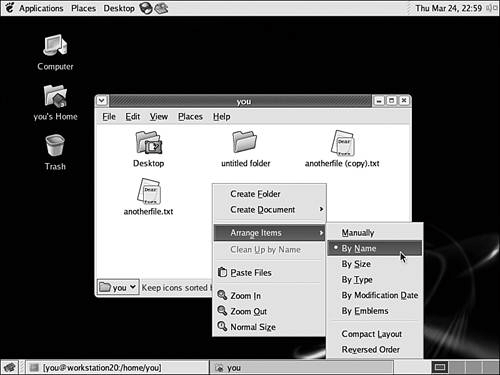 Depending on how you want the current directory to be displayed, you select from the following:
|
EAN: 2147483647
Pages: 311
- Chapter III Two Models of Online Patronage: Why Do Consumers Shop on the Internet?
- Chapter V Consumer Complaint Behavior in the Online Environment
- Chapter VI Web Site Quality and Usability in E-Commerce
- Chapter XV Customer Trust in Online Commerce
- Chapter XVI Turning Web Surfers into Loyal Customers: Cognitive Lock-In Through Interface Design and Web Site Usability
