Dealing with Catastrophic Failures
| Most anyone who has worked with computers for any length of time knows that sometimes our worst fears come true: A computer system suffers a failure of some kind, which prevents it from even starting properly any longer. Although Linux is a very stable operating system, if you use it long enough, you are still likely to encounter a situation at some point in which Linux is unable to start properly, even though your computer can at least be powered on and your hard drive appears to be functioning. Red Hat has provided a special tool called rescue that can be used to try to salvage some of your data in situations like this. Starting rescueTo start the rescue tool, insert your Fedora Core 4 install DVD or CD-ROM and allow it to boot your system. At the boot: prompt at the Fedora Core 4 title screen, type the phrase linux rescue as shown in Figure 35.2, then press Enter. Figure 35.2. Type the phrase linux rescue when booting your Fedora Core 4 install CD to start the rescue system.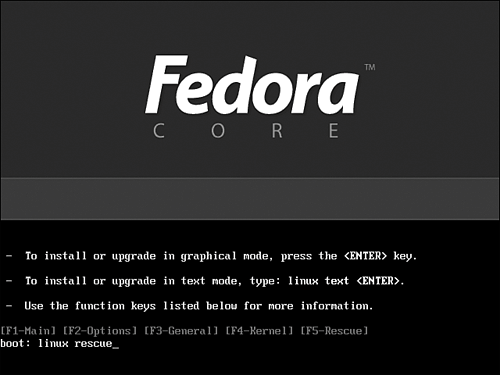
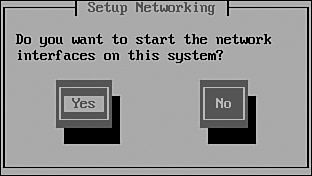
You soon see several preliminary dialog boxes that will help the Fedora Core 4 rescue mode to configure itself for use:
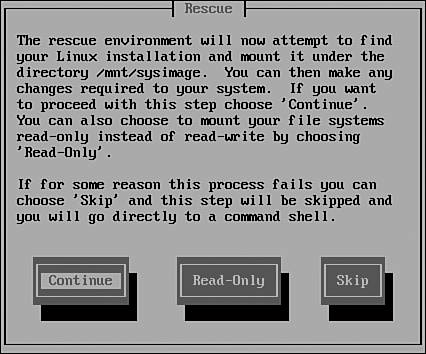
After answering each dialog box appropriately, you see the Rescue dialog box, as shown in Figure 35.4. Figure 35.4. The Rescue dialog box offers to try to find your Linux installation. Select the Read-Only option and press Enter.
The dialog box offers to have rescue TRy to find and mount the file systems that make up your Linux installation. Use the Tab key here to select the Read-Only option and then press Enter, thereby allowing rescue to try to access your data while ensuring that it won't be damaged any further. After rescue finds your Linux file system, it displays a message telling you that the file system has been mounted on /mnt/sysimage. Press Enter to go to a Linux command prompt, where you are able to try to salvage your data, a process explored in the next section. Attempting File System RepairsIf rescue is able to find and mount your Linux file system, you can try to use a technique that often restores nonbooting Linux systems to full functionality: the file system check. The e2fsck command can be used to thoroughly check your Linux file system for structural problems and attempt to repair them. To use e2fsck in rescue, you call it with the -f option (to force a full file system check) and supply the name of the device you want to check as an argument. There is, however, one catch: e2fsck must never be run on mounted file systems. Therefore, to test your file systems using e2fsck in rescue, follow the steps outlined next.
First, enter the mount command without arguments to list the mounted file systems; pipe the output of mount to the grep command and search for the text sysimage. This gives you a list of the devices that make your Linux file system because, as rescue told you, all your Linux file system is mounted under /mnt/sysimage. sh-3.00# mount | grep sysimage /dev/sda2 on /mnt/sysimage type ext3 (ro) /dev/sda1 on /mnt/sysimage/boot type ext3 (ro) /dev/proc on /mnt/sysimage/proc type proc (ro,nodiratime) /dev/sys on /mnt/sysimage/sys type sysfs (ro) /dev on /mnt/sysimage/dev type sh-3.00# Ignore lines that begin with /dev/proc, /dev/sys, and /dev (the last three lines). They are virtual file systems, and no real devices are connected to them. Pay attention only to volumes of type ext3, ext2, or reiserfs. In this case, the Linux file system is stored on two devices: /dev/sda1 and /dev/sda2. Before using the e2fsck utility, you must unmount all these file systems. To do this, issue umount for each file system in the list, beginning at the bottom and moving upward: sh-3.00# umount /mnt/sysimage/proc sh-3.00# umount /mnt/sysimage/sys sh-3.00# umount /mnt/sysimage/boot sh-3.00# umount /mnt/sysimage sh-3.00# Your Linux file system has now been unmounted, and you can proceed to check each device by using the e2fsck command, supplying the -f option followed by the device name for the device you want to check each time through. For example, to start with /dev/sda1, you enter sh-3.00# e2fsck -f /dev/sda1 e2fsck 1.36 (05-Feb-2005) Pass 1: Checking inodes, blocks and sizes [...] /: 76751/434592 files (0.2% non-contiguous), 346776/867510 blocks sh-3.00# The output e2fsck produces varies depending on the type and number of problems (if any) that e2fsck finds on the device. If you are asked any questions by e2fsck, press Enter to accept the default choice. The guts of the Linux file system are beyond the scope of a book like this one, and perhaps more importantly, choices other than the default choice are almost never the correct choice for the best chance at full repair. When e2fsck finishes checking a device, it prints a brief, somewhat cryptic summary of the number of files, noncontiguous files, and used blocks on the system. After you check all your devices, enter exit at the command prompt to exit rescue and reboot your system. If you are now able to boot normally into Fedora Core 4, your problem has been solved. Salvaging FilesIf you are able to start rescue mode, rescue is able to find your Linux file system, you are able to run file system checks using e2fsck, and yet your system still doesn't start normally, there is likely nothing left to do but try to save any current files in your Linux file system before reinstalling Fedora Core 4. Although a Linux expert might still have been able to repair the system, more advanced types of repairs are beyond the scope of a book like this one and are generally beyond the reach of Linux beginners. Restart Fedora Core 4's rescue in the same way you did before. After your file systems have been mounted on /mnt/sysimage again, you can proceed to use the backup techniques described in "Backing Up and Restoring Your Data" earlier in this chapter to save any current files you might want to save from your file system tree; commands such as mount, cp, and tar are all available to you in rescue. Remember, however, to adjust for the fact that your file system is now mounted on /mnt/sysimage. For example, to back up what is normally your /home tree to a SCSI tape drive using the tar command, you would now have to enter the following: tar -c -f /dev/st0 /mnt/sysimage/home Similarly, a file called myimportantfile.txt that normally resided in your home directory at /home/you would now be accessed as /mnt/sysimage/home/you/myimportantfile.txt. After you save the files you want to save from your Linux file system, exit rescue mode, reinstall Linux following the directions in Part I of this book, and then restore your important data from the backups you've just made. |
EAN: 2147483647
Pages: 311