Making Space for Linux


After you make sure your hardware is suitable for use with Linux, you must ensure that space is available on your hard drive for a Linux installation. Unfortunately, this task is not as simple as it might seem. Merely having unused space on your hard drive is not enough; a proper Linux installation requires unpartitioned spacespace that is not being used by another operating system.

Already Use Linux? Skip This Part!

If you already have a recent version of Linux installed on your computer, your system is likely to work with Fedora Core 4 as well. . If you are sure that you have enough space for Fedora Core 4 in your existing partitioning scheme, feel free skip to the section near the end of the chapter called "Launching the Fedora Core 4 Installer."


Understanding Partitions

PC operating systems such as Windows or Linux must be installed on one or more hard drive partitions. A partition is an area of the hard drive that has been set aside specifically for one operating system; in a sense, it is space that is "owned" by the operating system in question. A Windows partition therefore belongs, in a sense, to Windows, while a Linux partition belongs to Linux.

Most PCs today ship with Windows preinstalled. The entire hard drive has therefore been given to Windows; such drives contain only one partition that occupies the entire drive and that is owned by Windows.

Because of this, when you plan to install Linux on a system that already contains Windows, you have the following three options:

  • Delete the Windows partition or partitions that occupy the entire hard drive and allocate the entire hard drive to Linux. This approach has the effect of removing Windows from the computer system. The entire computer system and its hard drive are then owned exclusively by Linux. When a computer configured this way is switched on, it starts Linux immediately.

  • Resize or rebuild the existing Windows partition(s) so that Windows no longer occupies the entire hard drive, and then create new partitions for Linux in the resulting free space. The effect is like dividing a room using a large wooden screen and then declaring one section of the room to be yours and the other section to be your roommate's. One section of a repartitioned hard drive belongs to Windows, and the other section belongs to Linux. When a computer is configured this way, each time you switch on the computer, you can choose to start either Linux or Windows. Both operating systems share the same hard drive, but each has its own space on it. This process is commonly referred to as dual-booting.

  • Install an additional hard drive (or have one installed by a technician) specifically to hold Linux. When a computer is configured this way, each time you switch on the computer, you can choose to start either system, and Linux and Windows will have an entire hard drive to themselves. This is also a form of dual-booting.

Most users interested in building a server-oriented Linux computer choose to replace the Windows partition completely. This gives Linux exclusive control of the computer and all of the hard drive space it contains. If this is what you plan to do, you do not need to worry about repartitioning because the Fedora Core 4 installer can delete existing Windows partitions for you; feel free to skip the rest of this chapter.

If you plan to dual-boot Linux and Windowsthat is, to let them share a hard drive and to choose between them each time you switch on your computeryou need to repartition your hard drive to ensure that space is allocated to both systems. Most desktop and laptop computer users who are installing Linux for the first time choose this option.

Using Windows Applications in Linux

Dual-booting is a good choice for the beginner because Windows can then act as a failsafe. If you have trouble installing or configuring Internet access in Linux, for example, you can start Windows and visit Linux help sites for technical support to solve your problem. On the other hand, dual-booting means that less space will be available to Linux, because some of your existing hard drive space (often half or more) has been reserved for Windows.

Some users prefer not to dual-boot but still want the ability to run important Windows applications like Microsoft Office or Adobe Photoshop. Three solutions work very well for such needs: Win4Lin, which you can find at http://www.netraverse.co; VMWare, which you can find at http://www.vmware.org; and Crossover Office, which you can find at http://www.codeweavers.com.

Windows compatibility options are discussed in detail in Appendix B, "Adding Windows Compatibility to Linux."


Nondestructive Repartitioning

Users of Windows 95, Windows 98, and Windows Me can easily make room for Linux using a utility called FIPS, which is available on the Internet at no charge and is written by the same kinds free software developers that work on Linux. FIPS shrinks an existing Windows partition while preserving the data stored there. You can then create Linux partitions in the resulting unassigned space without losing or having to rearrange any Windows files.

Unfortunately, FIPS does not work with most Windows NT, 2000, or XP systems because FIPS is not capable of rearranging files stored in the way that Windows 2000 or Windows XP stores them. If you are using Windows NT, 2000, or ME and would like to repartition nondestructively, you can determine whether FIPS will work for you by following these steps:

1.

Double-click the My Computer icon on your Windows desktop or select My Computer from your Start menu. This will open the Windows Explorer and display icons for each of the storage devices in your system.

2.

In the Windows Explorer, right-click the icon representing the hard drive you plan to repartition and choose Properties from the pop-up context menu that appears.

3.

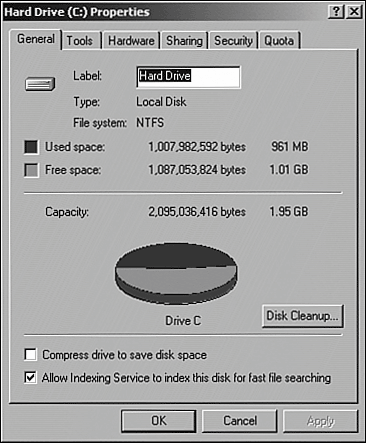
Look for the phrase File system in the Properties dialog box. If the words FAT or FAT32 are shown, you can use FIPS to resize your Windows partition while preserving all your data. If the word NTFS is shown, you cannot use FIPS to rearrange your existing Windows files in order to free space for Linux. Figure 1.3 shows a Properties dialog box listing an unresizable NTFS hard drive partition.

Figure 1.3. If you see the word NTFS in your Properties dialog box, you cannot resize your hard drive partition using FIPS.


Nondestructive Repartitioning with NTFS

Several commercial software vendors sell tools that can nondestructively resize Windows 2000 or XP NTFS partitions with varying degrees of success. Partition Magic is one such tool; for more information, visit http://www.partitionmagic.com. Another similar tool is called BootIt Next Generation; a demo version available from http://www.bootitng.com can help you decide whether BootIt is the right product for you.


Defragmenting Prior to Using FIPS

Before you actually use FIPS, you must defragment the drive partition. Defragmentation is necessary prior to running FIPS because FIPS can shrink a Windows partition only if a continuous area of empty space is available. The defragmentation process rearranges your files so that they are all stored one immediately after another toward the beginning of the partition. This leaves all the unused space near the end empty, where FIPS can trim it away and make it available to other operating systems like Linux.

Launch the Windows defragmentation tool by following these steps:

1.

Double-click the My Computer icon on your Windows desktop or select My Computer from your Start menu. This will open the Windows Explorer and display icons for each of the storage devices in your system.

2.

Right-click the icon representing the hard drive you want to defragment; choose Properties from the pop-up context menu.

3.

Select the Tools tab from the dialog box that appears.

4.

Click the Defragment Now button. A progress indicator shows that your hard drive is being defragmented. When Windows indicates that defragmentation has finished, exit the defragmentation tool.

Sometimes There's Just No Room

Even after you use the Windows defragment tool, the FIPS utility we're about to discuss may in some cases tell you that you don't have much empty room left on your hard drive. If that's the case, your best bet is to add a second hard drive to hold Linux.


Safeguard Your Data While Repartitioning

FIPS is a well-tested program that does a remarkably good job of resizing existing partitions while preserving data. But don't forget that you are responsible for protecting your data. Be absolutely sure that you back up any important files (copy them to a floppy disk, CD-ROM, flash device, or other storage device) before attempting to resize your Windows partition.

At the very minimum, most users choose to back up their My Documents folder. That way, if a hard drive is accidentally erased, important personal files stored in My Documents are preserved.


Creating a FIPS Floppy and Starting FIPS

The FIPS program can be downloaded at no charge by typing the following address into your Internet Explorer or web browser window:

http://www.tux.org/pub/dos/partition-programs/fips/fips-20/fips.exe

When prompted, save the file to your Windows desktop. After saving the FIPS program to your desktop, type the following address in your web browser to save the FIPS documentation:

http://www.tux.org/pub/dos/partition-programs/fips/fips-20/fips.doc.

Be sure to print the fips.doc file before continuing, so that you can refer to it as you use FIPS.

To use FIPS, you must run it from a DOS boot floppy. Such a floppy can be created only on an MS-DOS, Windows 95, Windows 98, or Windows Me system; Windows 2000 and Windows XP do not provide utilities for creating DOS boot floppies. Windows 2000 and XP users not intending to use FIPS can move to the section "Destructive Repartitioning," later in this chapter.

Boot Floppies and Windows 2000/XP

Windows 2000 and Windows XP users need to gain temporary access to an MS-DOS or a Windows 95, 98, or Me computer system to create a boot floppy following the directions given here. If you use Windows 2000 or Windows XP and don't have access to a computer system suitable for creating a boot floppy, destructive repartitioning is the only way to provide space for Linux on an existing Windows hard drive.


To create a DOS boot floppy containing FIPS from within Windows 95, 98, or Me, follow these steps:

1.

Insert a blank floppy disk into your PC.

2.

Double-click the My Computer icon on your Windows desktop; then right-click the icon representing the floppy drive. A context menu appears.

3.

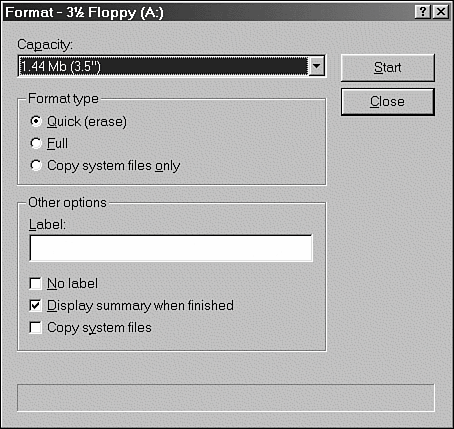
Choose the Format option from the pop-up context menu. A dialog box presents floppy formatting options, as shown in Figure 1.4.

Figure 1.4. The Format Floppy dialog box allows you to format a DOS boot floppy.


4.

Select Full as the format type and check the Copy System Files box. Click Start to format the floppy.

5.

When the format finishes, copy the FIPS program from your desktop (or wherever you saved it after downloading it) to the newly formatted floppy disk.

After you have created your FIPS floppy and printed the fips.doc file, switch off your computer. Insert the FIPS floppy disk into the PC and power on again. When you reach the DOS prompt, type fips and press Enter. Carefully follow the directions in fips.doc to resize partitions according to your needs.

More Details on FIPS, Hard Drives, and Floppy Drives

The following FIPS walk-through assumes that you have only one hard drive in your system. If you will be resizing partitions on a hard drive other than your primary hard drive, consult the FIPS documentation for instructions.

Note also that some personal computers do not have a floppy drive. If you own one of these computers, you need to add a floppy drive before you can use FIPS.


Using FIPS

When you first start FIPS, you're shown a small amount of general information about the program; press Enter to page through it. You're then shown technical information about your hard drive as FIPS performs a few basic checks to ensure that your existing hard drive partitions are in good condition:

 Boot sector: Bytes per sector: 512 Sectors per cluster: 8 Reserved sectors: 32 Number of FATs: 2 Number of rootdirectory entries: 0 Number of sectors (short): 0 Media descriptor byte: F8h Sectors per FAT: 3993 Sectors per track: 63 Drive heads: 64 Hidden sectors: 63 Number of sectors (long): 8092417 Physical drive number: 80h Signature: 29h Checking boot sector .. OK Checking FAT .. OK Searching for free space .. OK 

FIPS then asks whether you want to back up the root and boot sectors of your hard drive:

 Do you want to make a backup copy of your root and boot sector before proceeding (y/n)? 

Choose y. Should FIPS fail to correctly repartition your hard drive, you will need such backups to restore your original partition information and avoid data loss. FIPS then prompts you to insert a bootable floppy disk:

 Do you have a bootable floppy disk in drive A: as described in the documentation (y/n)? 

Answer y to this question as well, since you started FIPS from a bootable floppy. FIPS then creates a root and boot sector backup file on your floppy called rootboot.000. You can use the rootboot floppy to restore some of your hard drive's structure if anything goes wrong and you find that your system no longer boots as expected. (See the FIPS documentation for details on restoring from backups.)

Receiving INT 13h Errors with FIPS

A few manufacturers ship PCs in which the primary hard drive is connected to the second Integrated Drive Electronics (IDE) channel. If FIPS quits unexpectedly after reporting that it can't find an INT 13h hard drive device, you might need to connect your hard drive to the primary IDE channel to use FIPS. This step typically involves opening your PC and altering connections to sensitive components; consult a technician if you are unfamiliar with this process.


After the rootboot.000 backup file is created, FIPS presents you with a simple table that lists the proposed new size for the old partition, a cylinder boundary (the location on your hard drive where the disk will be divided), and the proposed size for the new partition:

 Old partition        Cylinder        New partition  397.7 MB             202              3600.6 MB 

The old partition size is the amount of disk space that will remain allocated to Windows after the repartitioning process is complete. Remember, this number does not represent the free space available to Windows, but rather all space allocated to Windows (including space used by existing Windows files and folders). The new partition size is the amount of space that will be unallocated and available to the Fedora Core 4 installer for Linux. Use your left- or right-arrow key to adjust these values; allocate space as desired to the old and new partitions. Remember that for Fedora Core 4 to function properly, you should have at least as much free space as the minimum hard drive size shown in Table 1.1 available to Linux.

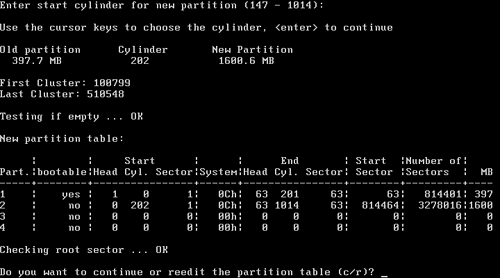
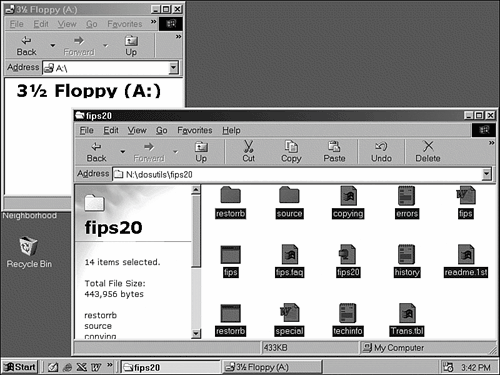
When you are satisfied with the numbers that FIPS shows, press Enter to confirm the changes. FIPS performs several more sanity checks and displays a table showing your proposed new partitions, as shown in Figure 1.5.

Figure 1.5. FIPS displays the new partition table that you have proposed. Check the sizes shown in the rightmost column to make sure they match the numbers you intended to choose.

After displaying the new partition details, FIPS asks whether you want to continue (you have one more chance to abort before changes are saved) or re-edit the partition table:

 Do you want to continue or reedit the partition table (c/r)? 

Select r to re-edit if you have changed your mind about the sizes of the partitions you want to create. If you select c to continue, you are shown an updated set of technical details about your hard drive, as it will appear after the changes are saved to the disk. FIPS then asks you one final time to confirm your changes:

 Ready to write new partition scheme to disk Do you want to proceed (y/n)? 

This is your last chance to change your mind, by selecting n at the prompt. If you have not yet backed up your data, you should seriously consider selecting n now, exiting, and backing up your data before running FIPS again. If you are ready to have FIPS save your changes to the disk and resize your Windows partition, select y to proceed.

You should quickly see a success message:

 Repartitioning complete With FAT32 partitions, you should now run scandisk on the shortened partition 

Remove the floppy disk, restart your computer, and immediately perform a file-system integrity check by following these steps:

1.

Double-click the My Computer icon on your Windows desktop or choose My Computer from your Start menu.

2.

Right-click the icon representing the hard drive you have repartitioned; then choose Properties from the pop-up context menu.

3.

Select the Tools tab from the dialog box that appears.

4.

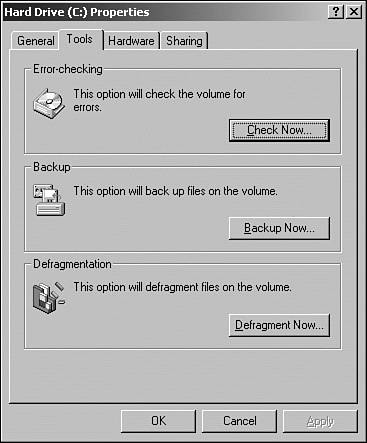
Click the Check Now button in the Error-Checking Status section of the dialog box, as shown in Figure 1.6. A dialog box appears; click Start to begin. The check takes several minutes, and a summary appears when it is complete.

Figure 1.6. Click the Check Now button to begin a file-system check.


After you run FIPS to make space for Linux and check your newly resized Windows partition for errors, you are ready to launch the Fedora Core 4 installer.

Destructive Repartitioning

Destructive repartitioning works just as it sounds: You will use your Windows 2000 or XP install CD to erase your hard drive completely and install Windows from scratch, taking care to specify to the Windows installer that you want Windows to be given only a portion of your hard drive, rather than the entire thing.

Destructive Repartitioning Erases Data!

Destructive repartitioning lives up to its name: It erases all your existing Windows data, including your personal letters, images, and other data. You must therefore copy any data that you want to preserve onto some other storage device such as a floppy, CD-ROM, or flash driveor you will lose it forever!

Most users choose at least to copy the contents of their My Documents folder to another storage medium. That way, their important data remains intact and can be copied back on to their hard drive after Windows has been installed again.


The process of installing and partitioning Windows varies between releases of the Windows operating system. Full instructions for installing and partitioning the particular version of Windows that you own appear in the installation guide that accompanied your Windows CD-ROM. Most current business and home users are Windows 2000 users, and can destructively repartition using a Windows 2000 install CD by following these steps:

1.

Insert the Windows install CD-ROM and turn on your computer. When prompted, press a key to boot from the CD-ROM. A number of drivers will be loaded; this part might take some time. After the drivers load, the Welcome to Setup screen appears.

2.

At the Welcome to Setup screen, press Enter to indicate that you want to install Windows 2000. A list of existing partitions appears.

3.

Use the up and down arrows to select the partition marked C:, and press the D key to delete the partition. A warning screen opens.

4.

Press Enter to confirm that you want to delete the partition. A second warning screen opens. Press L to delete the partition.

5.

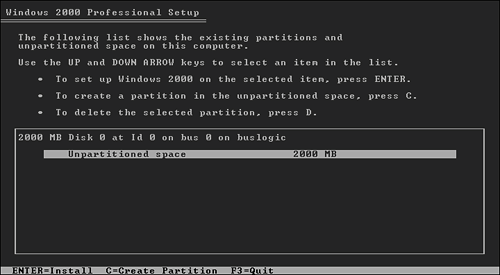
When the partition list appears once again, use the arrow keys to select the Unpartitioned Space entry, as shown in Figure 1.7. Then press C to create a partition of your own choosing.

Figure 1.7. Select the unpartitioned space and then press C to create a new partition for Windows in that space.


6.

When the partition sizing screen appears (see Figure 1.8), select a partition size for Windows.

Figure 1.8. The Windows 2000 installer enables you to allocate only a portion of the drive to Windows. Here 4GB of storage space is being allocated for the Windows 2000 partition. The remaining 6GB is available for Linux.


7.

After you enter the partition size you want, press Enter to redisplay the partition list. Be sure to create a partition large enough to hold Windows plus any applications that you want to installusually no smaller than 2,000MB.

8.

Select the C: entry in the partition list and press Enter once more to proceed with Windows installation, using your Windows installation guide.

Allowing Linux to Access Your Windows Installation

If you are reinstalling Windows 2000 or Windows XP as part of a destructive repartitioning of your hard drive, be sure to specify that you want Windows installed on a FAT32 partition, rather than on an NTFS partition. This step allows you to use FIPS in the future to resize your Windows partition, should you need to do so; it also allows Linux to access the personal files stored on your Windows partitionsomething that can't currently be accomplished with an NTFS partition.


After selecting the desired Windows partition size, simply install Windows using the installation instructions that accompany your Windows CD-ROM. After you finish reinstalling Windows to make space for Linux, the destructive repartitioning process is complete and you are ready to launch the Fedora Core 4 installer.

Avoiding Repartitioning by Adding a Hard Drive

If all this talk of repartitioning makes you more than nervous, you are not alone. Even professionals who have installed Linux many times dread repartitioning. There are so many variables involved in the process that sooner or later you are bound to erase a hard drive by accident and find yourself restoring data from a pile of Zip disks or CD-ROMs. Even when your data has been recently backed up, this process can be both time-consuming and frustrating.

There is an easier way, if you're willing to allow for a modest hardware budget. Most PCs today can accommodate four Enhanced IDE (EIDE) devices such as hard drives, CD-ROM/RW drives, or DVD drives. Most PCs, however, ship with only two drives connectedone hard drive and one removable drive (CD or DVD). This leaves room for up to two more EIDE devices in the typical PC.

Although the actual nuts and bolts of installing an additional hard drive are beyond the scope of this book, many experienced PC and Windows users are capable of adding a second hard drive to a PC system. Most computer retail shops can also install any hard drive that you purchase for a modest labor fee. By adding a second hard drive just for Linux, you gain several advantages:

  • You can proceed directly to Linux installation without needing to modify your Windows partitions at all.

  • Your Linux data is kept separate from your Windows data, so bugs in either operating system are less likely to affect data stored by the other.

  • You don't have to lose space in Windows in order to gain space for Linux.

If you can afford to have an additional hard drive installed, or if you can install one yourself, you should consider doing so, instead of repartitioning.


    SAMS Teach Yourself Red Hat(r) Fedora(tm) 4 Linux(r) All in One
    Cisco ASA and PIX Firewall Handbook
    ISBN: N/A
    EAN: 2147483647
    Year: 2006
    Pages: 311
    Authors: David Hucaby

    flylib.com © 2008-2017.
    If you may any questions please contact us: flylib@qtcs.net