Basics of Event Handling
| Any operating environment that supports GUIs constantly monitors events such as keystrokes or mouse clicks. The operating environment reports these events to the programs that are running. Each program then decides what, if anything, to do in response to these events. In languages like Visual Basic, the correspondence between events and code is obvious. One writes code for each specific event of interest and places the code in what is usually called an event procedure. For example, a Visual Basic button named HelpButton would have a HelpButton_Click event procedure associated with it. The code in this procedure executes whenever that button is clicked. Each Visual Basic GUI component responds to a fixed set of events, and it is impossible to change the events to which a Visual Basic component responds. On the other hand, if you use a language like raw C to do event-driven programming, you need to write the code that constantly checks the event queue for what the operating environment is reporting. (You usually do this by encasing your code in a giant loop with a massive switch statement!) This technique is obviously rather ugly, and, in any case, it is much more difficult to code. The advantage is that the events you can respond to are not as limited as in languages, like Visual Basic, that go to great lengths to hide the event queue from the programmer. The Java programming environment takes an approach somewhat between the Visual Basic approach and the raw C approach in terms of power and, therefore, in resulting complexity. Within the limits of the events that the AWT knows about, you completely control how events are transmitted from the event sources (such as buttons or scrollbars) to event listeners. You can designate any object to be an event listener in practice, you pick an object that can conveniently carry out the desired response to the event. This event delegation model gives you much more flexibility than is possible with Visual Basic, in which the listener is predetermined, but it requires more code and is more difficult to untangle (at least until you get used to it). Event sources have methods that allow you to register event listeners with them. When an event happens to the source, the source sends a notification of that event to all the listener objects that were registered for that event. As one would expect in an object-oriented language like Java, the information about the event is encapsulated in an event object. In Java, all event objects ultimately derive from the class java.util.EventObject. Of course, there are subclasses for each event type, such as ActionEvent and WindowEvent. Different event sources can produce different kinds of events. For example, a button can send ActionEvent objects, whereas a window can send WindowEvent objects. To sum up, here's an overview of how event handling in the AWT works.
You register the listener object with the source object by using lines of code that follow the model
Here is an example: ActionListener listener = . . .; JButton button = new JButton("Ok"); button.addActionListener(listener); Now the listener object is notified whenever an "action event" occurs in the button. For buttons, as you might expect, an action event is a button click. Code like the above requires that the class to which the listener object belongs implements the appropriate interface (which in this case is the ActionListener interface). As with all interfaces in Java, implementing an interface means supplying methods with the right signatures. To implement the ActionListener interface, the listener class must have a method called actionPerformed that receives an ActionEvent object as a parameter. class MyListener implements ActionListener { . . . public void actionPerformed(ActionEvent event) { // reaction to button click goes here . . . } } Whenever the user clicks the button, the JButton object creates an ActionEvent object and calls listener.actionPerformed(event), passing that event object. It is possible for multiple objects to be added as listeners to an event source such as a button. In that case, the button calls the actionPerformed methods of all listeners whenever the user clicks the button. Figure 8-1 shows the interaction between the event source, event listener, and event object. Figure 8-1. Event notification
NOTE
Example: Handling a Button ClickAs a way of getting comfortable with the event delegation model, let's work through all details needed for the simple example of responding to a button click. For this example, we will want
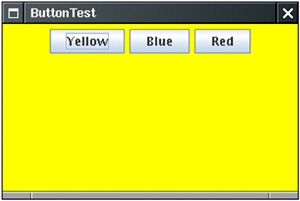
With this scenario, each time a user clicks on any of the buttons on the panel, the associated listener object then receives an ActionEvent that indicates a button click. In our sample program, the listener object will then change the background color of the panel. Before we can show you the program that listens to button clicks, we first need to explain how to create buttons and how to add them to a panel. (For more on GUI elements, see Chapter 9.) You create a button by specifying a label string, an icon, or both in the button constructor. Here are two examples: JButton yellowButton = new JButton("Yellow"); JButton blueButton = new JButton(new ImageIcon("blue-ball.gif")); Adding buttons to a panel occurs through a call to a method named (quite mnemonically) add. The add method takes as a parameter the specific component to be added to the container. For example, class ButtonPanel extends JPanel { public ButtonPanel() { JButton yellowButton = new JButton("Yellow"); JButton blueButton = new JButton("Blue"); JButton redButton = new JButton("Red"); add(yellowButton); add(blueButton); add(redButton); } } Figure 8-2 shows the result. Figure 8-2. A panel filled with buttons
Now that you know how to add buttons to a panel, you'll need to add code that lets the panel listen to these buttons. This requires classes that implement the ActionListener interface, which, as we just mentioned, has one method: actionPerformed, whose signature looks like this: public void actionPerformed(ActionEvent event) NOTE
When a button is clicked, then we want to set the background color of the panel to a particular color. We store the desired color in our listener class. class ColorAction implements ActionListener { public ColorAction(Color c) { backgroundColor = c; } public void actionPerformed(ActionEvent event) { // set panel background color . . . } private Color backgroundColor; } We then construct one object for each color and set the objects as the button listeners. ColorAction yellowAction = new ColorAction(Color.YELLOW); ColorAction blueAction = new ColorAction(Color.BLUE); ColorAction redAction = new ColorAction(Color.RED); yellowButton.addActionListener(yellowAction); blueButton.addActionListener(blueAction); redButton.addActionListener(redAction); For example, if a user clicks on the button marked "Yellow," then the actionPerformed method of the yellowAction object is called. Its backgroundColor instance field is set to Color.YELLOW, and it can now proceed to set the panel's background color. Just one issue remains. The ColorAction object doesn't have access to the panel variable. You can solve this problem in two ways. You can store the panel in the ColorAction object and set it in the ColorAction constructor. Or, more conveniently, you can make ColorAction into an inner class of the ButtonPanel class. Its methods can then access the outer panel automatically. (For more information on inner classes, see Chapter 6.) We follow the latter approach. Here is how you place the ColorAction class inside the ButtonPanel class.
Look closely at the actionPerformed method. The ColorAction class doesn't have a setBackground method. But the outer ButtonPanel class does. The methods are invoked on the ButtonPanel object that constructed the inner class objects. (Note again that outer is not a keyword in the Java programming language. We just use it as an intuitive symbol for the invisible outer class reference in the inner class object.) This situation is very common. Event listener objects usually need to carry out some action that affects other objects. You can often strategically place the listener class inside the class whose state the listener should modify. Example 8-1 contains the complete program. Whenever you click one of the buttons, the appropriate action listener changes the background color of the panel. Example 8-1. ButtonTest.java 1. import java.awt.*; 2. import java.awt.event.*; 3. import javax.swing.*; 4. 5. public class ButtonTest 6. { 7. public static void main(String[] args) 8. { 9. ButtonFrame frame = new ButtonFrame(); 10. frame.setDefaultCloseOperation(JFrame.EXIT_ON_CLOSE); 11. frame.setVisible(true); 12. } 13. } 14. 15. /** 16. A frame with a button panel 17. */ 18. class ButtonFrame extends JFrame 19. { 20. public ButtonFrame() 21. { 22. setTitle("ButtonTest"); 23. setSize(DEFAULT_WIDTH, DEFAULT_HEIGHT); 24. 25. // add panel to frame 26. 27. ButtonPanel panel = new ButtonPanel(); 28. add(panel); 29. } 30. 31. public static final int DEFAULT_WIDTH = 300; 32. public static final int DEFAULT_HEIGHT = 200; 33. } 34. 35. /** 36. A panel with three buttons. 37. */ 38. class ButtonPanel extends JPanel 39. { 40. public ButtonPanel() 41. { 42. // create buttons 43. 44. JButton yellowButton = new JButton("Yellow"); 45. JButton blueButton = new JButton("Blue"); 46. JButton redButton = new JButton("Red"); 47. 48. // add buttons to panel 49. 50. add(yellowButton); 51. add(blueButton); 52. add(redButton); 53. 54. // create button actions 55. 56. ColorAction yellowAction = new ColorAction(Color.YELLOW); 57. ColorAction blueAction = new ColorAction(Color.BLUE); 58. ColorAction redAction = new ColorAction(Color.RED); 59. 60. // associate actions with buttons 61. 62. yellowButton.addActionListener(yellowAction); 63. blueButton.addActionListener(blueAction); 64. redButton.addActionListener(redAction); 65. } 66. 67. /** 68. An action listener that sets the panel's background color. 69. */ 70. private class ColorAction implements ActionListener 71. { 72. public ColorAction(Color c) 73. { 74. backgroundColor = c; 75. } 76. 77. public void actionPerformed(ActionEvent event) 78. { 79. setBackground(backgroundColor); 80. } 81. 82. private Color backgroundColor; 83. } 84. } javax.swing.JButton 1.2
java.awt.Container 1.0
javax.swing.ImageIcon 1.2
Becoming Comfortable with Inner ClassesSome people dislike inner classes because they feel that a proliferation of classes and objects makes their programs slower. Let's have a look at that claim. You don't need a new class for every user interface component. In our example, all three buttons share the same listener class. Of course, each of them has a separate listener object. But these objects aren't large. They each contain a color value and a reference to the panel. And the traditional solution, with if . . . else statements, also references the same color objects that the action listeners store, just as local variables and not as instance fields. We believe the time has come to get used to inner classes. We recommend that you use dedicated inner classes for event handlers rather than turning existing classes into listeners. We think that even anonymous inner classes have their place. Here is a good example of how anonymous inner classes can actually simplify your code. If you look at the code of Example 8-1, you will note that each button requires the same treatment:
Let's implement a helper method to simplify these tasks: void makeButton(String name, Color backgroundColor) { JButton button = new JButton(name); add(button); ColorAction action = new ColorAction(backgroundColor); button.addActionListener(action); } Then the ButtonPanel constructor simply becomes public ButtonPanel() { makeButton("yellow", Color.YELLOW); makeButton("blue", Color.BLUE); makeButton("red", Color.RED); } Now you can make a further simplification. Note that the ColorAction class is only needed once: in the makeButton method. Therefore, you can make it into an anonymous class: void makeButton(String name, final Color backgroundColor) { JButton button = new JButton(name); add(button); button.addActionListener(new ActionListener() { public void actionPerformed(ActionEvent event) { setBackground(backgroundColor); } }); } The action listener code has become quite a bit simpler. The actionPerformed method simply refers to the parameter variable backgroundColor. (As with all local variables that are accessed in the inner class, the parameter needs to be declared as final.) No explicit constructor is needed. As you saw in Chapter 6, the inner class mechanism automatically generates a constructor that stores all local final variables that are used in one of the methods of the inner class. TIP
TIP
Turning Components into Event ListenersYou are completely free to designate any object of a class that implements the ActionListener interface as a button listener. We prefer to use objects of a new class that was expressly created for carrying out the desired button actions. However, some programmers are not comfortable with inner classes and choose a different strategy. They locate the component that changes as a result of the event, make that component implement the ActionListener interface, and add an actionPerformed method. In our example, you can turn the ButtonPanel into an action listener: class ButtonPanel extends JPanel implements ActionListener { . . . public void actionPerformed(ActionEvent event) { // set background color . . . } } Then the panel sets itself as the listener to all three buttons: yellowButton.addActionListener(this); blueButton.addActionListener(this); redButton.addActionListener(this); Note that now the three buttons no longer have individual listeners. They share a single listener object, namely, the button panel. Therefore, the actionPerformed method must figure out which button was clicked. The getSource method of the EventObject class, the superclass of all other event classes, will tell you the source of every event. The event source is the object that generated the event and notified the listener: Object source = event.getSource(); The actionPerformed method can then check which of the buttons was the source: if (source == yellowButton) . . . else if (source == blueButton) . . . else if (source == redButton ) . . . Of course, this approach requires that you keep references to the buttons as instance fields in the surrounding panel. As you can see, turning the button panel into the action listener isn't really any simpler than defining an inner class. It also becomes really messy when the panel contains multiple user interface elements. CAUTION
java.util.EventObject 1.1
java.awt.event.ActionEvent 1.1
java.beans.EventHandler 1.4
Example: Changing the Look and FeelBy default, Swing programs use the Metal look and feel. There are two ways to change to a different look and feel. The first way is to supply a file swing.properties in the jre/lib subdirectory of your Java installation. In that file, set the property swing.defaultlaf to the class name of the look and feel that you want. For example, swing.defaultlaf=com.sun.java.swing.plaf.motif.MotifLookAndFeel Note that the Metal look and feel is located in the javax.swing package. The other look-and-feel packages are located in the com.sun.java package and need not be present in every Java implementation. Currently, for copyright reasons, the Windows and Mac look-and-feel packages are only shipped with the Windows and Mac versions of the Java runtime environment. TIP
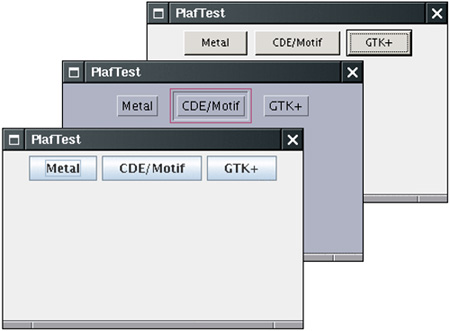
The second way is to change the look and feel dynamically. Call the static UIManager.setLookAndFeel method and give it the name of the look-and-feel class that you want. Then call the static method SwingUtilities.updateComponentTreeUI to refresh the entire set of components. You need to supply one component to that method; it will find all others. The UIManager.setLookAndFeel method may throw a number of exceptions when it can't find the look and feel that you request, or when there is an error loading it. As always, we ask you to gloss over the exception handling code and wait until Chapter 11 for a full explanation. Here is an example showing how you can switch to the Motif look and feel in your program: String plaf = "com.sun.java.swing.plaf.motif.MotifLookAndFeel"; try { UIManager.setLookAndFeel(plaf); SwingUtilities.updateComponentTreeUI(panel); } catch(Exception e) { e.printStackTrace(); } To enumerate all installed look and feel implementations, call UIManager.LookAndFeelInfo[] infos = UIManager.getInstalledLookAndFeels(); Then you can get the name and class name for each look and feel as String name = infos[i].getName(); String className = infos[i].getClassName(); Example 8-2 is a complete program that demonstrates how to switch the look and feel (see Figure 8-3). The program is similar to Example 8-1. Following the advice of the preceding section, we use a helper method makeButton and an anonymous inner class to specify the button action, namely, to switch the look and feel. Figure 8-3. Switching the look and feel
There is one fine point to this program. The actionPerformed method of the inner action listener class needs to pass the this reference of the outer PlafPanel class to the updateComponentTreeUI method. Recall from Chapter 6 that the outer object's this pointer must be prefixed by the outer class name: SwingUtilities.updateComponentTreeUI(PlafPanel.this); Example 8-2. PlafTest.java 1. import java.awt.*; 2. import java.awt.event.*; 3. import javax.swing.*; 4. 5. public class PlafTest 6. { 7. public static void main(String[] args) 8. { 9. PlafFrame frame = new PlafFrame(); 10. frame.setDefaultCloseOperation(JFrame.EXIT_ON_CLOSE); 11. frame.setVisible(true); 12. } 13. } 14. 15. /** 16. A frame with a button panel for changing look and feel 17. */ 18. class PlafFrame extends JFrame 19. { 20. public PlafFrame() 21. { 22. setTitle("PlafTest"); 23. setSize(DEFAULT_WIDTH, DEFAULT_HEIGHT); 24. 25. // add panel to frame 26. 27. PlafPanel panel = new PlafPanel(); 28. add(panel); 29. } 30. 31. public static final int DEFAULT_WIDTH = 300; 32. public static final int DEFAULT_HEIGHT = 200; 33. } 34. 35. /** 36. A panel with buttons to change the pluggable look and feel 37. */ 38. class PlafPanel extends JPanel 39. { 40. public PlafPanel() 41. { 42. UIManager.LookAndFeelInfo[] infos = UIManager.getInstalledLookAndFeels(); 43. for (UIManager.LookAndFeelInfo info : infos) 44. makeButton(info.getName(), info.getClassName()); 45. } 46. 47. /** 48. Makes a button to change the pluggable look and feel. 49. @param name the button name 50. @param plafName the name of the look and feel class 51. */ 52. void makeButton(String name, final String plafName) 53. { 54. // add button to panel 55. 56. JButton button = new JButton(name); 57. add(button); 58. 59. // set button action 60. 61. button.addActionListener(new 62. ActionListener() 63. { 64. public void actionPerformed(ActionEvent event) 65. { 66. // button action: switch to the new look and feel 67. try 68. { 69. UIManager.setLookAndFeel(plafName); 70. SwingUtilities.updateComponentTreeUI(PlafPanel.this); 71. } 72. catch(Exception e) { e.printStackTrace(); } 73. } 74. }); 75. } 76. } javax.swing.UIManager 1.2
javax.swing.UIManager.LookAndFeelInfo 1.2
Example: Capturing Window EventsNot all events are as simple to handle as button clicks. Here is an example of a more complex case that we already briefly noted in Chapter 7. Before the appearance of the EXIT_ON_CLOSE option in the JDK 1.3, programmers had to manually exit the program when the main frame was closed. In a non-toy program, you will want to do that as well because you want to close the program only after you check that the user won't lose work. For example, when the user closes the frame, you may want to put up a dialog to warn the user if unsaved work is about to be lost and to exit the program only when the user agrees. When the program user tries to close a frame window, the JFrame object is the source of a WindowEvent. If you want to catch that event, you must have an appropriate listener object and add it to the list of window listeners. WindowListener listener = . . .; frame.addWindowListener(listener); The window listener must be an object of a class that implements the WindowListener interface. There are actually seven methods in the WindowListener interface. The frame calls them as the responses to seven distinct events that could happen to a window. The names are self-explanatory, except that "iconified" is usually called "minimized" under Windows. Here is the complete WindowListener interface: public interface WindowListener { void windowOpened(WindowEvent e); void windowClosing(WindowEvent e); void windowClosed(WindowEvent e); void windowIconified(WindowEvent e); void windowDeiconified(WindowEvent e); void windowActivated(WindowEvent e); void windowDeactivated(WindowEvent e); } NOTE
As is always the case in Java, any class that implements an interface must implement all its methods; in this case, that means implementing seven methods. Recall that we are only interested in one of these seven methods, namely, the windowClosing method. Of course, we can define a class that implements the interface, add a call to System.exit(0) in the windowClosing method, and write do-nothing functions for the other six methods: class Terminator implements WindowListener { public void windowClosing(WindowEvent e) { System.exit(0); } public void windowOpened(WindowEvent e) {} public void windowClosed(WindowEvent e) {} public void windowIconified(WindowEvent e) {} public void windowDeiconified(WindowEvent e) {} public void windowActivated(WindowEvent e) {} public void windowDeactivated(WindowEvent e) {} } Adapter ClassesTyping code for six methods that don't do anything is the kind of tedious busywork that nobody likes. To simplify this task, each of the AWT listener interfaces that has more than one method comes with a companion adapter class that implements all the methods in the interface but does nothing with them. For example, the WindowAdapter class has seven do-nothing methods. This means the adapter class automatically satisfies the technical requirements that Java imposes for implementing the associated listener interface. You can extend the adapter class to specify the desired reactions to some, but not all, of the event types in the interface. (An interface such as ActionListener that has only a single method does not need an adapter class.) Let us make use of the window adapter. We can extend the WindowAdapter class, inherit six of the do-nothing methods, and override the windowClosing method: class Terminator extends WindowAdapter { public void windowClosing(WindowEvent e) { System.exit(0); } } Now you can register an object of type Terminator as the event listener: WindowListener listener = new Terminator(); frame.addWindowListener(listener); Whenever the frame generates a window event, it passes it to the listener object by calling one of its seven methods (see Figure 8-4). Six of those methods do nothing; the windowClosing method calls System.exit(0), terminating the application. Figure 8-4. A window listener
CAUTION
Creating a listener class that extends the WindowAdapter is an improvement, but we can go even further. There is no need to give a name to the listener object. Simply write frame.addWindowListener(new Terminator()); But why stop there? We can make the listener class into an anonymous inner class of the frame. frame.addWindowListener(new WindowAdapter() { public void windowClosing(WindowEvent e) { System.exit(0); } }); This code does the following:
We say again that the syntax for using anonymous inner classes takes some getting used to. The payoff is that the resulting code is as short as possible. java.awt.event.WindowListener 1.1
java.awt.event.WindowStateListener 1.4
java.awt.event.WindowEvent 1.1
|
EAN: 2147483647
Pages: 132