Sending E-Mail
No stamps, no envelopes, and no licking ”the beauty of electronic mail. You can send e-mail anytime and to anywhere without having to leave the comfort of your computer. Once your e-mail program has been configured, you can begin sending and receiving messages, one of the fastest and easiest ways to communicate.
Creating an E-Mail Message
At its root, an e-mail message is simply a text message that you send to someone over the Internet. All that is required is an e-mail address so the computer knows where to send the message and, of course, the message itself.
-
Click on the Compose button . This will open up a window in which you can create your message.
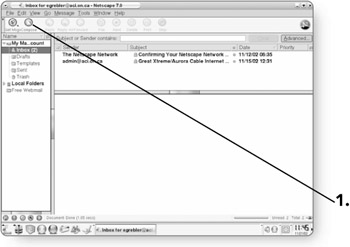
Tip You can also press Ctrl+M to open up the window that will allow you to create a new mail message.
-
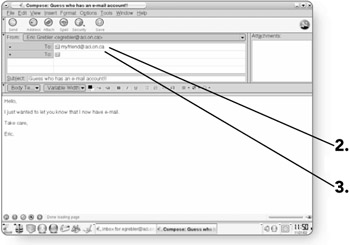
Click in the To field of the window.
-
Type the e-mail address of the person you wish to send the message to.
-
Press the Enter key to advance to the next line. If you are sending the e-mail to more than one recipient, you can enter another address.
-
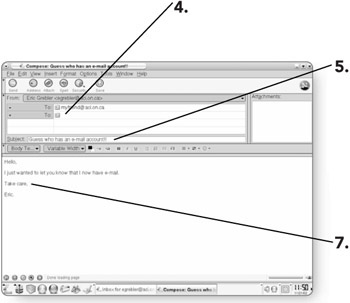
Click in the Subject field to enter a subject for your e-mail. You don't have to include a subject line in your e-mail, but it is a good idea, as it's one of the first things a recipient will see when receiving your e-mail.
-
Press the Tab key . This will advance your cursor to the body of the message.
-
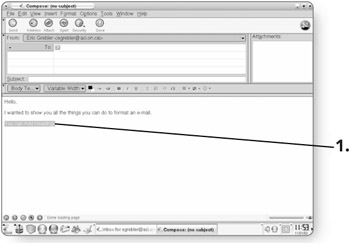
Type in your e-mail message . The process of typing your message is similar to typing in a word processor.
-
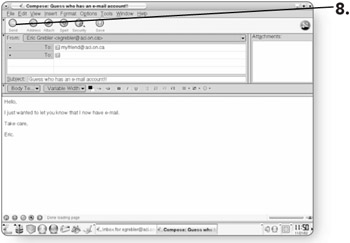
Click on the Send button . The e-mail will be sent to its recipients.
Changing the Type of Recipient
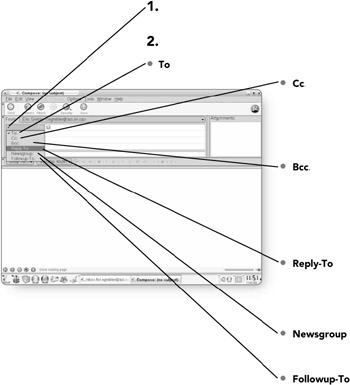
When you create an e-mail, you can control how the recipient will have access to the e-mail. There are five different address types.
-
Click on the down arrow beside the To field. A drop-down list of different recipient types will appear.
-
Click on the desired recipient type .
-
To . This is for the primary recipients of your message.
-
Cc . This stands for "carbon copy," which means that the recipient will receive a copy of the message and their name will be visible to everyone who received the message.
-
Bcc . This is for "blind carbon copy," which means that the recipient will receive a copy of the message, but their name will not be visible to anyone else who received the message.
-
Reply-To . If you'd like any replies to go to different e-mail addresses, rather than the original addressees, use Reply-To.
-
Newsgroup . This field is for posting your message to a newsgroup.
-
Followup-To . This is used to redirect a newsgroup posting. All replies will go to this newsgroup rather than the original.
-
Formatting an E-Mail
Why send boring black and white text e- mails when you can send bright, colorful e-mails using the Lindows e-mail program? Formatting e-mails is very similar to formatting documents in a word processor. You can change the font, color , size , and justification of your text, and you can even add graphics.
Formatting Text
If you've ever used a word processor, then formatting text in an e-mail should seem very familiar to you.
-
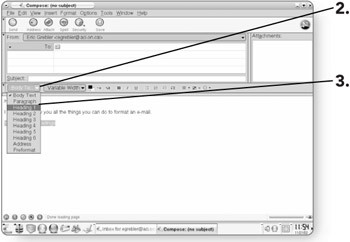
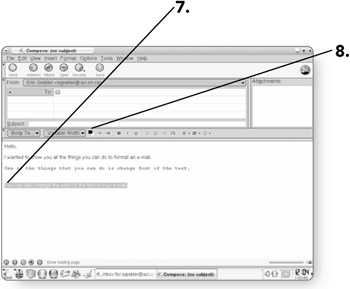
Click and drag across the text that you'd like to add a heading to. A heading is a preset format that you can apply to a body of text.
-
Click on the down arrow beside the Body Text list to choose from a list of different heading styles.
-
Select a heading style and the formatting of the selected text will change.
-
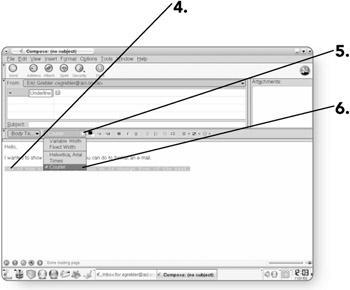
Click and drag across the text you want to change. It will be highlighted.
-
Click on the down arrow beside the Variable Width list. A list of fonts will appear.
-
Select the desired font , and the highlighted text will change to that font.
-
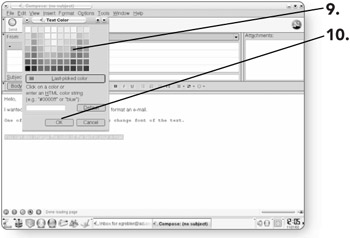
Click and drag across the text that you'd like to change color.
-
Click on the Color button . The Text Color dialog box will open, filled with different colors.
-
Click on the desired color .
-
Click on OK , and the highlighted text will change color.
-
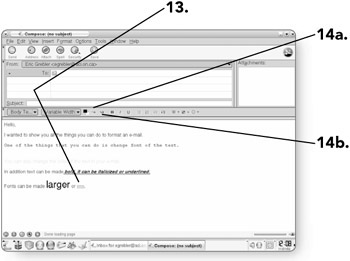
Click and drag across the text that you'd like to modify.
-
Select the Bold, Italic, or Underline buttons to apply those effects to the text.
Tip The shortcut keys for Bold, Italics, and Underline are Ctrl+B, Ctrl+I, and Ctrl+U, respectively.

-
Highlight the text that you'd like to change.
-
-
Click on the Smaller Font Size button to reduce the size of the font. Every time you click this button, the text will get smaller and smaller.
OR
-
Click on the Larger Font Size button to increase the size of the font. The font will increase in size every time you click on the button.
-
-
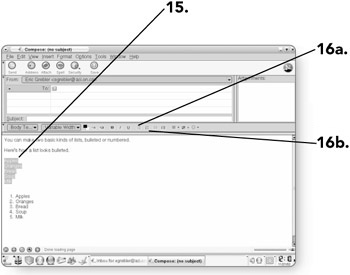
Click and drag across the text that you'd like to add bullets or numbers to.
-
-
Click on the Bulleted List button . A bullet will be put in front of every item in the list.
OR
-
Click on the Numbered List button. Numbers will be placed in front of every item in your list in ascending order.
-
-
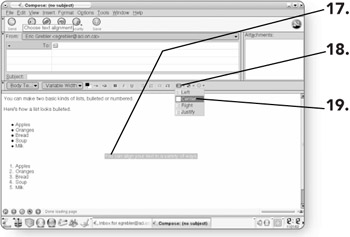
Click and drag across the text that you'd like to align.
-
Click on the Alignment button . A list of different alignment options will appear.
-
Select the desired alignment option, and your highlighted text will be aligned.
Inserting Pictures into E-Mail
One of the great features of e-mail is that you can insert a picture directly into the body of your message. Inserting pictures is different from attaching a picture, which we'll cover later in this chapter. Inserting puts the image directly in the body of the message, while attaching sends along a separate file.
-
Click on Insert . The Insert menu will appear.
-
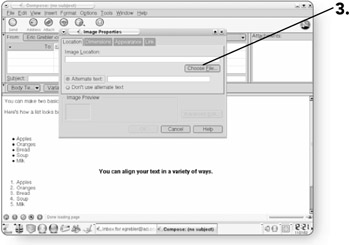
Click on Image . The Image Properties dialog box will open, allowing you to insert an image.
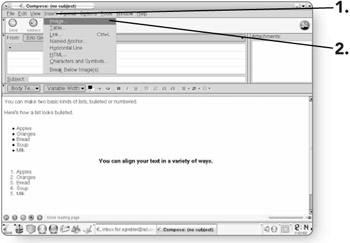
-
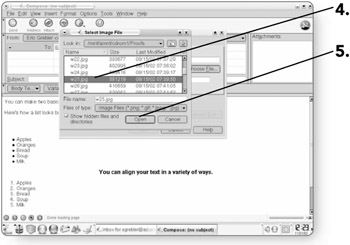
Click on the Choose File button . The Select Image File dialog box will open, allowing you to select an image.
Note You can insert images formatted as .PNG, .GIF, .JPEG, or .JPG file types.
-
Click on the image file name you'd like to insert.
-
Click on Open to insert the image.
-
Click on the radio button beside Don't use alternate text. Some e-mail packages don't support images, so alternate text would include text in the place of the image.
-
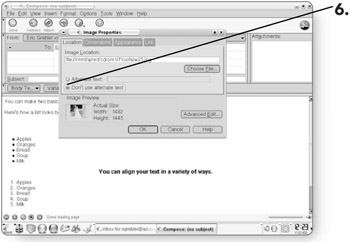
Click on the Dimensions tab of the Image Properties dialog box. This will open up an area where you can change the dimensions of the image. Typically the original size of the photo is too big to e-mail, so you can change its size in this area.
-
Click on the radio button beside Custom Size. This will allow you to change the dimensions of the photo.
-
Type new dimensions for the image. By default, the Constrain box is checked, meaning that if you change the height, the width will change automatically to match the dimensions of the photo.
-
Click on OK , and the picture will be inserted into the e-mail where your cursor was positioned.

Adding a Mood Icon to Your E-Mail
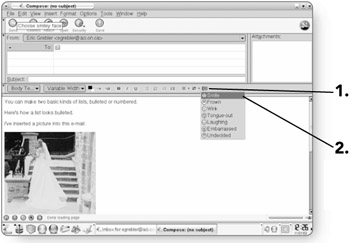
The Netscape e-mail program that comes with Lindows allows you to insert different face icons to express your mood in an e-mail.
-
Click on the Choose smiley face button to select from a list of facial expressions.
-
Click on the desired smiley face , and it will appear in your e-mail where your cursor was positioned.
Changing the Background of an E-Mail
You can change the background color of your e-mail or insert any picture as the background for your e-mail.
-
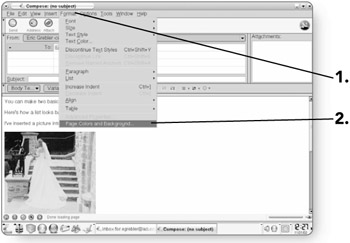
Click on Format . The Format menu will appear.
-
Click on Page Colors and Background . The Page Colors and Background dialog box will open, allowing you to change your background settings.
-
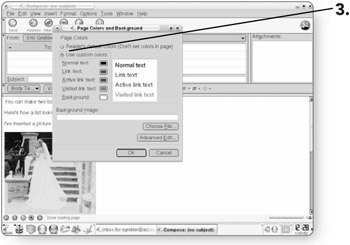
Click on Use custom colors so that you can set your own background colors.
-
Click on the Background box . The Page Background dialog box will open with different colors to choose from.
-
Select the desired color . This will become the background color for your e-mail.
-
Click on OK . The new background color will appear in the Preview window.
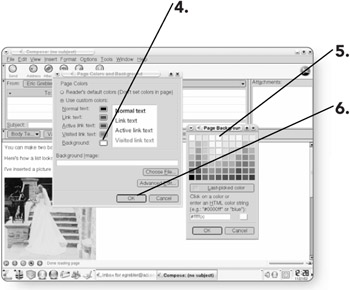
Tip By clicking on Choose File in the Page Colors and Background dialog box, you can navigate your computer and select a picture to use as a background image.
-
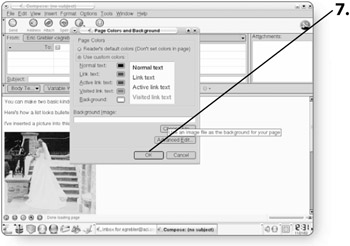
Click on OK , and the background that you've selected will be applied to your e-mail.
-
Click on the Send button . The message will be sent to the recipient, and a copy will be placed in your Sent folder.
Inserting a Hyperlink in an E-Mail
Perhaps you are surfing the Internet and come across a Web site that you think a friend will find particularly interesting. In an e-mail to that friend, you can include a hyperlink that will allow them to jump directly to that page from their e-mail program. You can also include e-mail addresses or turn any piece of text into a link.
-
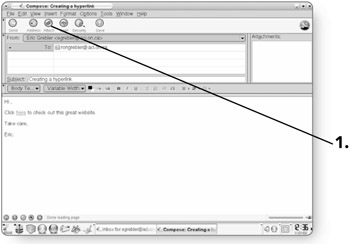
Click and drag across the text that you'd like to turn into a link. The text will be highlighted.
-
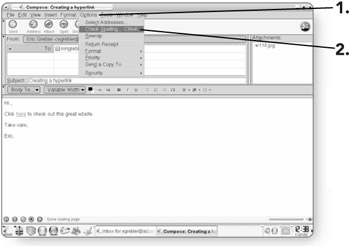
Click on Insert. The Insert menu will appear.
-
Click on Link . The Link Properties dialog box will appear.

-
Type the e-mail or http: address for the link. If you want the link to open up an e-mail program, you can enter it as a mailto: link, for example, <mailto:chris.gray@hockey.com.> Otherwise, you can add a normal hyperlink, for example, www.lindows.com.
-
Click on OK . The text will appear blue with a blue underline, indicating that it is an active link.

Attaching Files to an E-Mail Message
A convenient way to send digital photos, documents, or other types of files is as an attachment. An attachment can be any file on your computer that you wish to share with someone else. You should keep in mind, however, that depending on your ISP (Internet service provider), there are certain limitations on the number and size of files that you can send in any one e-mail.
-
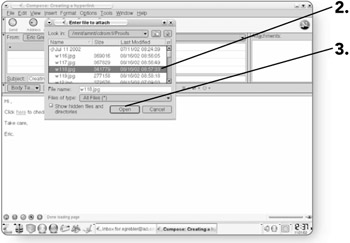
Click on the Attach button . The Enter file to attach dialog box will open, from which you can choose the file you'd like to attach.
-
Locate and click on the file that you'd like to attach.
-
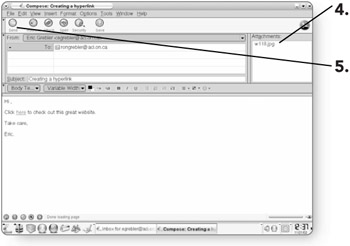
Click on Open . This will attach the file to your e-mail.
-
Review the attachments by checking in the Attachments window.
-
Click on the Send button . The e-mail will be sent with the attachment.
Spell Checking E-Mail
U spel not so goode? If that's the case, there is a spell checker built directly into the e-mail program.
-
Click on Options . The Options menu will appear.
-
Click on Check Spelling to open up the spell checker.
Tip The keyboard shortcut Ctrl+K will automatically open up the spell checker.
-
-
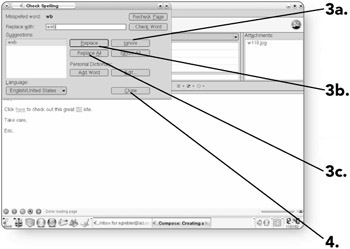
Click on Ignore if the word in the Replace with text box is spelled correctly.
OR
-
Click on Replace to replace the incorrect word with the word selected in the Suggestions area.
OR
-
Click on Replace All to replace every instance of the incorrect word with the word selected in the Suggestions area.
-
-
Click on Close to shut down the spell checker and return to your e-mail.
EAN: 2147483647
Pages: 152