Section 8.1. Start by Understanding the Process
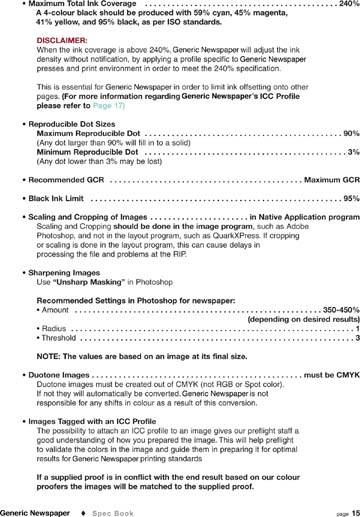
8.1. Start by Understanding the ProcessTo prepare your images in Photoshop for newsprint, you'll need to understand the process. Lets take a few steps back and see the progression of an image to newsprint. Although some images are intended for use exclusively in newspaper, typically images used for other ad placements are repurposed for newsprint. An image may start as a magazine ad and end up in a newspaper. The first thing to understand is that coated paper stock is typically used in quality magazines is not very absorbent, and therefore higher line screens and higher ink densities can be used for the images. Newsprint stock or paper, on the other hand, is very absorbent, so fine-line screens and full, rich images will not print well. Fine screen values printed on newsprint stock fill in very quickly when the ink hits the paper, and full dense areas and shadow details completely plug up or fill in. Subtle lines and details also become soft because the lines and details spread due to the nature of the paper stock. Note: Drop a droplet of water on a tissue and watch how quickly it spreads . The same effect happens with ink on newsprint. One thing you may want to get your hands on is a specification sheet from your local newspaper printer, like the ones shown in Figures 8-1 and 8-2. Figure 8-1. Specifications supplied by a typical newspaper printer for black and white ads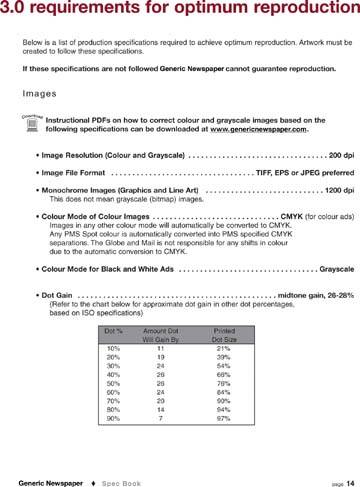 8.1.1. Setting Up Your Image to Meet the Client's SpecsLet's look at some of the specs mentioned and see how we can apply them.
8.1.2. Using Photoshop Tools to Simulate a Newspaper Press Try to get an ICC profile from your local newspaper that you can load into Photoshop to check you images and to simulate press conditions. Figure 8-3 shows you the process through which to use the profiles in Photoshop. Prior to using the profiles in Photoshop, though, you'll have to copy the supplied profile into the following folder: On you main hard disk, go to Library Figure 8-3. Set up a custom profile to meet the client's spec sheet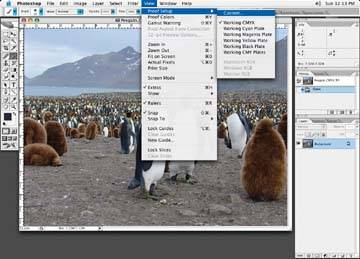 To load the profile to view your file, go to View Figure 8-4. The Customize Proof Condition dialog box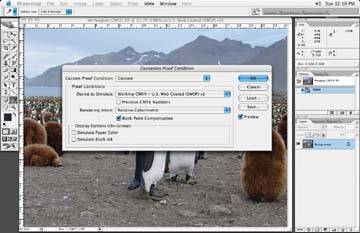 Under Device to Simulate, you will want to load the newspaper profile the newspaper company supplied you with. Figure 8-5 shows the options that come up on my computer. Figure 8-5. Choose the profile under which you wish to view your image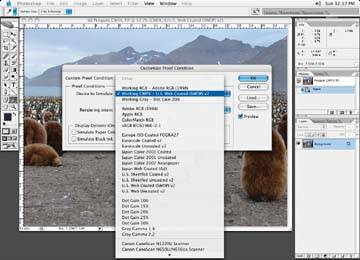 Figure 8-6. A sample compensation curve using the Curve tool in Photoshop, based on the dot gain specifications supplied by the newspaper company or printer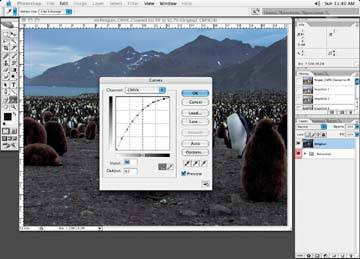 When the image you are to correct for newspaper is open and you wish to get an idea of how it may look in the newspaper, simply select View Creating a compensation curve in Photoshop, as shown in Figure 8-6, may also be useful. You can then use the compensation curve you create to check your images as you plot along with the changes you make. You would never apply the curve, it would simply be used as a guide to show how the image may look when printed. To create the newspaper compensation curve based on what the newspaper specs suggest, open your image. Go to your Photoshop menu and select: Image Look at the numbers supplied to you to see how the ink gains from the newspaper. Place a dot on the curve line that represents each of the numbers. Then type in a gain value in the Output box for each dot you place on the curve line. For instance, if you place a dot on the curve line that reads 20, and the newspaper says that a 20 gains to 30, then type 20 in the Input box and 30 in the Output box. Keep adding dots and type in the both the input and output values for each dot until you build a curve like the one in the example. The techniques described in this chapter will apply to both black and white and full color images. I'll talk about full color images because there are more steps involved, but the changes are applicable to any color mode. |
 Application Support
 EAN: N/A
Pages: 83