Installing INF Files
|
|
Setup Information files have the .inf extension; I call them INF files. The Windows XP setup API (Application Programming Interface) uses INF files to script installations. Most people associate INF files with device-driver installation, but applications often use them, too. Most actions that you associate with installing device drivers and applications are available through INF files. You can copy, remove, and rename files. You can add, change, and delete registry values. You can install and start services. You can install most anything using INF files. For example, you can use them to customize registry settings—obviously. You can also create INF files that users can uninstall using Add Or Remove Programs.
INF files look similar to INI and REG files. They're text files that contain sections that look like [Section]. Each section contains items, sometimes called properties, that look like Name = Value. Windows XP happens to come with the perfect INF-file editor: Notepad. When you create a new INF file using Notepad, make sure that you enclose the file name in quotation marks or choose All Files in the Save As Type list in the Save As dialog box. That way, your file will have the .inf extension instead of the .txt extension. Installing an INF file is straightforward: Right-click the INF file, and then click Install. To deploy an INF file and prevent users from having to install it manually, use the following command, replacing Filename with the name of your INF file. (This is the command line that Windows XP associates with the .inf file extension in the registry.)
rundll32.exe setupapi,InstallHinfSection DefaultInstall 132 Filename.inf
Listing 9-1 shows a simple INF file. The first section, [Version], is required. The name of the second section is arbitrary but usually [DefaultInstall] so that users can right-click the file to install it. The linkage to this section is through the command line you saw just before this paragraph. The command is rundll32.exe, which executes the API in Setupapi.dll called InstallHinfSection. The next item on the command line, DefaultInstall, is the name of the section to install. The 132 you see before the file name tells the setup API to prompt the user before rebooting the computer, if necessary. The last item on the command line is the name of the INF file to install. Like I mentioned, because this is the command that Windows XP associates with the .inf file extension, you should usually name this section [DefaultInstall]. Within this section you see two directives, AddReg and DelReg. The directive AddReg=Add.Settings adds the settings contained in the section [Add.Settings].
Listing 9-1: Example.inf
[Version] Signature=$CHICAGO$ [DefaultInstall] AddReg=Add.Settings DelReg=Del.Settings [Add.Settings] HKCR,regfile\shell,,0,"edit" [Del.Settings] HKCU,Software\Microsoft\Windows\CurrentVersion\Applets\Regedit
The directive DelReg=Del.Settings deletes the settings listed in the section [Del.Settings]. The names of these sections are arbitrary; you should adopt names that make sense to you and stick with them so you don't confuse yourself down the road.
Now you've had my two-dollar tour of an INF file. The sections that follow describe how to write the different parts of an INF file. I'm focusing on using INF files to edit the registry, but you can do much more with them. The ultimate resource for writing INF files is http://msdn.microsoft.com/library/en-us/install/hh/install/inf-format_7soi.asp on Microsoft's Web site. This is the INF File Sections and Directives section of the Windows Driver Development Kit (DDK). Don't let the fact that this information is in the DDK scare you; it's really straightforward and useful for much more than installing device drivers.
Starting with a Template
I never start INF files from scratch. I can't be bothered to remember the format of the sections and directives, so I use a template. I'm lazy enough (or efficient enough) that I add the template you see in Listing 9-2 to the Templates folder in my user profile so that I can right-click in a folder, and then click New, Setup Information File. The easiest way is to first create the file Setup Information File.inf with the contents of Listing 9-2. Then use Tweak UI, which you learn about in Chapter 5, "Mapping Tweak UI," to add the template. It's a real timesaver.
Listing 9-2: Setup Information File.inf
[Version] Signature=$CHICAGO$ [DefaultInstall] BitReg=Bits.Set AddReg=Reg.Settings AddReg=Reg.Uninstall CopyFiles=Inf.Copy [DefaultUninstall] BitReg=Bits.Clear DelReg=Reg.Settings DelReg=Reg.Uninstall DelFiles=Inf.Copy [Reg.Settings] ; ROOT,SUBKEY[,NAME[,FLAG[,DATA]]] ; ; FLAG: ; ; 0x00000 - REG_SZ ; 0x00001 - REG_BINARY ; 0x10000 - REG_MULTI_SZ ; 0x20000 - REG_EXPAND_SZ ; 0x10001 - REG_DWORD ; 0x20001 - REG_NONE [Bits.Set] ; ROOT,SUBKEY,NAME,FLAG,MASK,BYTE ; ; FLAG: ; ; 0x00000 - Clear bits in mask ; 0x00001 - Set bits in mask [Bits.Clear] ; ROOT,SUBKEY,NAME,FLAG,MASK,BYTE ; ; FLAG: ; ; 0x00000 - Clear bits in mask ; 0x00001 - Set bits in mask [Reg.Uninstall] HKCU,Software\Microsoft\Windows\CurrentVersion\Uninstall\%NAME% HKCU,Software\Microsoft\Windows\CurrentVersion\Uninstall\%NAME%,DisplayName\ ,,"%NAME%" HKCU,Software\Microsoft\Windows\CurrentVersion\Uninstall\%NAME%,UninstallString\ ,,"Rundll32.exe setupapi.dll,InstallHinfSection DefaultUninstall 132"\ " %53%\Application Data\Custom\FILENAME" ; ROOT: ; ; HKCU ; HKLM [Inf.Copy] FILENAME [DestinationDirs] Inf.Copy=53,Application Data\Custom ; DIRID: ; ; 10 - %SystemRoot% ; 11 - %SystemRoot%\System32 ; 17 - %SystemRoot%\Inf ; 53 - %UserProfile% ; 54 - %SystemDrive% ; -1 - Absolute path [SourceDisksNames] 55=%DISKNAME% [SourceDisksFiles] FILENAME=55 [Strings] NAME = "Jerry's NAME" DISKNAME = "Setup Files"
The reason this template makes creating INF files so easy is because I've added comments to it. Comments begin with the semicolon (;) and add descriptive information to the file. In this case, for each section, I described the format of the different directives. In the [Reg.Settings] section, for example, you see the syntax for adding values to the registry. In the [Bits.Set] section, you see the format for setting individual bits in a number. I often write INF files that users can uninstall using Add Or Remove Programs; the template in Listing 9-2 shows you how to do that. If you don't want users to uninstall the file and its settings, remove the [DefaultUninstall], [Reg.Uninstall], [Inf.Copy],[DestinationDirs], [SourceDisksNames], and [SourceDisksFiles] sections and any linkages to those sections. In this template, all-capitalized words are placeholders that I replace when I create an INF file. For example, I replace FILENAME with the INF file's actual name.
The first two lines in Listing 9-2 are the only ones required. The [Version] section and the Signature property identify the file as a valid INF file. You must include these two lines at the top of all your INF files. Incidentally, Chicago was Microsoft's code name for Microsoft Windows 95, and so version=$CHICAGO$ identifies the file as a Windows 95 INF file. These days, $CHICAGO$ indicates an INF file that's compatible with all versions of Windows. Use $Windows 95$ if you want to indicate that your INF file is compatible with 16-bit versions of Windows only. Use $Windows NT$ to indicate that your INF file is compatible with 32-bit versions of Windows only. Generally, I leave Signature set to $CHICAGO$.
Linking Sections Together
After the [Version] section is usually the [DefaultInstall] section. As I said earlier, the name of this section is arbitrary, but you should use [DefaultInstall] if you want users to be able to install your INF file by right-clicking it. The command associated with the .inf file extension references this section by name. This is the section that links together your INF file. You fill it with directives that tell the Setup API which sections in the INF file to process and what to do with them.
You saw this section in Listing 9-2. Each line in this section is a directive. The Setup API supports a number of different directives, but the ones we care about in this book are AddReg, DelReg, and BitReg. In the listing, you see a line that says AddReg=Reg.Settings. This adds the settings listed in the [Reg.Settings] section. The line BitReg=Bits.Set sets the bit masks listed in the section [Bits.Set]. As well, you can list more than one section for each directive. You can duplicate a directive on multiple lines, for example, or you can assign multiple sections to it: AddReg= Section1,Section2,SectionN. For an example, see Listing 9-3.
Listing 9-3: Example.inf
[Version] Signature=$CHICAGO$ [DefaultInstall] AddReg=Reg.Settings1,Reg.Settings2,Reg.Settings3 AddReg=Reg.Settings4 AddReg=Reg.Settings5 DelReg=Reg.Settings6 [Reg.Settings1] ; Registry settings to add or change [Reg.Settings2] ; Registry settings to add or change [Reg.Settings3] ; Registry settings to add or change [Reg.Settings4] ; Registry settings to add or change [Reg.Settings5] ; Registry settings to add or change [Reg.Settings6] ; Registry keys and values to remove
| Note | The order of the AddReg and DelReg directives doesn't matter. The Setup API processes all DelReg directives first, followed by the AddReg sections. |
Adding Keys and Values
As you just saw, the AddReg directive in [DefaultInstall] indicates the names of sections that contain settings you want to add to the registry. These are [add-registry-section] sections. You can add new keys, set default values, create new values, or modify existing values using an [add-registry-section] section. And each section can contain multiple entries. Each [add-registry-section] name must be unique in the INF file.
Syntax
[add-registry-section] rootkey, [subkey], [value], [flags], [data]
| rootkey | This is the root key containing the key or value you're modifying. Use the abbreviations HKCR, HKCU, HKLM, or HKU. |
| subkey | This is the subkey to create or the subkey in which to add or change a value. This is optional. If missing, all operations are on the root key. |
| value | This is the name of the value to create or modify if it exists. This value is optional. If value is omitted and the flags and data parameters are given, operations are on the key's default value. If value, flags, and data are omitted, you're adding a subkey. |
| flags |
|
| data | This is the data to write to value. If the value doesn't exist, the Setup API creates it; if the value exists, the API overwrites it; if the value is REG_MULTI_SZ and you set the 0x00010008 flag, the API adds the value to the existing string list. If you omit data, the Setup API creates the value without setting it. See the following example to learn how to format each type of value. |
Example
[Version] Signature=$CHICAGO$ [DefaultInstall] AddReg=Reg.Settings [Reg.Settings] ; Sets the default value of HKCU\Software\Sample HKCU,Software\Sample,,,"Default" ; Creates a REG_SZ value called Sample HKCU,Software\Sample,String,0x00000,"String" ; Creates a REG_BINARY value called Binary HKCU,Software\Sample,Binary,0x00001,00,01,30,05 ; Creates a REG_MULTI_SZ value called Multisz HKCU,Software\Sample,Multisz,0x10000,"String list" ; Creates a REG_DWORD value called Dword HKCU,Software\Sample,Dword,0x10001,0x01010102 ; Creates a REG_SZ value called Hello HKLM,SOFTWARE\Sample,Hello,,"World" ; Creates a REG_DWORD value and sets it to 0x0000 HKLM,SOFTWARE\Sample,Nothing,0x10001
Deleting Keys and Values
The [DefaultInstall] section's DelReg directive specifies sections containing registry keys and values to delete. These are [del-registry-section] sections. They are much simpler than the [add-registry-section] sections but have similar rules: Each section can contain multiple entries, and the name of each section must be unique.
Syntax
[del-registry-section] rootkey, [subkey], [value], [flags], [data]
| rootkey | This is the root key containing the key or value you're deleting. Use the abbreviations HKCR, HKCU, HKLM, or HKU. |
| subkey | This is the subkey to delete or subkey from which to delete a value. This is optional. If missing, all operations are on the root key. |
| value | This is the name of the value to delete. This value is optional. If value is omitted, you're deleting subkey. |
| flags |
|
| data | This is used only when flags is 0x00018002. This specifies the string to remove from a REG_MULTI_SZ value. |
Example
[Version] Signature=$CHICAGO$ [DefaultInstall] DelReg=Reg.Settings [Reg.Settings] ; Removes the key HKCU\Software\Sample HKCU,Software\Sample ; Removes the value Hello from HKCU\Software\Sample HKCU,Software\Sample,Hello ; Removes the string "World" from the REG_MULTI_SZ value Hello HKCU,Software\Sample,Hello,0x00018002,"World"
Setting and Clearing Bits
The BitReg directive is similar to the AddReg directive. You add it to the [DefaultInstall] section to indicate the names of sections that contain bits you want to set and clear. These are [bit-registry-section] sections. Use the BitReg directive when you want to work with bit masks in the registry. For example, if you want to enable certain user-interface features in the value UserPreferencesMask, use this directive. Like the other directives you learned about, each section can contain multiple entries, and the name of each section must be unique.
In the following description of the syntax, notice the differences between the [bit-registry-section] and [add-registry-section] sections. The parameter value is not optional. Also, the parameters mask and byte replace the value data. The parameter mask is 8 bits long and indicates which bit you want to enable or disable. The parameter byte indicates which byte in the binary value you want to modify. This indicates bytes left to right starting from 0. This is straightforward when working with REG_BINARY values but less so when working with REG_DWORD values. As discussed in Chapter 1, "Learning the Basics," Windows XP stores REG_DWORD values in the registry in reverse-byte order (little-endian architecture). To be sure, test your INF files carefully to make sure you're masking the bits you think you're masking. Figure 9-1 shows the relationship between value, mask, and byte. The value to which I'm applying the mask is a REG_DWORD value stored in the registry in reverse-byte notation: 0x0180C000. Set the mask in byte 0, and the result is 0x0180C080. Clear the mask in byte 1, and the result is 0x0140C080.
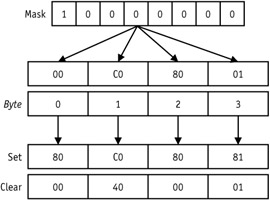
Figure 9-1: The parameter byte indicates to which of a number's bytes you want to apply mask.
Syntax
[bit-registry-section] rootkey, [subkey], value, [flags], mask, byte
| rootkey | This is the root key containing the value you're modifying. Use the abbreviations HKCR, HKCU, HKLM, or HKU. |
| subkey | This is the subkey in which to change a value. This is optional. If missing, all operations are on the root key. |
| value | This is the name of the value to modify. This value is not optional and should be a REG_DWORD or REG_BINARY value. |
| flags |
|
| mask | This is the byte-sized mask specifying the bits to set or clear in the specified byte of value. Specify this value in hexadecimal notation. Bits that are 1 will be set or cleared, depending on flags, and bits that are 0 will be ignored. |
| byte | This specifies the byte in value to which you want to apply mask. The left-most byte is 0, the next is 1, and so on. Keep in mind that Windows XP stores REG_DWORD values in reverse-byte order when specifying which byte on which to apply mask. Thus, in REG_DWORD values, the right-most byte is stored first in memory. |
Example
[Version] Signature=$CHICAGO$ [DefaultInstall] BitReg=Bit.Settings [Bit.Settings] ; Changes 50,00,10,00 to 31,00,10,00 HKCU,Software\Sample,Mask,0x0001,0x01,0 ; Changes 50,00,F0,00 to 30,00,70,00 HKU,Software\Sample,Mask,0x0000,0x80,2
Using Strings in INF Files
You can make your INF files far easier to read if you use the [Strings] section. Each line in this section is a string in the format name ="string". Then you can use that string elsewhere in the INF file by referencing it as %name%. This makes INF files easier to read in numerous ways (see Listing 9-4, which is also a good example of using the BitReg directive):
-
The [Strings] section collects strings at the bottom of your INF file so that you can see them in one place.
-
The [Strings] section enables you to type a string one time and then use that string in numerous places. The string is consistent throughout your INF file.
-
The [Strings] section makes translating INF files easier because localizable strings are at the bottom of the file.
Listing 9-4: Strings.inf
[Version] Signature=$CHICAGO$ [DefaultInstall] BitReg=Bits.Set AddReg=Add.Settings DelReg=Del.Settings [Add.Settings] HKCU,%HK_DESKTOP%,ActiveWndTrkTimeout,0x10001,1000 HKLM,%HK_SETUP%,RegisteredOwner,,%OWNER% [Del.Settings] HKCU,%HK_EXPLORER%\MenuOrder HKCU,%HK_EXPLORER%\RunMRU HKCU,%HK_EXPLORER%\RecentDocs HKCU,%HK_EXPLORER%\ComDlg32\LastVisitedMRU HKCU,%HK_SEARCH%\ACMru HKCU,%HK_INTERNET%\TypedURLs [Bits.Set] HKCU,%HK_DESKTOP%,UserPreferencesMask,1,0x01,0 HKCU,%HK_DESKTOP%,UserPreferencesMask,1,0x40,0 [Strings] HK_DESKTOP="Control Panel\Desktop" HK_EXPLORER="Software\Microsoft\Windows\CurrentVersion\Explorer" HK_SEARCH="Software\Microsoft\Search Assistant" HK_INTERNET="Software\Microsoft\Internet Explorer" HK_SETUP="SOFTWARE\Microsoft\Windows NT\CurrentVersion" OWNER=" Fuzzy Wuzzy Was a Bear"
| Note | Here's the truth-in-advertising bit: I seldom use strings because I don't often localize INF files. I use strings only when doing so really does make the INF file easier to read. In particular, when a line becomes so long that it wraps, I use a string to shorten it. Alternatively, you can use the line-continuation character, a backslash (\), to split lines. I also use strings for values that change frequently, particularly in template INF files. Strings make using templates easier. |
|
|
EAN: 2147483647
Pages: 185