Chapter 8: Finding Registry Settings
|
|
This chapter shows you how to relate a setting in the user interface to a value in the registry. Power users can use this information to find their own registry hacks. IT professionals get the long end of this stick, though; they can use the information to locate settings in the registry for a variety of purposes. For example, after they've found settings, they can build administrative templates for them and deploy the settings on their network. They can write scripts that automatically apply the settings they found. They can even use this information to help build and deploy better default user profiles.
Three basic techniques are available for tracking down settings. The first, and often most effective, is comparing two snapshots of the registry. Take one snapshot before changing a setting and the second after you've made a change. The second method is monitoring the registry to detect changes that a program makes. Monitoring is often difficult because of the way Microsoft Windows XP and programs thrash the registry. Nonetheless, with a good tool and the tips you read here, it is an occasionally useful method. The last is auditing, which is the most difficult to use effectively and causes performance degradation. Because the first method is often most effective, that's where I start.
Comparing REG Files
Comparing two REG files is often the easiest way to discover where in the registry Windows XP stores a setting. Create these REG files before and after changing a setting that is in the user interface and that you know is somewhere in the registry. This is how I found the location of the settings that Tweak UI includes and that I documented in Chapter 5, "Mapping Tweak UI." First I exported HKCU to a REG file. I changed a setting in Tweak UI and exported the same branch to a second REG file. Then I compared the two files to figure out which value changed when I changed the setting in Tweak UI. You can use this method to trace just about any setting that has a user interface to its location in the registry.
The only disadvantage to comparing two registry files is that the process requires a file-comparison tool. Windows XP comes with such a tool, though, which I'll tell you about later in this section. The advantages of this method are many. First it's quick and easy. Second its results are dead-on accurate. If you don't let a lot of time pass between each snapshot, the differences between the two should include only those settings you changed. Also, REG files are easy to read, so you won't have any problems deciphering the results.
Now for some details. Recall that Registry Editor (Regedit) can export all or part of the registry to text files that have the .reg extension (REG files). A REG file looks similar to an INI file. It contains one or more sections; the name of each section is the path of a registry key. Each section contains the key's values. The format of each value is name = value. If the value is a string containing spaces, value must be quoted. Each key's default value looks like @= value. Chapter 9, "Scripting Registry Changes," describes REG files in all their glory, including how to interpret the different types of values in them. To export the registry to a REG file, click the key that you want to export. Then on the File menu, click Export. In the Export Registry File dialog box, click Win9x/NT4 Registration Files (*.reg) to export to a version 4 ANSI REG file. Remember from Chapter 2, "Using the Registry Editor," that Regedit supports REG files in two different file formats: ANSI and Unicode. Many file-comparison tools work only with the first, thus you must create version 4 ANSI REG files for them. The tools I talk about in this chapter support Unicode text files, though. If you're not familiar with ANSI and Unicode character encoding, see Chapter 1, "Learning the Basics."
The sections following this one describe tools you can use to compare two REG files. My personal favorite is WinDiff, which comes with Windows XP. I like this tool so much because of its simple user interface and, more importantly, the speed at which it compares very large text files. Another choice is probably already installed on your computer: Microsoft Word 2002. It's slower than WinDiff, but you're probably already familiar with how to use this word processor. In any case, the overall process is the same:
-
Export the registry to a REG file. Name the file something like Before.reg. If you have a general idea where the setting is in the registry, export that branch; otherwise, export the entire registry, including HKCU and HKLM.
-
Change a setting in the user interface or perform some other action that you're trying to trace to the registry. For example, if you want to see where a program stores its settings during installation, install the program.
-
Export the registry to a second REG file. Name it After.reg. Make sure you export the same branch using the same file format as you did in step 1. If you don't duplicate the process exactly, the files won't match, and finding the difference will be difficult.
-
Compare Before.reg and After.reg using your favorite file-comparison utility. The differences between the two files are your changes. The file-comparison tool points out only the values that changed, because only the values under each section heading change, but if you look a little higher in the file, you'll see the key that contains the values.
LastBit Software produces a program called RegSnap that performs the process I described in this section. You don't have to create any REG files or compare two REG files with a file-comparison tool. RegSnap does the whole bit for you, making it a cool program to have around if you do this sort of thing on a regular basis. You can download the shareware version of RegSnap from http://www.webdon.com. Give it a try; if you like it, it's very inexpensive. It comes in a standard edition and a professional edition. The professional edition enables you to work with remote registries; otherwise, the standard edition is sufficient to locate a setting in the registry. The only problem I have with RegSnap is that its user interface is very clunky.
That leads me to RegView, from Vincent Chiu. This program is available at http://home.xnet.com/~vchiu/regview.shtml. I like this program because it has a cleaner user interface. You can use it to edit and search the registry and to compare different versions of it. RegView doesn't have a setup program, but it really doesn't need one. Figure 8-1 shows the result in RegView of comparing a snapshot to the current registry. RegView's output is a little easier to read than RegSnap's output, but RegView is quite a bit slower at producing it.

Figure 8-1: RegView is an enhanced registry editor.
If turn-around time is important to you, use RegSnap. If you're after an enhanced registry editor that can do a search-and-replace as well as compare snapshots of the registry, you should consider RegView. Both shareware programs are inexpensive, but if you don't want to shell out the money, stick with the methods you learn in this chapter.
There are a few ways to make this process more efficient. Comparing two large REG files can take a while—even using WinDiff. If you're pretty certain you know the general vicinity of a setting in the registry, export just that branch. For example, if you know a setting is a per-user setting, export just HKCU. If you suspect it's somewhere in HKLM\SOFTWARE\Microsoft, search just that branch. You can always resort to exporting the entire registry if your hunch isn't right. Another way to streamline the process is to ignore differences that are irrelevant. Some settings change whether or not you doing anything. For example, Plug and Play values change frequently, as does the configuration of some services. The easiest way to eliminate the confusion that these inherent changes cause is to exclude HKLM\SYSTEM in your REG files. Also, the less time that elapses between snapshots, the less noise you'll have in your comparison results.
Using WinDiff
WinDiff is the ultimate tool for comparing two versions of a text file. Its roots are as a developer tool for comparing different versions of source files to see changes before checking them into version control. It was also useful as a debugging tool to figure out which changes in a source file might have introduced a problem. WinDiff was originally available in the Windows Software Development Kit (SDK). Microsoft included it in the last several Windows resource kits. It comes with Windows XP as part of the Windows XP Support Tools. Install the tools from \Support\Tools on your Windows XP CD. Type windiff in the Run dialog box to start it.
After starting WinDiff, here's how to compare two REG files with it:
-
On the File menu, click Compare Files.
-
Type the path and name of the first file, and click Open.
-
Type the path and name of the second file, and click Open.
-
On the View menu, click Expand, or double-click the files in the list.
After comparing the two files, you see results similar to Figure 8-2. WinDiff combines both files and highlights the differences in red and yellow. Differences are relative to the second file, which is why I had you open the second file after the first one. Deleted lines, present in the first file but not in the second, are red. Inserted lines, absent in the first file but present in the second, are yellow. White lines are the same in both files. You also see arrows that indicate whether a line is deleted or inserted. A left arrow (<!) indicates a line deleted from the second file, and a right arrow(!>) indicates a line inserted into the second file. WinDiff represents changed lines as deletions followed by insertions, as shown in Figure 8-2. Because WinDiff compares files line by line instead of character by character, you have to judge for yourself whether a deleted line followed by an inserted line represents a changed line of text. Press F8 to move to the next block of differences that WinDiff found; press F7 to move to the previous block of differences.
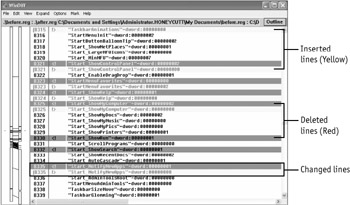
Figure 8-2: The two columns you see on the left side of the window represent the two files that you're comparing. These columns are a roadmap of the files' differences.
Using Word 2002
On the odd chance that WinDiff isn't available to you (for example, if you're not free to install the support tools on a customer's computer), you can use the comparison features of Word to compare REG files. You might also prefer using Word if you're already familiar with the word processor and don't want to install or learn how to use WinDiff. The only drawback is that using Word to compare REG files is often a slow and tedious process because it's not designed for this purpose.
When using Word to compare REG files, open the second REG file first, and compare it to the first REG file. This order ensures that Word indicates insertions and deletions properly. Here's how to compare two REG files using Word:
-
On the File menu, click Open, type the path and name of the first REG file in the File Name box, and click Open.
-
If the File Conversion dialog box appears, select the encoding method that makes the text in the Preview area readable, and then click OK.
You can choose between Windows (Default), MS-DOS, and Other Encoding. Windows (Default) corresponds to ANSI, which is what version 4 REG files use. If the file is a version 5 REG file, select the Other Encoding option, and then click Unicode in the list.
-
On the Tools menu, click Compare And Merge Documents, type the path and name of the second REG file, and then click Merge.
-
If the File Conversion dialog box appears, select the encoding method that makes the text in the Preview area readable.
Word displays the results as shown in Figure 8-3. To see the next change, click the Next button on the Reviewing toolbar. To see the previous change, click the Previous button. Word displays the results differently depending on the view:
-
Normal view. To switch to the normal view, click Normal on the View menu. This is the view shown in Figure 8-3. By default, insertions are underlined. Deletions are crossed out.
-
Print Layout view. To switch to Print Layout view, click Print Layout on the View menu. In this view, you see bubbles in the right column that describe the differences between the two files. This view is often the easiest to read.
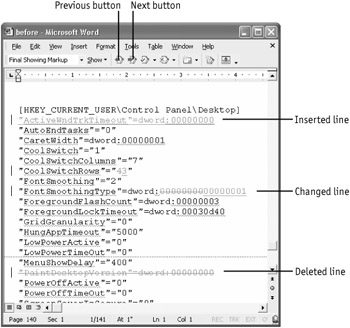
Figure 8-3: Word is effective at comparing large REG files, but much slower than WinDiff.
| Tip | When comparing two REG files in Word, make sure that you disable grammar and spelling checking. Word isn't likely to find many correctly spelled words in a REG file, so it burns up a lot of resources checking them. To disable both features, on the Tools menu, click Options. In the Options dialog box, click the Spelling & Grammar tab, and clear the Check Spelling As You Type and Check Grammar As You Type check boxes. |
|
|
EAN: 2147483647
Pages: 185