Extending Registry-Based Policy
|
|
You can extend registry-based policy by customizing existing administrative templates or by creating new ones. Windows XP provides administrative templates for its policies. Other applications, such as Office XP, also provide templates. When you install the Office XP Resource Kit, it adds the Office XP policy templates to %SYSTEMROOT%\Inf. You should never customize these templates. You might want to create your own templates that extend registry-based policy, though.
First the caveats: Extending registry-based policy is generally something that developers do to give administrators more control over users' applications. Remember that a registrybased policy requires developers to add code to their applications that read policies and enforce those settings. If developers added policies to their code, they almost certainly created policy templates for them, so you don't have to. On the other hand, if no code enforces a policy setting, creating an administrative template for it is useless. It almost sounds like extending registry-based policy is futile, eh? But there are still times when it's useful and some times that are extremely valuable:
-
Repairing broken policies. I don't run across broken policies often, but when I do, the only way to fix them is to create a custom template for them. For example, in the Windows XP beta, the screen saver policy stored the timeout period incorrectly in the registry. My simple fix was to create a custom template for it.
-
Creating custom administrative templates. Windows XP supports hundreds of policies, as does Office XP. Hunting for policies is sometimes frustrating. You can create a custom administrative template that assembles all the policies you're deploying in one place, making the job a bit easier. You can also rephrase the language of a policy with easier-to-understand descriptions.
-
Customizing Windows XP. Many of the registry settings you can use to customize Windows XP have no user interface. You can build a user interface for them by creating an administrative template and changing those settings with the Group Policy editor. For power users, this is a great reason to master this topic. This goes against one of the primary features of Group Policy, however, because settings you change outside the normal policy branches in the registry will tattoo the registry.
You can use any text editor to create an administrative template. Administrative templates have a language all their own, and you learn about that language in the remainder of this section. The Group Policy editor is very good about displaying useful errors when a template file contains an error. It gives you the line number, the keyword that's in error, and more information. In summary:
-
Create an administrative template using the language you learn about in this chapter. The template file is a text file with the .adm extension.
-
Load the template file in the Group Policy editor as you learn to do in the section "Deploying Registry-Based Policy."
-
Edit the settings that the administrative template defines.
The following listing is a sample administrative template that doesn't do much but illustrates what a template file looks like. Figure 6-4 shows what this template looks like in the Group Policy editor. The figure's annotations show some of the keywords that are responsible for different portions of a policy. For example, the keyword EXPLAIN is responsible for displaying the policy's description that you see in the figure. Throughout the remainder of this section, you'll see dozens more examples that give you the building blocks for creating your own administrative templates. Take these building blocks and copy them right into your file to get started straightaway.
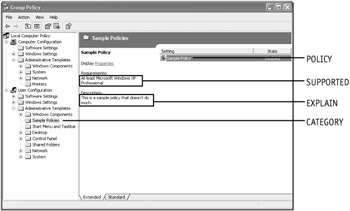
Figure 6-4: Administrative templates, such as the one in this example, define the user interface for collecting settings that the editor stores in the file Registry.pol.
Listing 6-1: example.adm
CLASS USER CATEGORY "Sample Policies" #if version >= 4 EXPLAIN "These are sample policies that don't do anything." #endif POLICY "Sample Policy" #if version >= 4 SUPPORTED "At least Microsoft Windows XP Professional" #endif EXPLAIN "This is a sample policy that doesn't do much." KEYNAME "Software\Policies" VALUENAME Sample VALUEON NUMERIC 1 VALUEOFF NUMERIC 0 END POLICY END CATEGORY
| Note | The statements #if and #endif enclose statements that work with only certain versions of System Policy or Group Policy. Using these statements, the developer can write one administrative template that works with different versions of Windows, including Windows NT, Windows 2000, and Windows XP. System Policy in Windows NT is version 2. Windows 2000 is version 3. Windows XP is version 4. Thus, to make sure that the Group Policy editor in Windows 2000 ignores keywords that only Windows XP supports, the developer encloses those keywords between #if version >= 4 and #endif. To ensure that only System Policy Editor in Windows NT sees a block of keywords, enclose them between #if version = 2 and #endif. These conditional statements show that Microsoft was thinking far into the future, even back in the old days. |
Comments
Comments are useful and necessary to document the contents of your policy templates. You can add comments to template files two different ways. Precede the comment with a semicolon (;) or two forward slashes (//). You can also place comments at the end of any valid line. You see examples of comments throughout this chapter; I've documented each example using them. Each line in the following example is a valid comment. I prefer using //for comments.
Listing 6-2: example.adm
; This is a comment // This is also a comment CLASS USER // Per-user settings CLASS MACHINE ; Per-computer settings
Strings
In a one-off, quick-and-dirty template file, don't feel bad about hard-coding strings. That means adding the string where you need it and repeating the same string as often as necessary. The listing you saw in the section "Extending Registry-Based Policy" uses hard-coded strings. If you're using enterprise-class template files, or if you're managing the files over time, use string variables. Using string variables makes it easier to maintain template files that use the same strings more than once. More importantly, it makes localization of template files far easier and much less error prone.
Define strings at the end of your template file in the [strings] section. The format of each string is name="string". You must enclose the string in double quotation marks. To use string variables in your template file, use the format !!name. Each time the Group Policy editor sees !! name, it substitutes the string for the name. Incidentally, the !! makes searching template files for strings easy—just search the file for the double exclamation marks. The following listing is an example of how strings and string variables are used in template file:
Listing 6-3: example.adm
POLICY !!Sample // Defined in [strings] section SUPPORTED "At least Microsoft Windows XP" // Hard-coded string EXPLAIN !!Sample_Explain // Defined in [strings] section ... [strings] Sample="Sample Policy" Sample_Explain="This sample policy doesn't do much of anything."
| Note | In this chapter, I tend not to use string variables for clarity. Avoiding string variables prevents you from having to look up each string as you're wading through the listings. Keep in mind that you'll want to use string variables if you plan on localizing your files. |
CLASS
The first entry in a template file is the keyword CLASS. It defines whether the policies following it are per-user or per-computer, that is, it specifies where in the Group Policy editor you see the policy: User Configuration or Computer Configuration. You can use multiple CLASS keywords in a template file. When the Windows XP client-side extensions process the file, it merges the settings defined in the CLASS USER sections and does the same for the settings defined in all the CLASS MACHINE sections. Then it loads the settings defined in the CLASS USER sections in HKCU and the settings defined in the CLASS MACHINE sections in HKLM.
Syntax
CLASS Name
| Name | This must be MACHINE or USER.MACHINE specifies that the policies following the CLASS keyword are per-computer policies, and USER specifies that the policies following the keyword are per-user policies. This keyword persists until you change it using additional CLASS keywords. |
Example
Listing 6-4: example.adm
CLASS MACHINE // Policies here are per-computer policies CLASS USER // Policies here are per-user policies CLASS MACHINE // Policies here are per-computer policies
CATEGORY
After you define whether your policy will appear under the Computer Settings or User Settings branch of the Group Policy editor using the CLASS keyword, use the CATEGORY keyword to create subfolders in that branch. The editor displays your settings in that folder. Just as you can create subkeys within keys in the registry, you can create subcategories within categories by nesting the CATEGORY keyword. Just keep in mind that all the CATEGORY keyword does is create folders.
Categories can include zero or more policies. Categories that contain no policies usually contain one or more subcategories, at a minimum. You define a registry key in which the Group Policy editor creates settings for that category using the KEYNAME keyword, which you learn about in the next section. Using the KEYNAME keyword here is optional if you're defining the key elsewhere. Last, you end a category with END CATEGORY.
Syntax
CATEGORY Name KEYNAME Subkey Policies END CATEGORY
| Name | This is the folder name you want to see in the Group Policy editor. Use a string variable or a string enclosed in quotes. |
| Subkey | This is an optional subkey of HKLM or HKCU to use for the category. Do not include either root key in the path, though, because the preceding CLASS keyword specifies which of these root keys to use. If you specify a subkey, all subcategories, policies, and parts use it unless they specifically provide a subkey of their own. Enclose names that contain spaces in double quotes. |
Example
Listing 6-5: example.adm
CLASS USER // Settings are per-user in HKCU CATEGORY "Desktop Settings" KEYNAME "Software\Policies\System" // Add policies for the Desktop Settings category here CATEGORY "Custom Application Settings" KEYNAME "Software\Policies\CustomApps" // Add policies for the custom applications subcategory here END CATEGORY END CATEGORY
Keywords
The valid keywords you can use within a CATEGORY section are the following:
-
CATEGORY
-
END
-
KEYNAME
-
POLICY
KEYNAME
Use the KEYNAME keyword within a category to define which subkey of HKCU or HKLM (depending on the CLASS keyword) contains the value you're changing. Do not include a root key in the path because the CLASS keyword defines it. If the name contains spaces, you must enclose the string in double quotation marks. The example in the previous section, "CATEGORY" shows how to use the KEYNAME keyword.
POLICY
Use the POLICY keyword to define a policy that the administrator can change. The policy editor displays the policy and its controls in a dialog box that the administrator uses to change the policies state and settings. You can include multiple POLICY keywords in a single category, but you don't need to include the KEYNAME keyword before each POLICY keyword. The most recent KEYNAME keyword applies for each policy. You end a policy with END POLICY.
Each policy contains a VALUENAME keyword to associate a registry value with it. By default, the policy editor assumes it's a REG_DWORD value and stores 0x01 in it when you enable the policy. The policy editor also removes the value when you disable the policy. You must use the VALUEON and VALUEOFF keywords if you don't want the policy editor to remove the value when you disable the policy. You don't have to use any keywords other than VALUENAME to get this behavior. You can include optional PART keywords that specify additional options, however, such as drop-down list boxes, check boxes, text boxes, and so on. You see these controls in the bottom part of the policy's dialog box (see Figure 6-3).
Syntax
POLICY Name [KEYNAME Subkey] EXPLAIN Help VALUENAME Value [Parts] END POLICY
| Name | This is the name of the policy as you want to see it in the Group Policy editor. Use a descriptive but short name. |
| Subkey | This is an optional subkey of HKLM or HKCU to use for the category. Do not include either root key in the path, though, because the preceding CLASS keyword specifies which of these root keys to use. If you specify a subkey, all subcategories, policies, and parts use it unless they specifically provide a subkey of their own. Enclose names that contain spaces in double quotes. |
| Help | This is the string that the Group Policy editor displays on the Explain tab and on the Extended tab of the policy's dialog box. |
| Value | This is the registry value to modify. Enabling the policy sets the REG_DWORD value to 0x01. Select the Not Configured option or disable the policy, and the policy editor removes the value from the registry. To specify values other than the default 0x01, use the VALUEON and VALUEOFF keywords directly following the VALUENAME keyword:
VALUEON [NUMERIC] Enabled VALUEOFF [NUMERIC] Disabled When you use these keywords, the policy editor sets the registry value to Enabled when you enable the policy and sets the value to Disabled when you disable the policy. The default value type is REG_SZ, but you can change it to REG_DWORD by prefixing the value with the keyword NUMERIC. Regardless, setting the policy to Not Configured removes the value altogether. |
Example
Listing 6-6: example.adm
CLASS MACHINE CATEGORY "Disk Quotas" KEYNAME "Software\Policies\MS\DiskQuota" POLICY "Enable disk quotas" EXPLAIN "Enables and disables disk quotas management." VALUENAME "Enable" VALUEON NUMERIC 1 VALUEOFF NUMERIC 0 END POLICY END CATEGORY
Keywords
The valid keywords within a POLICY section include the following:
-
ACTIONLISTOFF
-
ACTIONLISTON
-
END
-
KEYNAME
-
PART
-
VALUENAME
-
VALUEOFF
-
VALUEON
-
HELP
-
POLICY
| Note | Additional keywords are available for policies, but they are for developers creating policy extensions. For example, CLIENTEXT associates a client-side extension with a policy via the extension's GUID. I'm not covering these because they don't fit our purposes here. |
EXPLAIN
The EXPLAIN keyword provides help text for a specific policy. In Windows 2000 and Windows XP, each policy's dialog box includes an Explain tab, which provides details about the policy settings. You also see this help text on the Extended tab of the editor's right pane in Windows XP. Each policy you create for Windows 2000 and Windows XP should contain one EXPLAIN keyword followed by a full description of the policy and its settings. Although I don't show this in my examples (trying to keep them simple), you should enclose this keyword between #if version >=3 and #endif to prevent earlier versions of the policy editor from choking on these keywords:
Listing 6-7: example.adm
#if version >= 3 EXPLAIN "Enables and disables disk quotas management." #endif
VALUENAME
The VALUENAME keyword identifies the registry value that the policy editor modifies when you enable or disable the policy. The syntax is VALUENAME Name. You saw an example of this keyword in the section "VALUEON and VALUEOFF keywords, described in the next section, the policy editor creates the policy as a REG_DWORD value:
-
Enabled. Sets the value to 0x01
-
Disabled. Removes the value
-
Not Configured. Removes the value
VALUENAME, VALUEON, and VALUEOFF describe the value that enables and disables the policy. If you want to define additional settings that enable you to collect additional values to refine the policy, you must use the PART keyword. Settings in a PART section are in the bottom part of the policy's dialog box.
VALUEON and VALUEOFF
You can use the VALUEON and VALUEOFF keywords to write specific values based on the state of the policy. The section "POLICY" contains an example of how these keywords are used. The syntaxes are VALUEON [NUMERIC] Enabled and VALUEOFF [NUMERIC] Disabled. By default, the policy editor creates the value as a REG_SZ value; if you want it to create the value as a REG_DWORD value, prefix it with the NUMERIC keyword. For example:
VALUEON 0 // Created as a REG_SZ value containing "0" VALUEOFF NUMERIC 1 // Created as a REG_DWORD value containing 0x01
ACTIONLIST
The ACTIONLIST keyword enables you to group settings together. Think of it as a list of values you want the policy editor to change when you change a policy. The following two variants of the ACTIONLIST keyword are the most commonly used:
-
ACTIONLISTON. A list of values to change when the policy is enabled
-
ACTIONLISTOFF. A list of values to change when the policy is disabled
Syntax
ACTIONLIST [KEYNAME Subkey] VALUENAME Value VALUE Data END ACTIONLIST
| Subkey | This is an optional subkey of HKLM or HKCU to use for the category. Do not include either root key in the path, though, because the preceding CLASS keyword specifies which of these root keys to use. If you specify a subkey, all subcategories, policies, and parts use it unless they specifically provide a subkey of their own. Enclose names that contain spaces in double quotes. |
| Value | This is the registry value to modify. Enabling the policy sets the REG_DWORD value to 0x01. Select the Not Configured option, and the policy editor removes the value from the registry. To specify values other than the default 0x00 and 0x01, use the VALUE keyword. |
| Data | This is the data to which you want to set the value. The default value type is REG_SZ, but you can change it to REG_DWORD by prefixing the value with the keyword NUMERIC. If you follow the keyword VALUE with the keyword DELETE (VALUE DELETE), policy editor removes the value from the registry. Regardless, setting the policy to Not Configured removes the value altogether. |
Example
Listing 6-8: example.adm
POLICY "Sample Action List" EXPLAIN "This illustrates action lists" ACTIONLISTON VALUENAME Sample1 VALUE 1 VALUENAME Sample2 VALUE 1 END ACTIONLISTON ACTIONLISTOFF VALUENAME Sample1 VALUE 0 VALUENAME Sample2 VALUE 0 END ACTIONLISTOFF END POLICY
PART
The PART keyword enables you to specify various options, including drop-down lists, text boxes, and check boxes, in the lower part of a policy's dialog box. Figure 6-5 shows an example of the settings that you want to collect in addition to enabling or disabling the policy. For simple policies that you only need to enable or disable, you won't need to use this keyword. In fact, only a relative handful of the policies in Windows XP use the PART keyword at all.
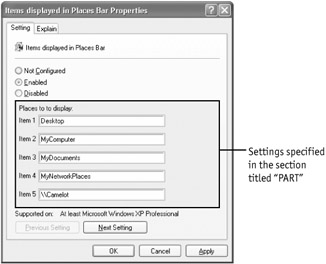
Figure 6-5: Use the PART keyword to collect additional data that further refines the policy.
You begin a part with the PART keyword and end it with END PART. The syntax of the PART keyword is PART Name Type. Name is the name of the part, and Type is the type of part. Each policy can contain multiple PART keywords, and the policy editor displays them in the dialog box using the order that it found them in the administrative template. This section gives you the overall syntax of the PART keyword, and the sections following this one describe how to create the different types of parts.
Syntax
PART Name Type Keywords [KEYNAME Subkey] [DEFAULT Default] VALUENAME Name END PART
| Name | This specifies the name of the setting as you want to see it in the policy's dialog box. Enclose the name in double quotes if it contains spaces. This is the setting's prompt. |
| Type | This can be one of the following types:
|
| Keywords | This is information specific to each type of part. See the sections following this for more information about these keywords. |
| Subkey | This is an optional subkey of HKLM or HKCU to use for the category. Do not include either root key in the path, though, because the preceding CLASS keyword specifies which of these root keys to use. If you specify a subkey, all subcategories, policies, and parts use it unless they specifically provide a subkey of their own. Enclose names that contain spaces in double quotes. |
| Default | This is the default value for the part. When you enable the policy, the policy editor fills the control with the default value. Use a default value that's appropriate for the part's type. |
| Value | This is the registry value to modify. The value type and data depend entirely on the part's type. |
Example
Listing 6-9: example.adm
POLICY "Sample Part" EXPLAIN "This illustrates parts" KEYNAME "Software\Policies" POLICY "Sample Policy" EXPLAIN "This is a sample policy including parts." VALUENAME "Sample" PART test EDITTEXT DEFAULT "This is the default text" VALUENAME Sample END PART END POLICY
Keywords
The valid keywords within a PART section are the following:
-
CHECKBOX
-
COMBOBOX
-
DROPDOWNLIST
-
EDITTEXT
-
END
-
LISTBOX
-
NUMERIC
-
PART
-
TEXT
CHECKBOX
The CHECKBOX keyword displays a check box. In the registry, it's a REG_SZ value. By default, the check box is cleared, and the settings it writes to the registry for each of its states are as follows:
-
Checked. Writes 1 to the REG_SZ value
-
Cleared. Writes 0 to the REG_SZ value
Include the keyword DEFCHECKED within the part if you want the check box selected by default. Otherwise, the check box is cleared by default.
Syntax
PART Name CHECKBOX DEFCHECKED VALUENAME Value END PART
| Name | This specifies the name of the setting as you want to see it in the policy's dialog box. Enclose the name in double quotes if it contains spaces. You see the name next to the check box. |
| Value | This is the registry value to modify. Enabling the policy sets the REG_SZ value to 1. Set the Not Configured option, and the policy editor removes the value from the registry. To specify values other than the default 0 and 1, use the VALUEON and VALUEOFF keywords following the VALUENAME keyword:
VALUEON [NUMERIC] Enabled VALUEOFF [NUMERIC] Disabled When you use these keywords, the policy editor sets the registry value to Enabled when you enable the policy and sets the value to Disabled when you disable the policy. The default value type is REG_SZ, but you can change it to REG_DWORD by prefixing the value with the keyword NUMERIC. Regardless, setting the policy to Not Configured removes the value altogether. You can also use the ACTIONLISTON and ACTIONLISTOFF keywords to associate multiple values with a check box. |
Example
Listing 6-10: example.adm
CLASS USER CATEGORY "Sample Policies" EXPLAIN "These are sample policies that illustrate parts." POLICY "Sample Policy" SUPPORTED "At least Microsoft Windows XP Professional" EXPLAIN "This is a sample policy that illustrates a part." KEYNAME "Software\Policies" PART Sample1 CHECKBOX VALUENAME Sample1 END PART PART Sample2 CHECKBOX DEFCHECKED VALUENAME Sample2 VALUEON NUMERIC 11 VALUEOFF NUMERIC 12 END PART END POLICY END CATEGORY
Keywords
The valid keywords within a CHECKBOX section include the following:
-
ACTIONLISTOFF
-
ACTIONLISTON
-
DEFCHECKED
-
END
-
KEYNAME
-
VALUENAME
-
VALUEOFF
-
VALUEON
COMBOBOX
The COMBOBOX keyword adds a combo box to the policy's dialog box. It has one additional keyword you must use, SUGGESTIONS. This creates a list of suggestions that the policy editor places in the drop-down list. Separate the items in this list with white space and enclose items containing spaces within double quotation marks. End the list with the END SUGGESTIONS.
A few keywords modify the behavior of the combo box:
-
DEFAULT. Specifies the default value of the combo box
-
EXPANDABLETEXT. Creates the value as a REG_EXPAND_SZ value
-
MAXLENGTH. Specifies the maximum length of the value
-
NOSORT. Prevents the policy editor from sorting the list
-
REQUIRED. Specifies that a value is required
Syntax
PART Name COMBOBOX SUGGESTIONS Suggestions END SUGGESTIONS [DEFAULT Default] [EXPANDABLETEXT] [MAXLENGTH Max] [NOSORT] [REQUIRED] VALUENAME Value END PART
| Name | This specifies the name of the setting as you want to see it in the policy's dialog box. Enclose the name in double quotes if it contains spaces. You see the name next to the combo box. |
| Suggestions | This is a list of items to put in the drop-down list. Separate each suggestion with white space (line feeds, tabs, spaces and the like), and enclose any suggestion that includes a space in double quotes. |
| Default | This is the default value for the part. When you enable the policy, the policy editor fills the control with the default value. Use a default value that's appropriate for the part's type. |
| Max | This is the maximum length of the value's data. |
| Value | This is the registry value to modify. The policy editor creates this in the registry as a REG_SZ value and fills it with any text that you typed or selected in the combo box. |
Example
Listing 6-11: example.adm
CLASS USER CATEGORY "Sample Policies" EXPLAIN "These are sample policies that don't do anything but illustrate parts." POLICY "Sample Policy" SUPPORTED "At least Microsoft Windows XP Professional" EXPLAIN "This is a sample policy that illustrates creating a part." KEYNAME "Software\Policies" PART Sample COMBOBOX SUGGESTIONS Sample1 Sample2 "Another Sample" END SUGGESTIONS VALUENAME Sample END PART END POLICY END CATEGORY
Keywords
The valid keywords within a COMBOBOX section are the following:
-
DEFAULT
-
END
-
EXPANDABLETEXT
-
KEYNAME
-
MAXLENGTH
-
NOSORT
-
REQUIRED
-
SUGGESTIONS
-
VALUENAME
DROPDOWNLIST
The DROPDOWNLIST keyword adds a drop-down list to the policy's dialog box. It has one additional keyword you must use, and that is ITEMLIST. This creates a list of items that the policy editor places in the drop-down list. Define each item within the ITEMLIST section using the syntax NAME Name VALUE Value. Enclose items containing spaces within double quotation marks. End the list with the END ITEMLIST.
A few keywords modify the behavior of the drop-down list:
-
DEFAULT. Specifies the default value of the drop-down list
-
EXPANDABLETEXT. Creates the value as a REG_EXPAND_SZ value
-
NOSORT. Prevents the policy editor from sorting the list
-
REQUIRED. Specifies that a value is required
Syntax
PART Name DROPDOWNLIST ITEMLIST NAME Item VALUE Data END ITEMLIST [DEFAULT Default] [EXPANDABLETEXT] [NOSORT] [REQUIRED] VALUENAME Value END PART
| Name | This specifies the name of the setting as you want to see it in the policy's dialog box. Enclose the name in double quotes if it contains spaces. You see the name next to the drop-down list. |
| Item | This is the name of each item in the list. This is the text that you'll see in the drop-down list. This isn't the value that the policy editor stores in the registry, though. |
| Data | This is the data you want the policy editor to store in the value when you select the associated item. |
| Default | This is the default value for the part. When you enable the policy, the policy editor fills the control with the default value. Use an item defined in ITEMLIST. |
| Value | This is the registry value to modify. The policy editor creates this in the registry as a REG_SZ value and fills it with the value of Data associated with the selected item. |
Example
Listing 6-12: example.adm
CLASS USER CATEGORY "Sample Policies" EXPLAIN "These are sample policies that illustrate parts." POLICY "Sample Policy" SUPPORTED "At least Microsoft Windows XP Professional" EXPLAIN "This is a sample policy that illustrates creating a part." KEYNAME "Software\Policies" PART Sample DROPDOWNLIST ITEMLIST NAME Sample1 VALUE 0 NAME Sample2 VALUE 1 NAME "Another Sample" VALUE 2 END ITEMLIST VALUENAME Sample END PART END POLICY END CATEGORY
Keywords
The valid keywords within a DROPDOWNLIST section are the following:
-
DEFAULT
-
END
-
EXPANDABLETEXT
-
KEYNAME
-
NOSORT
-
REQUIRED
-
ITEMLIST
-
VALUENAME
EDITTEXT
The EDITTEXT keyword enables you to input alphanumeric text in a text box. Policy editor stores the text in a REG_SZ value. A few keywords modify the behavior of the text box:
-
DEFAULT. Specifies the default value of the text box
-
EXPANDABLETEXT. Creates the value as a REG_EXPAND_SZ value
-
MAXLENGTH. Specifies the maximum length of the value
-
REQUIRED. Specifies that a value is required
Syntax
PART Name EDITTEXT [DEFAULT Default] [EXPANDABLETEXT] [MAXLENGTH Max] [REQUIRED] VALUENAME Value END PART
| Name | This specifies the name of the setting as you want to see it in the policy's dialog box. Enclose the name in double quotes if it contains spaces. You see the name next to the text box. |
| Default | This is the default value for the part. When you enable the policy, the policy editor fills the control with the default value. Use a default value that's appropriate for the part's type. |
| Max | This is the maximum length of the value's data. |
| Value | This is the registry value to modify. The policy editor creates this in the registry as a REG_SZ value and fills it with any text that you typed. |
Example
Listing 6-13: example.adm
CLASS USER CATEGORY "Sample Policies" EXPLAIN "These are sample policies that illustrate parts." POLICY "Sample Policy" SUPPORTED "At least Microsoft Windows XP Professional" EXPLAIN "This is a sample policy that illustrates creating a part." KEYNAME "Software\Policies" PART Sample EDITTEXT VALUENAME Sample END PART END POLICY END CATEGORY
Keywords
The valid keywords within an EDITTEXT section are the following:
-
DEFAULT
-
END
-
EXPANDABLETEXT
-
KEYNAME
-
MAXLENGTH
-
REQUIRED
-
VALUENAME
LISTBOX
The LISTBOX keyword adds a list box with Add and Remove buttons to the policy's dialog box. This is the only type of part that you can use to manage multiple values in one key. You can't use the VALUENAME option with the LISTBOX part because it doesn't associate just a single value with it. Use the following options with the LISTBOX part type:
-
ADDITIVE. By default, the content of list boxes overrides values already set in the registry. That means that the Windows XP client-side extensions remove values before setting them. When you use this keyword, the client-side extensions do not delete existing values before adding the values set in the list box.
-
EXPLICITVALUE. This keyword makes you specify the value name and data. The list box shows two columns, one for the name and one for the data. You can't use this keyword with the VALUEPREFIX keyword.
-
VALUEPREFIX. The prefix you specify determines value names. If you specify a prefix, the policy editor adds an incremental number to it. For example, a prefix of Sample generates the value names Sample1, Sample2, and so on. The prefix can be empty (""), causing the value names to be 1, 2, and so on.
By default, without using either the EXPLICITVALUE or VALUEPREFIX keywords, only one column appears in the list box. For each entry in the list, the policy editor creates a value using the entry's text for the value's name and data. For example, the entry Sample in the list box creates a value called Sample whose data is Sample. The default behavior is seldom the desirable result.
Syntax
PART Name LISTBOX [EXPANDABLETEXT] [NOSORT] [ADDITIVE] [EXPLICITVALUE | VALUEPREFIX Prefix] END PART
| Name | This specifies the name of the setting as you want to see it in the policy's dialog box. Enclose the name in double quotes if it contains spaces. |
| Prefix | This is the prefix to use for incremental names. If you specify a prefix, the policy editor adds an incremental number to it. For example, a prefix of Sample generates the value names Sample1, Sample2, and so on. The prefix can be empty (""), causing the value names to be 1, 2, and so on. |
Example
Listing 6-14: example.adm
CLASS USER CATEGORY "Sample Policies" EXPLAIN "These are sample policies that illustrate parts." POLICY "Sample Policy" SUPPORTED "At least Microsoft Windows XP Professional" EXPLAIN "This is a sample policy that illustrates creating a part." KEYNAME "Software\Policies" PART Sample LISTBOX EXPLICITVALUE END PART END POLICY END CATEGORY
Keywords
The valid keywords within a LISTBOX section are the following:
-
ADDITIVE
-
END
-
EXPANDABLETEXT
-
EXPLICITVALUE
-
KEYNAME
-
NOSORT
-
VALUEPREFIX
NUMERIC
The NUMERIC keyword enables you to input alphanumeric text using a spinner control that adjusts the number up and down. Policy editor stores the number in a REG_DWORD value, but you can change the value's type to REG_SZ using the TXTCONVERT keyword. A few other keywords modify the behavior of the text box:
-
DEFAULT. Specifies the initial value of the text box
-
MAX. Specifies the maximum value. The default is 9999
-
MIN. Specifies the minimum value. The default is 0.
-
REQUIRED. Specifies that a value is required
-
SPIN. Specifies the increment to use for the spinner control. The default value is 1, and using 0 removes the spinner control.
-
TXTCONVERT. Writes values as REG_SZ values rather than REG_DWORD
Syntax
PART Name NUMERIC [DEFAULT Default] [MAX Max] [MIN Min] [REQUIRED] [SPIN] [TXTCONVERT] VALUENAME Value END PART
| Name | This specifies the name of the setting as you want to see it in the policy's dialog box. Enclose the name in double quotes if it contains spaces. You see the name next to the text box. |
| Default | This is the default value for the part. When you enable the policy, the policy editor fills the control with the default value. Use a default value that's appropriate for the part's type. |
| Max | This is the maximum value. The default is 9999. |
| Min | This is the minimum value. The default is 0. |
| Value | This is the registry value to modify. The policy editor creates this in the registry as a REG_DWORD value, setting it to the value that you specify in the dialog box. To change the value's type to REG_SZ, use the TXTCONVERT keyword. |
Example
Listing 6-15: example.adm
CLASS USER CATEGORY "Sample Policies" EXPLAIN "These are sample policies that illustrate parts." POLICY "Sample Policy" SUPPORTED "At least Microsoft Windows XP Professional" EXPLAIN "This is a sample policy that illustrates creating a part." KEYNAME "Software\Policies" PART Sample NUMERIC DEFAULT 11 MIN 10 MAX 20 VALUENAME Sample END PART END POLICY END CATEGORY
Keywords
The valid keywords within a NUMERIC section are the following:
-
DEFAULT
-
END
-
KEYNAME
-
MAX
-
MIN
-
REQUIRED
-
SPIN
-
TXTCONVERT
-
VALUENAME
TEXT
The TEXT keyword adds static text to the bottom part of the policy's dialog box.
Syntax
PART Text TEXT END PART
| Text | This is the text you want to add to the dialog box. |
Example
Listing 6-16: example.adm
CLASS USER CATEGORY "Sample Policies" EXPLAIN "These are sample policies that illustrate parts." POLICY "Sample Policy" SUPPORTED "At least Microsoft Windows XP Professional" EXPLAIN "This is a sample policy that illustrates creating a part." KEYNAME "Software\Policies" PART "This is sample text added to the dialog box." TEXT END PART END POLICY END CATEGORY
|
|
EAN: 2147483647
Pages: 185