Using System Restore
|
|
System Restore returns your computer to a previous snapshot without losing recent personal information, such as documents, history lists, favorites, or e-mail. It monitors the computer and many applications for changes and creates restore points. I call these restore points snapshots, but they're really instructions for undoing recent changes. You restore these snapshots when your configuration isn't working. By default, Windows XP creates restore points daily and when significant events such as installing an application or device driver occur. System Restore is ideal for serious work in the registry because you can create your own restore points any time you like. You can also change the snapshot schedule or even script System Restore. Yes, I'm going to show you how.
System Restore creates different types of restore points:
-
Initial system checkpoints. System Restore creates initial system checkpoints when Windows XP starts the first time. Restoring to this point returns Windows XP and programs to their state immediately after installing Windows XP.
-
System checkpoints. System Restore creates restore points regularly, whether or not the system changes. By default, it creates system checkpoints every 24 hours. If you turn the computer off for more than 24 hours, System Restore will create a system checkpoint the next time you start Windows XP.
-
Installation checkpoints. System Restore creates installation checkpoints when you install programs that use recent installer technologies, so you can restore the computer to its state before installing the programs. To reverse the changes made by other programs, restore the most recent checkpoint.
-
Automatic update checkpoints. System Restore creates a restore point before updating Windows XP using Automatic Update or Windows Update.
-
Manual checkpoints. System Restore or a script can be used to create your own restore points; I'll show you how later in this chapter. Create manual checkpoints before making significant changes to the registry.
-
Restore operation checkpoints. System Restore creates restore operation checkpoints each time you restore a checkpoint. You use restore operation checkpoints to undo a restoration if you don't like the results.
-
Unsigned device driver checkpoints. System Restore creates a restore point when you install an unsigned device driver. If installing the device driver interferes with your computer's stability, you can restore the computer to its state before installing the device driver.
-
Backup utility recovery checkpoints. System Restore creates a restore point before you use Backup to perform a recovery. You can restore the computer if the recovery leaves your computer in a questionable state.
Note You must still uninstall programs using Add Or Remove Programs, even if you restore to a point prior to program installation. Removing the program and then restoring the checkpoint is the best sequence.
System Restore requires at least 200 MB of available disk space. If 200 MB of space isn't available, Windows XP disables System Restore. By default, Windows XP allocates 12 percent of the hard disk's size (or 400 MB on hard disks that are smaller than 4 GB), and this happens to be the most that Windows XP can give it. You can otherwise configure the amount of disk space System Restore consumes, though. On the System Restore tab of the System Properties dialog box, drag the slider left or right to adjust the amount of disk space it uses. To open System Properties, click Start, Control Panel, Performance And Maintenance, and then click System. However, don't reduce the amount much because doing so limits the number of restore points that System Restore can maintain at one time.
Taking Configuration Snapshots
Here's how to create a restore point using System Restore:
-
Start System Restore one of the following ways:
-
Click System Restore in Help and Support Center.
-
Click Start, All Programs, Accessories, System Tools, System Restore.
-
Run %SYSTEMROOT%\System32\Restore\rstrui.exe.
-
-
Select the Create A Restore Point option, and then click Next.
-
In the Restore Point Description box, type a descriptive name for the restore point, and then click Create. (System Restore adds the date and time to the name of the restore point.)
To restore a checkpoint, follow these steps:
-
Start System Restore using one of the three methods in the previous procedure.
-
Select the Restore My Computer To an Earlier Time option, and then click Next.
-
Select the restore point that you want to restore, and then click Next.
System Restore maintains up to 90 days of restore points, given enough disk space, so you can move backward and forward in the calendar to see the restore points created on each day. In the calendar, shown in Figure 3-4, bold dates are those that contain restore points.
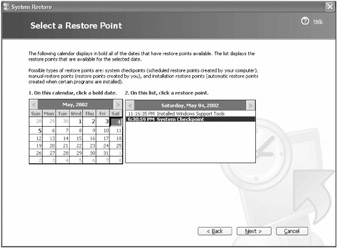
Figure 3-4: Before continuing, make sure you save your documents and close any programs that are running. System Restore restarts your computer. -
Click a date, and then click the restore point in the list.
-
Click Next again, and Windows XP restarts so it can restore your configuration to the restore point you selected.
Sometimes, if your configuration is unstable enough, you won't be able to start Windows XP normally. That leaves you with Safe Mode, which you'll learn about in "Advanced Options Menu," later in this chapter. In Safe Mode, you can't create restore points, but you can restore ones that have already been created. Thus, if Windows XP doesn't start normally, start it in Safe Mode, restore to an earlier configuration, and then restart the computer.
Peeking Under the Covers
Many of the files and folders System Restore uses are super hidden, so you won't see them unless you display system and hidden files. In Windows Explorer, click Tools, Options. On the Folder Options dialog box's View tab, select the Show Hidden Files And Folders option, and then clear the Hide Protected Operating System Files check box. System Restore's program files are in %SYSTEMROOT%\System32\Restore. Aside from the program file rstrui.exe, you'll find the super-hidden file filelist.xml, which lists the files and settings that System Restore monitors. Double-click this file to view the XML in Internet Explorer. It excludes a few legacy configuration files, for example Win.ini, System.ini, Autoexec.bat, and Config.sys. It excludes a handful of folders, too, most of which aren't important to the operating system's stability. What's interesting is the list of file extensions that it includes. System Restore protects everything from EXE and DLL files to VBS and VXD files. If a file matches one of the included file extensions and it's not in a folder that filelist.xml excludes, System Restore monitors it. It also monitors the per-user hive files listed in the key HKLM\SOFTWARE\Microsoft\Windows NT\CurrentVersion\ProfileList.
The actual restore points are in each volume's System Volume Information folder. This folder is also super hidden, so you'll need to select the Show Hidden Files And Folders option and then clear the Hide Protected Operating System Files check box to see it. You'll have to add your name to the folder's ACL to open it. I don't recommend you do that on a production computer, however, because you risk blowing the file system. If you have a lab computer, go for it; otherwise, I'll describe this folder for you.
System Volume Information contains a subfolder called _restoreGUID, where GUID is the computer's GUID (see Chapter 1, "Learning the Basics"). For example, my computer has _restore{4545302B-EA51-4100-A7E2-C7A37551AA83}. Beneath that folder is one folder for each restore point called RPN, where N is an incremental number beginning with 1. RPN contains backup copies of changed and deleted files. In fact, I opened my latest restore point folder, deleted a program file, and watched as System Restore added it to the restore point. It also backs up files that change so it can restore those. System Restore changes the file names, so you won't find missing files or documents in there. This folder also contains a list of the changes that System Restore must apply to the computer to restore the checkpoint. That includes instructions for restoring backup files.
The subfolder called \snapshot is in RPN. It contains backup copies of the registry's hive files. If you have access to System Volume Information, you can load these hive files in Regedit, examine them, or even recover settings from them. If you really need settings from these hive files, you're better off restoring them using System Restore. You can see System Volume Information in Figure 3-5; hopefully that will satisfy your curiosity enough to keep you out of it. The following is a list of the registry hive files you find in \snapshot:
-
_REGISTRY_MACHINE_SAM
-
_REGISTRY_MACHINE_SECURITY
-
_REGISTRY_MACHINE_SOFTWARE
-
_REGISTRY_MACHINE_SYSTEM
-
_REGISTRY_USER_.DEFAULT
-
_REGISTRY_USER_NTUSER_SID
-
_REGISTRY_USER_USRCLASS_SID
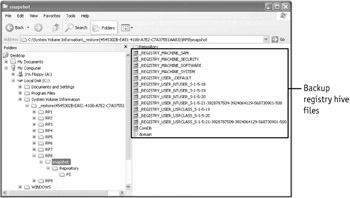
Figure 3-5: System Restore backs up all the hive files so it can restore them if necessary. Managing System Restore
Managing System Restore
System Restore has sparse management options. You can change how much disk space it uses, which I've already covered, and you can even disable it altogether. There's only one good time to disable System Restore, and that's when you install Windows XP on sluggish computers. System Restore consumes a small slice of your computer's resources as it monitors the file system for changes, and disabling it can recover those resources. To disable System Restore, click Start, Control Panel, Performance And Maintenance, and then click System to open the System Properties dialog box. On the System Restore tab, select the Turn Off System Restore check box. But unless the computer is painfully slow, leave System Restore alone.
Two policies are available to IT professionals for managing System Restore. The first is Turn off System Restore, which disables System Restore altogether. I know some administrators who haven't embraced System Restore yet, and they're disabling it in their organizations. Their concern is the amount of disk space it uses and the small performance penalty for using it; both are negligible in my opinion. If you don't want users to be able to configure System Restore, enable the Turn off Configurationpolicy, which locks the user interface so users can't change System Restore's configuration. Users can still create their own restore points, however. Both of these policies are per-computer administrative settings (Computer Configuration\Administrative Templates) in \System\System Restore.
System Restore has a few other settings for which it doesn't provide a user interface or policy. These are mostly settings in the registry that control System Restore's schedule. You can build your own administrative template for these, however, which you learn about in Chapter 6, "Using Registry-Based Policy." Chapter 6 also shows you how to enable policies.
Hacking System Restore
HKLM\Software\Microsoft\WindowsNT\CurrentVersion\SystemRestore is the key where you find all of System Restore's settings. Unless otherwise noted, all the settings in the following list are REG_DWORD values:
-
CompressionBurst. This value specifies the idle time compression in seconds. That is the amount of time to compress data after the computer becomes idle. System Restore can compress data for the amount of time specified, and then it must stop until after the next time the computer becomes idle.
-
DiskPercent and DSMax. These values together specify how much disk space System Restore uses. System restore uses the greater of the two values. Thus, for hard disks smaller than 4 GB, System Restore uses 400 MB, which is the default value of DSMax. For hard disks larger than 4 GB, System Restore uses 12 percent, which is the default value of DiskPercent.
-
DSMin. This value specifies the minimum amount of free disk space that System Restore requires during the installation process. This value also specifies the minimum amount of disk space that System Restore needs to reactivate and resume the creation of restore points after Windows XP disabled it due to low disk space.
-
RestoreStatus. This value indicates whether the last restore operation failed (0x00), succeeded (0x01), or was interrupted (0x02).
-
RPGlobalInterval. This value specifies the amount of time in seconds that System Restore waits between creating system checkpoints. The default value is 24 hours, or 0x15180.
-
RPLifeInterval. This value specifies the time in seconds that System Restore keeps restore points before removing them from the computer. The default value is 0x76A700, or 90 days.
-
RPSessionInterval. This value specifies the amount of time in seconds that System Restore waits before it creates the system checkpoints while the computer is turned on. The default value is zero, disabling this feature. You can change this value to 0xE10 to create a restore point every hour that the computer is in use. On a computer that you customize often, such as a lab computer, you might create a restore point every hour.
-
ThawInterval. This value specifies the amount of time in seconds that System Restore waits before it reactivates itself after adequate disk space becomes available. Start the System Restore user interface, and it reactivates immediately.
The remaining settings you find in SystemRestore aren't useful to customize and Microsoft warns in no uncertain terms that you shouldn't change them. However, you can disable System Restore by setting DisableSR to 0x01, and doing so doesn't remove existing restore points like it does when you disable System Restore in the user interface. Editing the remaining settings can do bad things to your computer's performance, so limit yourself to the settings I described in this section.
Scripting System Restore
You can script System Restore using Windows Scripting Host (WSH) and Windows Management Instrumentation (WMI). Chapter 9, "Scripting Registry Changes," describes in detail how to script registry edits. But perhaps you want write scripts specifically to automate System Restore. These scripts are a handy way to get more control over the creation of restore points than the registry settings in the previous section give you.
Scripting System Restore relies on WMI and Srclient.dll, which is the System Restore client DLL. The account in which you run these scripts must have administrative privileges, which prevents them from being used by members of the Users or Power Users group. In Scheduled Tasks, you can schedule these scripts to run with elevated privileges, though. The following listing shows a script that automatically creates a restore point. It creates a System Restore object using WMI, and then creates a restore point by calling the method CreateRestorePoint(). The first parameter is the name of the restore point; you should use a descriptive name that begins with a verb, such as Installed or Changed.
Set SRP = GetObject( "winmgmts:\\.\root\default:Systemrestore" ) CSRP = SRP.CreateRestorePoint( "Hacked the registry", 0, 100 )
In addition to creating restore points, you can restore checkpoints using scripts. You can also configure System Restore; enable and disable it; or iterate through the list of restore points on the computer. For more information about System Restore's WMI classes, see http://msdn.microsoft.com/library/en-us/sr/srstart_2dd1.asp, which is the MSDN documentation for System Restore.
|
|
EAN: 2147483647
Pages: 185