Common XML Tasks in .NET
Common XML Tasks in .NET
The default page for the samples contains a link Introduction to XML Data Access in .NET. The menu page that this opens, shown in Figure 8-14, contains links to several examples of the basic .NET Framework XML data access techniques.
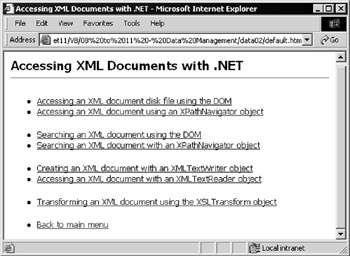
Figure 8-14:
The first two pairs of links show how to access XML data stored in a document object in two distinct ways “ using the methods and properties provided by the XML DOM, and through the new .NET XPathNavigator class. The next pair of links demonstrates use of the XmlTextWriter and XmlTextReader classes, and the final one shows a simple example of using the XslTransform class. We look at all of these classes in Chapter 11.
XML Document Access via the DOM
The .NET XML classes provide an XML parser object named XmlDocument that is W3C DOM-compliant. This is the core object for most XML-based activities carried out in .NET. You can use it to access an XML document using the same kind of code as you would with (say) the MSXML parser object. The first example page, Accessing XML documents using the DOM ( xml-via-dom.aspx ), is shown in Figure 8-15:
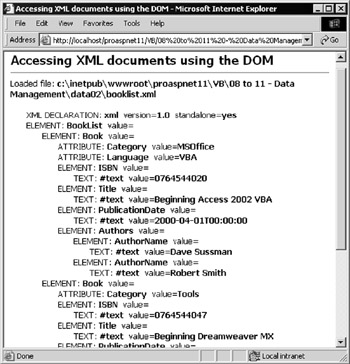
Figure 8-15:
This screenshot displays the results of recursively parsing a simple XML document using DOM methods. As with all the examples in this chapter, you can use the [view source] link at the bottom of any of the sample pages to see the entire code
The XML DOM Example Code
This example, like the earlier relational data access examples, uses code in the Page_Load event handler to access the data and present the results within <div> elements located in the page. It first creates a string containing the path to the XML document, which is located in the same folder as the ASP.NET page, and then creates a new XmlDocument object and loads the XML file. The example contains some elementary error-handling code that we've removed here for clarity.
Now you can display the contents of the XML document by calling a custom function that recursively extracts details of each element. A function named GetChildNodes used here accepts a parameter an XmlNodeList object containing the collection of the child nodes of the current node “ in this case, all the children of the document node.
| Note | An XML document has a single document node that has as its children the XML declaration node (such as <?xml version="1.0"?> ), the root node of the XML (in this case <BookList> ) and any comment nodes or processing instructions. |
The function also accepts an integer that indicates the nesting level. This is used to create the indentation of the output to show the structure more clearly. So, by calling this function initially with objXMLDoc.ChildNodes and as the parameters, we'll start the process with the XML declaration and the root element of the document:
'create physical path to booklist.xml sample file (in same folder as ASPX page) Dim strCurrentPath As String = Request.PhysicalPath Dim strXMLPath As String = Left(strCurrentPath, InStrRev(strCurrentPath, "\")) _ & "booklist.xml" 'create a new XmlDocument object Dim objXMLDoc As New XMLDocument() 'load the XML file into the XmlDocument object objXMLDoc.Load(strXMLPath) outDocURL.innerHTML = "Loaded file: <b>" & strXMLPath & "</b>"
The Custom GetChildNodes Function
The complete listing of the GetChildNodes function is shown in the following code. The techniques are standard W3C DOM coding practice. The principle is to iterate through all the nodes in the current NodeList , displaying information about each one. There are different properties available for different types of node “ check the NodeType first, and then access the appropriate properties.
Next, if it is an Element -type node, iterate through all the attributes adding information about these. Finally, check if this node has any child nodes, and if so, iterate through these recursively calling the same GetChildNodes function.
Function GetChildNodes(objNodeList As XMLNodeList, intLevel As Integer) _ As String Dim strNodes As String = "" Dim objNode As XmlNode Dim objAttr As XmlAttribute 'iterate through all the child nodes for the current node For Each objNode In objNodeList 'display information about this node strNodes = strNodes & GetIndent(intLevel) _ & GetNodeType(objNode.NodeType) & ": <b>" & objNode.Name 'if it is an XML Declaration node, display the 'special' properties If objNode.NodeType = XMLNodeType.XmlDeclaration Then 'cast the XMLNode object to an XmlDeclaration object Dim objXMLDec = CType(objNode, XmlDeclaration) strNodes = strNodes & "</b> version=<b>" _ & objXMLDec.Version & "</b> standalone=<b>" _ & objXMLDec.Standalone & "</b><br />" Else 'just display the generic 'value' property strNodes = strNodes & "</b> value=<b>" _ & objNode.Value & "</b><br />" End If 'if it is an Element node, iterate through the Attributes 'collection displaying information about each attribute If objNode.NodeType = XMLNodeType.Element Then 'display the attribute information for each attribute For Each objAttr In objNode.Attributes strNodes = strNodes & GetIndent(intLevel + 1) _ & GetNodeType(objAttr.NodeType) & ": <b>" _ & objAttr.Name & "</b> value=<b>" _ & objAttr.Value & "</b><br />" Next End If 'if this node has child nodes, call the same function recursively 'to display the information for it and each of its child node If objNode.HasChildNodes Then strNodes = strNodes & GetChildNodes(objNode.childNodes, intLevel + 1) End If Next 'go to next node Return strNodes 'pass the result back to the caller End Function
There are a couple of other minor functions that the preceding code uses. The GetIndent function simply takes an integer representing the current indent level and returns a string containing a suitable number of non-breaking space characters . The GetNodeType function looks up the numeric node type value returned from the NodeType property of each node, and returns a text description of the node type. Remember that you can view the code for these functions in the sample page using the [view source] link at the bottom of the page.
XML Document Access with an XPathNavigator
The second example, shown in Figure 8-16, demonstrates how you can achieve the same results as the previous example, by using the XPathNavigator object. The Accessing XML documents using an XPathNavigator ( xml-via-navigator.aspx ) sample page produces output that is fundamentally similar to the previous example. Notice, however, that now you get the complete content of all the child elements for the value of an element (all the #text child nodes of all the children concatenated together):
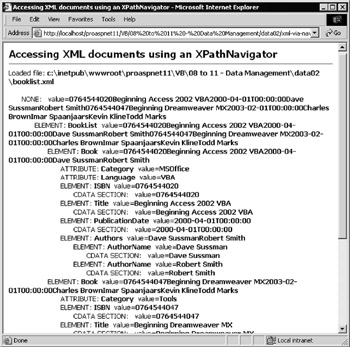
Figure 8-16:
The XPathNavigator Example Code
As in the previous example, start out by locating and loading the XML document into an XmlDocument object (see the code that follows ). If there is no error, you know that the document is well formed and loaded successfully. However, here the code differs considerably “ you create an XPathNavigator object based on the XmlDocument object (shown highlighted in the code).
To display the output, first move the current position (pointer) of the XPathNavigator to the document itself. Then you can call a custom recursive function named GetXMLDocFragment that iterates through all the nodes in the document and inserts the result into your <div> element elsewhere in the page. Note that this time you are calling your custom function with the new XPathNavigator object as the first parameter (the second is the same indent level parameter as used in the previous example):
'create physical path to booklist.xml sample file (in same folder as ASPX page) Dim strCurrentPath As String = Request.PhysicalPath Dim strXMLPath As String = Left(strCurrentPath, _ InStrRev(strCurrentPath, "\")) & "booklist.xml" 'create a new XmlDocument object and load the XML file Dim objXMLDoc As New XmlDocument objXMLDoc.Load(strXMLPath) outDocURL.innerHTML = "Loaded file: <b>" & strXMLPath & "</b>" 'now ready to parse the XML document 'it must be well-formed to have loaded without error 'create a new XPathNavigator object using the XMLDocument object Dim objXPNav As XPathNavigator = objXMLDoc.CreateNavigator() 'move the current position to the root #document node objXPNav.MoveToRoot() 'call a recursive function to iterate through all the nodes in the 'XPathNavigator, creating a string that is placed in the <div> above outResults.innerHTML = GetXMLDocFragment(objXPNav, 0)
The Custom GetXMLDocFragment Function
The XPathNavigator object exposes a series of properties, methods, and collections that make it easy to navigate an XML document. We use a range of these in our custom function, shown in the following code. The first step, after declaring a couple of necessary local variables , is to get the information about the current node. Notice that you use the same GetNodeType function as in the previous example to convert the numeric NodeType value into a text description of the node type.
Function GetXMLDocFragment(objXPNav As XPathNavigator, intLevel As Integer) _ As String Dim strNodes As String = "" Dim intLoop As Integer 'display information about this node strNodes = strNodes & GetIndent(intLevel) _ & GetNodeType(objXPNav.NodeType) & ": " & objXPNav.Name _ & " value=" & objXPNav.Value & "<br />"
In the previous XML DOM example, you extracted the value of the node through the XmlNode object's Value property, which returned just the value of this node. In this example, the content of the XML document is being accessed through an XPathNavigator , and not by using the XML DOM methods. For example, to get the value of the node, we are using the Value property of our objXPNav object “ an XPathNavigator that is currently pointing to the node being queried. The Value property of a node returned by an XPathNavigator is a concatenation of all the child node values.
Reading the Attributes of a Node
Now you can check if this node has any attributes. If it does, iterate through them collecting information about each one. You can see in the following code how this is different from using the DOM methods, where you could iterate through the Attributes collection. Using an XPathNavigator is predominantly a forward-only pull technique. You need to extract the nodes from the document in the order that they appear. So, for a node that does have attributes, we move to the first attribute, process it, move to the next attribute until there are no more to process, and then move back to the previous position using the MoveToParent method:
'see if this node has any Attributes If objXPNav.HasAttributes Then 'move to the first attribute objXPNav.MoveToFirstAttribute() Do 'display the information about it strNodes = strNodes & GetIndent(intLevel + 1) _ & GetNodeType(objXPNav.NodeType) & ": " & objXPNav.Name _ & " value=" & objXPNav.Value & "<br />" Loop While objXPNav.MoveToNextAttribute() 'then move back to the parent node (that is the element itself) objXPNav.MoveToParent() End If
Reading the Child Nodes for a Node
You can see if the current node has any child nodes by checking the HasChildren property. If it does, you need to move to the first child node and recursively call the function for that node “ incrementing the level parameter to get the correct indenting of the results. Then you can move back to the previous position (the parent) and continue, as shown:
'see if this node has any child nodes If objXPNav.HasChildren Then 'move to the first child node of the current node objXPNav.MoveToFirstChild() Do 'recursively call this function to display the child node fragment strNodes = strNodes & GetXMLDocFragment(objXPNav, intLevel + 1) Loop While objXPNav.MoveToNext() 'move back to the parent node - the node we started from when we 'moved to the first child node - could have used Push and Pop instead objXPNav.MoveToParent() End If
Reading the Sibling Nodes for a Node
So far you've only processed the current node, its attributes, and its child nodes (if any). You need to repeat the process for all the following sibling (element) nodes as well. This is achieved using the MoveToNext method, and by calling the recursive function again for each one, as shown:
Do While objXPNav.MoveToNext() 'recursively call this function to display this sibling node 'and its attributes and child nodes strNodes = strNodes & GetXMLDocFragment(objXPNav, intLevel) Loop Return strNodes 'pass the result back to the caller End Function
Searching an XML Document
The second pair of links in the menu page opens two examples that search for specific element values within an XML document, rather than displaying the entire document. The two examples are Searching an XML document using the DOM ( search-dom.aspx ) and Searching an XML document with an XPathNavigator ( search-navigator.aspx ). The task is to retrieve the values of all the <AuthorName> elements within the document. You can run these samples to see the results. Figure 8-17 shows the XML DOM version:
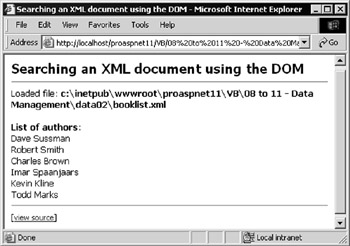
Figure 8-17:
Using the DOM Methods
Using the DOM methods, you can take advantage of the very useful GetElementsByTagname method that the XmlDocument object exposes. This method can be used to create a collection of matching elements as an XmlNodeList , as shown in the following code, and then iterate through the collection displaying the values of the #text child node for each one.
Dim strResults As String = "<b>List of authors</b>:<br />" 'create a NodeList collection of all matching child nodes Dim colElements As XmlNodeList colElements = objXMLDoc.GetElementsByTagname("AuthorName") 'iterate through collection getting values of child #text nodes for each one For Each objNode In colElements strResults += objNode.FirstChild().Value & "<br />" Next 'then display the result outResults.innerHTML = strResults
| Note | Remember that an element's value is stored in a #text -type child node of the element node “ it's not the value of the element node itself. You can clearly see this in the previous examples that displayed all the nodes in the document. |
Using an XPathNavigator
You've already seen how to create an XPathNavigator for an XmlDocument and use it to traverse the document. The XPathNavigator also provides the Select method, which takes an XPath expression and selects all matching nodes or fragments within the document. You can then traverse the set of selected nodes and extract the values you want.
You can also improve performance by using the lighter and faster XPathDocument object to hold your XML document rather than the W3C-compliant XmlDocument object.
Creating an XPathDocument and XPathNavigator Object
The following code in the Page_Load event handler first creates an XPathDocument instance and loads the XML document into it. However, in this case, you must use the constructor for the XPathDocument to load the XML, because there is no Load method for this class. While you can create an XPathDocument from a Stream , a TextReader or an XmlReader , the easiest way when you have an XML disk file is to specify the path and name of that file. The code then creates an XPathNavigator object for this document.
'declare a variable to hold an XPathDocument instance Dim objXPathDoc As XPathDocument 'create XPathDocument object and load the XML file objXPathDoc = New XPathDocument(strXMLPath) 'create an XPathNavigator based on this document Dim objXPNav As XPathNavigator = objXPathDoc.CreateNavigator()
Selecting the Nodes and Displaying the Results
Now you can execute the Select method of the XPathNavigator with an appropriate XPath expression. The result will be an XPathNodeIterator object that contains the matching node(s). Then, as shown in the following code, it's simply a matter of iterating through the selected nodes collecting their values. Each node in the XPathNodeIterator is itself an XPathNavigator based on this node within the document. This new XPathNavigator has Name and Value properties that reflect the values for the current node.
Dim strResults As String = "<b>List of authors</b>:<br />" 'select all AuthorName nodes into XPathNodeIterator object 'using an appropriate XPath expression Dim objXPIter As XPathNodeIterator objXPIter = objXPNav.Select("descendant::AuthorName") Do While objXPIter.MoveNext() 'get the value and add to the 'results' string strResults += objXPIter.Current.Value & "<br />" Loop outResults.innerHTML = strResults 'display the result
You need to consider the task you want to achieve quite carefully when deciding whether to use an XPathNavigator object or the XML DOM methods. Of course, as you can create an XPathNavigator based on an existing XmlDocument object (as well as on an XPathDocument ), you can use both where this is appropriate. Also remember to choose the lighter and faster XPathDocument if you don't need to access the XML DOM (in other words when you can perform all the tasks you require using an XPathNavigator ).
An XML TextWriter Object Example
The Creating an XML document with an XMLTextWriter object ( xml-via-textwriter.aspx ) example demonstrates how to use the XmlTextWriter object to quickly create a new XML document as a disk file. It writes to the file a series of elements and attributes that make up the document, and then reads the document back from disk and displays it, as shown in Figure 8-18:
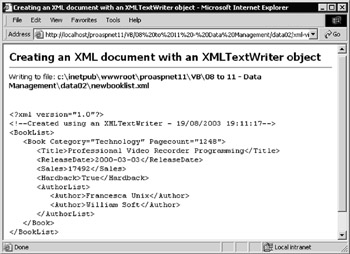
Figure 8-18:
The XMLTextWriter Example Code
To create the new XML document, first create a suitable path and filename so that the new file will be placed in the same folder as the ASP page, as shown in the following code. Then create the XmlTextWriter object instance. Specify the path to the new file as the first parameter to the constructor, and Nothing ( null in C#)for the second. The second parameter is the encoding required for the file, defined as an Encoding object. If you set this parameter to Nothing , the default encoding UTF-8 is used.
Next, set the properties of the XmlTextWriter . In the example, we want the document to be indented (to show the structure more clearly), with each level of indent being three space characters. Then we're ready to start writing the new document. The WriteStartDocument method creates the opening XML declaration, and this is followed with a comment indicating the date and time that the document was created:
'create physical path for the new file (in same folder as ASPX page) Dim strCurrentPath As String = Request.PhysicalPath Dim strXMLPath As String = Left(strCurrentPath, InStrRev(strCurrentPath, "\")) _ & "newbooklist.xml" 'declare a variable to hold an XmlTextWriter object Dim objXMLWriter As XmlTextWriter 'create a new objXMLWriter object for the XML file objXMLWriter = New XmlTextWriter(strXMLPath, Nothing) outDocURL.innerHTML = "Writing to file: <b>" & strXMLPath & "</b>" 'now ready to write (or "push") the nodes for the new XML document 'turn on indented formatting and set indent to 3 chararcters objXMLWriter.Formatting = Formatting.Indented objXMLWriter.Indentation = 3 'start the document with the XML declaration tag objXMLWriter.WriteStartDocument() 'write a comment element including the current date/time objXMLWriter.WriteComment("Created using an XMLTextWriter - " & Now())
Writing Elements and Attributes
The next step is to write the opening tag of the <BookList> root element. The WriteStartElement does this for you; follow it with the opening <Book> element tag, as shown in the following code. We also want to add two attributes to the <Book> element. For these, use the WriteAttributeString method to create an attribute from a text string. Where the value for the attribute is a numeric (or other non- String ) data type, you must convert it to a string first:
objXMLWriter.WriteStartElement("BookList") objXMLWriter.WriteStartElement("Book") 'add two attributes to this element's opening tag objXMLWriter.WriteAttributeString("Category", "Technology") Dim intPageCount As Integer = 1248 'numeric value to convert objXMLWriter.WriteAttributeString("Pagecount", intPageCount.ToString("G"))
The next step is to write the four elements that form the content of the <Book> element that's already opened. Use the WriteElementString method, which writes a complete element (not just the opening tag like the WriteStartElement method we used earlier does). Note that the actual content of the element in the final document is always text (XML documents are plain text). Therefore, you have to convert non- String type values to a string first, as shown:
'write four elements, using different source data types objXMLWriter.WriteElementString("Title", _ "Professional Video Recorder Programming") Dim datReleaseDate As DateTime = #02/02/2002# objXMLWriter.WriteElementString("ReleaseDate", _ datReleaseDate.ToString("yyyy-MM-dd")) Dim intSales As Integer = 17492 objXMLWriter.WriteElementString("Sales", intSales.ToString("G")) Dim blnHardback As Boolean = True objXMLWriter.WriteElementString("Hardback", blnHardback.ToString())
Next, as shown in the following code, we want to write the <AuthorList> element and its child <Author> elements. You need to open the <AuthorList> element and then write the child elements. Afterwards, you can create the closing </AuthorList> tag simply by calling the WriteEndElement method. This automatically closes the most recently opened element.
'write the opening tag for the <AuthorList> child element objXMLWriter.WriteStartElement("AuthorList") 'add two <Author> elements objXMLWriter.WriteElementString("Author", "Francesca Unix") objXMLWriter.WriteElementString("Author", "William Soft") 'close the <AuthorList> element objXMLWriter.WriteEndElement()
To finish the document, just close the <Book> element and the root <BookList> element. Then flush the output to the disk file and close the XmlTextWriter , as shown in the following code. Always remember to call the Close method; otherwise the disk file will remain locked. You don't actually have to call the Flush method here, as closing the XmlTextWriter has the same effect, but you can call Flush to force the part-formed document to be written to disk whenever you wish:
'close the <Book> element objXMLWriter.WriteEndElement() 'close the root <BookList> element objXMLWriter.WriteEndElement() objXMLWriter.Flush() objXMLWriter.Close()
Displaying the New XML Document
Now that you've got your new XML document written to a disk file, you can read it back and display it. To do this, use a StreamReader object, as shown in the following code. Open the file, read the entire content into a string variable, and close the file. Then you can insert the string into a <div> element elsewhere on the page to display it. Add <pre> elements (you could use <xmp> instead) to maintain the indentation and line breaks in the document when displayed in the browser.
Dim strXMLResult As String Dim objSR As StreamReader = File.OpenText(strXMLPath) strXMLResult = objSR.ReadToEnd() objSR.Close objSR = Nothing outResults.innerHTML = "<pre>" & Server.HtmlEncode(strXMLResult) & "</pre>"
An XML TextReader Object Example
OK, so you can create an XML document as a disk file with an XmlTextWriter . The obvious next step is to read a disk file back using an XmlTextReader object. The Accessing an XML document with an XMLTextReader object ( xml-via-textreader.aspx ) example does just that (though with a different XML document).
Figure 8-19 shows a list of the nodes found in the sample booklist.xml document. For each node, the page shows the type of node, and the node name and value (if applicable “ some types of node have no name and some types have no value):

Figure 8-19:
The XMLTextReader Example Code
As in the previous example, the first step is to build the path to the file that'll be opened “ in this case, booklist.xml in the same folder as the ASP page. Next, as shown in the following code, you can declare an XmlTextReader object, passing the path to the file that you want to open as the parameter to the constructor.
Reading the XML document is just a matter of calling the Read method to return each node. This returns False if there are no more nodes to read. For each node you find, examine the NodeType property to see what kind of node it is. Depending on the node type, there are different properties available that you can access to build your results string.
'create physical path to booklist.xml sample file (in same folder as ASPX page) Dim strCurrentPath As String = Request.PhysicalPath Dim strXMLPath As String = Left(strCurrentPath, InStrRev(strCurrentPath, "\")) _ & "booklist.xml" 'declare a variable to hold an XmlTextReader object Dim objXMLReader As XmlTextReader 'create a new XmlTextReader object for the XML file objXMLReader = New XmlTextReader(strXMLPath) outDocURL.innerHTML = "Opened file: <b>" & strXMLPath & "</b>" 'now ready to read (or "pull") the nodes of the XML document Dim strNodeResult As String = "" Dim objNodeType As XmlNodeType 'read each node in turn - returns False if no more nodes to read Do While objXMLReader.Read() 'select on the type of the node (these are only some of the types) objNodeType = objXMLReader.NodeType Select Case objNodeType Case XmlNodeType.XmlDeclaration: 'get the name and value strNodeResult += "XML Declaration: <b>" & objXMLReader.Name _ & " " & objXMLReader.Value & "</b><br />" Case XmlNodeType.Element: 'just get the name, any value will be in next (#text) node strNodeResult += "Element: <b>" & objXMLReader.Name & "</b><br />" Case XmlNodeType.Text: 'just display the value, node name is "#text" in this case strNodeResult += " - Value: <b>" & objXMLReader.Value _ & "</b><br />" End Select
The XmlTextReader returns the document node-by-node when you call the Read method. However, an element-type node that has attributes is returned as a complete entity during a single Read method call, and so you have to examine each node as you read it to see if it is an element that has attributes. If it does, as shown in the following code, iterate through these by using the MoveToFirstAttribute or the MoveToNextAttribute methods. After processing the current node, you go back and handle the next one. And after the Do loop is complete (in other words, after you've processed all the nodes returned by successive Read method calls), close the XmlTextReader object and display the results in a <div> element elsewhere in the page:
'see if this node has any attributes If objXMLReader.AttributeCount > 0 Then 'iterate through the attributes by moving to the next one 'could use MoveToFirstAttribute but MoveToNextAttribute does 'the same when the current node is an element-type node Do While objXMLReader.MoveToNextAttribute() 'get the attribute name and value strNodeResult += "- Attribute: " & objXMLReader.Name _ & " Value: " & objXMLReader.Value & "<br />" Loop End If Loop 'and read the next node objXMLReader.Close() 'finished with the reader so close it outResults.innerHTML = strNodeResult 'display the results in the page
An XSL Transform Object Example
The final example in this chapter shows one other task that is regularly required when working with XML data, and which .NET makes easy. You can use XML stylesheets written in XSL or XSLT to transform an XML document into another format, or to change its structure or content.
The Transforming an XML document using the XSLTransform object ( xsl-transform.aspx ) example page demonstrates a simple transformation using the booklist.xml file from the previous example and an XSLT stylesheet named booklist.xsl . The result of the transformation is written to disk as booklist.html . As shown in Figure 8-20, you can use the links in the page to open the XML document, the stylesheet, and the final HTML page:
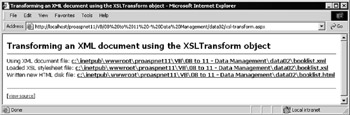
Figure 8-20:
| Note | You must run this page in a browser running on the same machine as the web server to be able to open the linked files using the absolute physical paths. |
The XSLTransform Example Code
There is surprisingly little code required to perform the transformation (you can view the code in the example using the [view source] link at the bottom of the page). First, create an XslTransform object and load the XSL stylesheet into it from disk. Then you can perform the transformation directly using the XSL file in the XslTransform object and the XML file path held in a variable named strXMLPath , as shown in the following code:
'create a new XslTransform object Dim objTransform As New XslTransform() 'load the XSL stylesheet into the XslTransform object objTransform.Load(strXSLPath) 'perform the transformation objTransform.Transform(strXMLPath, strHTMLPath)
The result is sent to the disk file specified by the variable named strHTMLPath . Figure 8-21 shows the resulting HTML page:
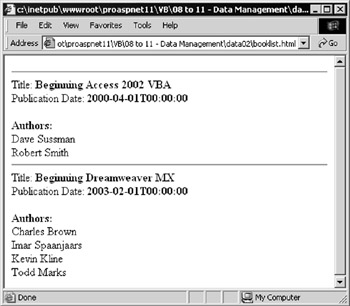
Figure 8-21:
This is just one way to use the XslTransform object (in fact, the simplest way) and you'll see a more complex example at the end of Chapter 11, where XML data management techniques are discussed.
This section was a basic introduction to working with XML in the .NET environment. The next two chapters look at relational data management, but we'll see how the relational and XML data models are quite thoroughly integrated under .NET. Then, in Chapter 11, we'll come back to XML and look in more depth at some of the other techniques that .NET provides to make even the most complex tasks much easier that ever before. Let's try to make some sense of the whole relational versus XML issue.
EAN: 2147483647
Pages: 243
- ERP Systems Impact on Organizations
- ERP System Acquisition: A Process Model and Results From an Austrian Survey
- The Effects of an Enterprise Resource Planning System (ERP) Implementation on Job Characteristics – A Study using the Hackman and Oldham Job Characteristics Model
- Intrinsic and Contextual Data Quality: The Effect of Media and Personal Involvement
- A Hybrid Clustering Technique to Improve Patient Data Quality