Web Services Security
Security, as it relates to web services, almost seems to be a taboo topic. Individuals and companies are still trying to understand exactly what they can build with web services, but still aren't quite sure how they should protect those investments.
Fortunately, because ASP.NET Web services are simply part of an ASP.NET application, we can take advantage of all the security features provided by ASP.NET including solutions for granting or denying access to resources based on the identity of the user (username, password, and the groups/roles that the user may belong to) as well as protecting the data through the use of encryption, such as using Secure Sockets Layer ( SSL ) with HTTP (HTTPS). We can also step outside the bounds of what ASP.NET provides and implement some custom solutions, which will be discussed at the end of the chapter.
Let's start with the authentication and authorization security features provided by ASP.NET
ASP.NET Authentication and Authorization
As shown in Chapter 14, ASP.NET has several offerings for authenticating and authorizing access to ASP.NET resources:
-
Windows authentication :Uses existing Windows users, groups and security concepts, such as an Access Control List ( ACL ), to protect resources. To enable Windows authentication or authorization, IIS must also enforce Windows authentication, either through NTLM or Clear-Text/Basic authentication.
-
Forms authentication :Uses user-defined users and roles and ASP.NET's URL authorization features. Using the ASP.NET configuration system, the developer defines what a given user or role is allowed to access. ASP.NET then enforces these permissions and redirects the user to a login page if they do not present a valid forms authentication cookie.
-
Passport authentication :Uses a distributed authentication store to validate usernames and passwords.
Windows Authentication
To enable Windows authentication for our web service, we need to instruct IIS to use Windows authentication. This is done through the IIS Administration tool (Start Programs Administrative Tools Internet Services Manager). You then find the resource that you want to enforce Windows security upon, such as /WebServices/BasicAuthentication/Server . Right-click on the resource, select Properties from the menus , and then select the Directory Security tab shown in Figure 20-10:
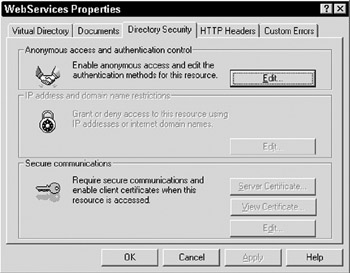
Figure 20-10:
From here we'll select the Edit button for Anonymous access and authentication control. This brings up the Authentication Methods dialog depicted in Figure 20-11:
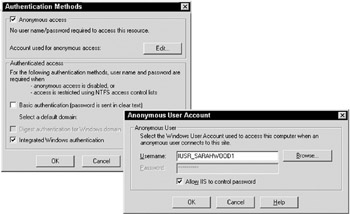
Figure 20-11:
You can see the default settings. Anonymous access is checked and Authenticated Access is set to use Integrated Windows authentication. With Anonymous access checked, IIS will not, by default, require the client to present identity to the server. Instead the server will treat all requests , including web services, as anonymous “ unless the requested resource, such as a file, does not allow anonymous access, in which case the client will be challenged for credentials.
Uncheck Anonymous access, and leave Integrated Windows authentication checked. This will instruct IIS to enforce NTLM authentication challenges for resources requested in the /Wrox/WebServices/BasicAuthentication/Server directory. You can then write a simple ASP.NET Web service (shown here in VB.NET) to validate the credentials used:
<%@ WebService Class="SecureSample" %> Imports System.Web.Services Public Class SecureSample Inherits WebService <WebMethod> _ Public Function WhoAreYou() As String Return User.Identity.Name End Function End Class
This web service simply uses the ASP.NET User object's Identity.Name property to return the name of the authenticated user back to the caller. You can now build a proxy for this web service and test to see if the credentials are enforced. The following is a simple ASP.NET page (written in VB.NET) that uses the proxy to call the SecureSample Web service:
<%@ Import Namespace="System.Net" %> <Script runat="server"> Public Sub Page_Load(sender As Object, e As EventArgs) ' Create an instance of the SecureSample proxy Dim secureSample As New SecureSample() ' Create a new NetworkCredential class Dim credentials As New NetworkCredential() ' Set username and password values credentials.UserName = "demo" credentials.Password = "00password" credentials.Domain = "rhoward" ' Set the credentials secureSample.Credentials = credentials ' Call its WhoAreYou() function lblSecureSample.Text = secureSample.WhoAreYou() End Sub </Script> <asp:label id="lblSecureSample" runat="server"/>
This code creates an instance of the SecureSample proxy and then creates an instance of NetworkCredentials . The NetworkCredentials class is used to specify a UserName , Password , and Domain . These credentials are then used along with the network request. For the proxy class, we assign the NetworkCredentials instance to an inherited property of the proxy, Credentials . Then we can make our request to the Windows authenticated web service. If the credentials are valid, the users are authenticated; otherwise , they are denied access.
This example uses NTLM authentication. When you make a request to the web server, the web server determines that Windows authentication is required and issues a challenge response back to the caller. The caller then has the opportunity to send a hashed value of the username, password, and domain to the server. The server will then attempt to create the same hash. If the values match, the user is considered authenticated. Sometimes, however, NTLM authentication can't be used. For example, your client could be a non-Windows application, in which case you might decide to use Clear-Text/Basic authentication.
Clear-Text/Basic Authentication
Whereas Windows NTLM authentication sends a hash of the credentials, this hash can only be computed by an application that is able to create the hash. Some web service clients may not wish to use NTLM authentication, but are likely still to be able to use Clear-Text/Basic authentication.
Clear-Text/Basic authentication works in a manner similar to NTLM in that the server issues a challenge, but rather than sending a hashed value of the credentials, the client Base64-encodes the values. The format is BASIC: Domain\Username:Password . Basic authentication hides the data, but the credentials can be easily extracted. The value is sent using the AUTHORIZATION HTTP header and the value of this header is the Base64-encoded value. Clear-Text/Basic authentication, by itself, is not considered a secure form of authentication. However, when used with HTTPS, which encrypts all communication between the client and server, it is quite useful.
You can enable this authentication option in IIS, by revisiting the Authentication methods dialog and selecting only Basic authentication, shown in Figure 20-12:
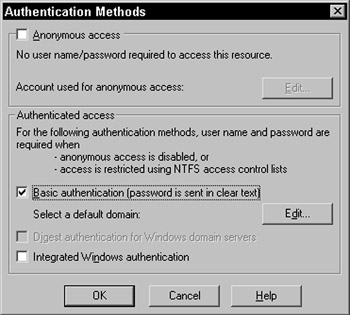
Figure 20-12:
When you enable Basic authentication, IIS will display a warning that this authentication method will pass credentials in clear text. You can use the proxy class to make calls to the web service. However, instead of using a secure authentication mechanism, your credentials are passed in Base64-encoded clear text.
Another option is to use ASP.NET Forms authentication to validate the user. However, you have to make some special arrangements to use this type of authentication with web services. This is because Forms authentication uses cookies, and you have already seen how a cookie is kept in memory and is lost when the proxy is destroyed . Additionally, Forms authentication makes use of HTTP redirects to an HTML form for unauthenticated users.
Forms Authentication
ASP.NET Forms authentication allows you to use an HTML form to request the credentials for a user. The submitted credentials can then be validated against any data store, and if the credentials are considered valid, an HTTP cookie is sent to the client. This cookie is used on subsequent requests to authenticate the user.
While Forms authentication is a very flexible system, it is somewhat cumbersome to use with web services. The main issue is that when configured for Forms authentication, ASP.NET will redirect requests to an HTML forms login page. This will cause problems for a web service proxy that is expecting a SOAP response. To use Forms authentication with ASP.NET Web services, you have to bend the rules a little. To look at how this is done, let's use the same SecureSample Web service we used earlier with one minor modification:
<%@ WebService Class="SecureSample" %> Imports System.Web.Services Imports System.Web.Security Public Class SecureSample Inherits WebService <WebMethod> _ Public Function WhoAreYou() As String Return User.Identity.Name End Function <WebMethod> _ Public Function Authenticate(username As String, password As String) If (username = "John") AND (password = "password") Then FormsAuthentication.SetAuthCookie(username, true) Return true End If Return false End Function End Class
We've added a new function, Authenticate , which accepts both a username and a password . We then have to write code to determine the validity of the username and password values, and have used the FormsAuthentication SetAuthCookie static method to write the Forms authentication cookie to the client. We also need a web.config file that configures this web service to use Forms authentication:
<configuration> <system.web> <authentication mode="Forms"> <forms name=".ASPXAUTH" loginUrl="login.aspx" protection="All" timeout="30" path="/" /> </authentication> </system.web> </configuration> We don't specify an <authorization> section. This allows us to get around the problem of redirecting the user to login.aspx , but still allows us to use the Forms authentication cookie for validation purposes.
After you authenticate by calling the web service Authenticate method, you can call the WhoAreYou method and see that the ASP.NET User object recognizes you as a valid user. You can then authorize actions for this user in the code. For example, for users in the 'customer' role, you could allow access to direct database requests, but for users in the 'anonymous' role, you could send them cached data.
Yet another solution to the authentication problem is to use client certificates . Client certificates usually go hand-in-hand with SSL, so we'll discuss them together.
HTTPS Encryption and Client Certificates
The recommended strategy for hiding data in transmission is to use the HTTPS protocol. HTTPS uses public/private asymmetric cryptography to provide a secure communication between the caller and the server.
| Note | Refer to the IIS documentation for directions on how to install and use a server certificate for secure communication. |
Once a server certificate is installed, you can enforce the use of the certificate on your web application by simply opening the properties dialog for the web application, selecting the Directory Security tab, clicking the Edit button under Secure Communications, and then checking the Require secure channel (SSL) checkbox, as Figure 20-13 depicts:
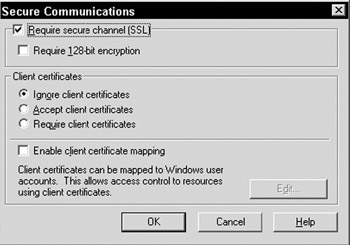
Figure 20-13:
Requests to this web application will now require HTTPS to request data from the server, thus encrypting content. You can simply add an ASP.NET Web service to this application and the use of HTTPS will be transparent.
An ASP.NET Web service served from a web application with HTTPS enabled will generate WSDL that correctly identifies the web service as using HTTPS (described via the location attribute of the port setting in the WSDL). When you build a proxy using the WSDL, the proxy will automatically be configured to use HTTPS for secure communication with the server.
Another option, which is only available when the server has an installed certificate, is to enable the server to recognize client certificates.
Client Certificates
Server certificates are issued by a third party to ensure that the identity of the server is valid and can be trusted. A client certificate is also issued by a trusted third party, but is used to ensure that the identity of the client is valid and can be trusted. A client can send a request to the server along with the client certificate. The server can then determine if the certificate is trusted, and can use the certificate to authenticate and authorize the client.
The most common use of client certificates is a certificate installed with the browser. For example, if you obtain a client certificate, you can view the certificate in Internet Explorer. For Internet Explorer 6, this is done by selecting Tools Internet Options. This opens the Internet Options dialog. Next , select the Content tab shown in Figure 20-14:
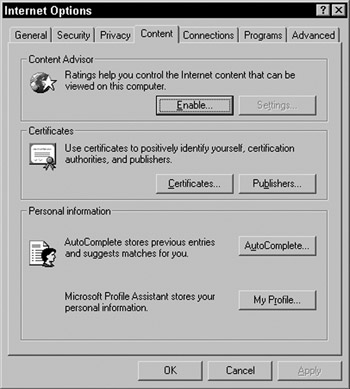
Figure 20-14:
If you press the Certificates button, you'll be provided with a list of the installed client certificates.
You can require the use of client certificates on the server by configuring your web application through the same Secure Communication dialog box used for enabling HTTPS (note that this requires that you have a server certificate as well). To enable support for client certificates, simply check the Require or Accept client certificates option.
Clients that make requests to this web application are then required to present a client certificate. If the client does not present a certificate, access is denied. If certificates are accepted, the onus is on us to determine whether or not to authenticate the request. We validate the certificate through code, as you'll see in a moment.
Before using the certificate from our proxy, we'll test the certificate using a browser that has a client certificate installed, and access an ASP.NET Web service on a server that requires the use of client certificates “this all happens transparently within our code.
If client certificates are installed, we can also write some code on the server that examines the certificate and extracts meaningful information from it. The following is a simple ASP.NET Web service (written in VB.NET) that accesses certificates presented by the client and extracts meaningful details:
<%@ WebService Class="CertExample" %> Imports System.Security.Principal Imports System.Web.Services Imports System.Web Imports System Public Class CertExample <WebMethod> _ Public Function GetCertDetails() As CertDetails Dim request As HttpRequest = HttpContext.Current.Request Dim cert As New CertDetails() cert.Issuer = Request.ClientCertificate.Issuer cert.Subject = Request.ClientCertificate.Subject cert.Valid = Request.ClientCertificate.IsValid cert.KeySize = Request.ClientCertificate.KeySize cert.PublicKey = Convert.ToBase64String(Request.ClientCertificate.PublicKey) cert.Cookie = Request.ClientCertificate.Cookie Return cert End Function End Class Public Class CertDetails Public Issuer As String Public Subject As String Public Valid As Boolean Public KeySize As Integer Public PublicKey As String Public Cookie As String End Class
If you test this web service through a browser and the client presents a certificate, you should see a result similar to that shown in Figure 20-15:
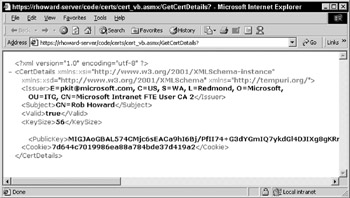
Figure 20-15:
This example demonstrates how a certificate sent by the client is used on the server to recognize the client's identity. Let's now look at the same example, but instead of using a browser to present the certificate, we'll use the ASP.NET proxy to present it along with the request.
Using Client Certificates with Web Services
To use client certificates with the proxy, you need to export the client certificate. If you select Tools Internet Options from Internet Explorer, select the Content tab, and view the installed certificates (as you did earlier), you can select a certificate and export it.
If you select the certificate and press the Export button, the Certificate Export Wizard will open . You can simply press the Next button, accepting the defaults, until you arrive at the File to Export dialog. Here, you need to provide a filename for the exported certificate as well as a location, for example C:\cert.cer . Click the Finish button, and your certificate is exported.
You now need to modify the application that's using the web service proxy to supply the certificate with the call:
<%@ Import Namespace="System.Security.Cryptography.X509Certificates" %> <script runat="server"> Public Sub Page_Load(sender As Object, e As EventArgs) Dim cert As new CertExample() Dim details As CertDetails Dim x509 As X509Certificate.CreateFromCertFile("c:\cert.cer") cert.ClientCertificates.Add(x509) details = cert.GetCertDetails() lblIssuer.Text = details.Issuer lblSubject.Text = details.Subject lblValid.Text = details.Valid lblKeySize.Text = details.KeySize lblPublicKey.Text = details.PublicKey lblCookie.Text = details.Cookie End Sub </script> Issuer: <asp:label id="lblIssuer" runat="server"/> <br> Subject: <asp:label id="lblSubject" runat="server"/> <br> Valid: <asp:label id="lblValid" runat="server"/> <br> KeySize: <asp:label id="lblKeySize" runat="server"/> <br> PublicKey: <asp:label id="lblPublicKey" runat="server"/> <br> Cookie: <asp:label id="lblCookie" runat="server"/>
In this code, the X509Certificate class is used to load the client certificate from the C:\cert.cer file. Then the certificate is added to the proxy, and the request is issued.
In the next section, we'll delve a bit deeper into web service security issues.
EAN: 2147483647
Pages: 243