Cross-Language Inheritance
In the past, it has been quite difficult (nearly impossible , actually) to have components written in one language subclass and extend a component written in another. You couldn't take a class written in C++ and inherit from it in Visual Basic to create a new object “ things like that just weren't possible. You also had no way of taking a compiled binary component “ even one written in the same language “ and deriving a new object from it, without having the sourcecode for the parent object, or at least a header file. It came down to the fact that there just wasn't enough information about the compiled components embedded in them to allow you to derive a new object.
Now with the CLR however, you have the ability to do just that. The metadata that is associated with a .NET class provides enough information, even in compiled form, to allow you to derive a new class from an existing class. The other cool thing that the CLR allows is for you to derive a new class in a different language. In the past, you actually had to have the sourcecode for the base class in order to derive a new class “and that new class had to be written in the same language as the base class. But since all CLR languages compile down to an intermediate language “ MSIL “ the new class can be in whatever CLR- compliant language you choose.
Cross-language inheritance , as this is known, also makes debugging much easier. It doesn't matter what language the code was written in when debugging. Simply run the debugger on the code, and then the CLR will trace from one language to the next automatically , transparent to the developer. It can even handle exceptions across languages and not worry about translating or modifying the information as it switches languages “ the CLR makes that all transparent.
The other key advantage of cross-language inheritance is that it makes a great way to create class libraries. If you cast your memory back a few years to the Microsoft Foundation Classes ( MFC ) introduced by Microsoft to build Windows applications, you have an example of a class library. MFC was written in C++, so it could be used to create C++ Windows applications or components. Since MFC is innately tied to C++, a Visual Basic developer could not directly use any of the capabilities of MFC, though. With the .NET Framework, Microsoft has written those in C#, but the cross-language inheritance capabilities of the CLR allow any supported language to both use the framework as well as create new classes that inherit from classes within the framework.
Cross-Language Inheritance Example
To show how cross-language inheritance works, let's look at a quick example component. In this example, take the C# class that was created earlier in the chapter and derive another class from it. This class will be written in Visual Basic .NET and will override the function that calculates the average selling price. The first step is to modify the C# class so that the function can be overridden.
To do this, add the virtual modifier to the function declaration for the AveragePrice function in the C# class. In C#, properties and methods are non-virtual by default, which means that they can't be overridden in any derived classes. Without the virtual keyword, you would get an error message when compiling the derived class that was trying to override this method:
public virtual Double AveragePrice (string productType) { This points out an interesting design dilemma when creating the classes. If there are methods that you think might be overridden in a derived class, it probably makes sense to mark these as virtual when you first create the class. In the previous example, this wasn't done, so now you have to go back and re- deploy the original component. Likewise, if there is a function that you don't want overridden in a derived class, make sure that it is not defined as virtual , and anyone that derives from the class will not be able to override it.
Next, let's look at the new class, written in Visual Basic .NET, derived from this C# class:
Option Explicit Option Strict Imports BusObjectCS Imports System.Data Namespace SubBusinessClass Public Class SubIBAProducts Inherits IBAProducts Public Overrides Function AveragePrice ( productType As String) As Double Dim iAverage As Double iAverage = MyBase.AveragePrice(productType) Return CDbl(iAverage * 0.65) End Function Public Function GetNewestProduct (productType As String) As String Dim myProducts As DataSet myProducts = GetProducts(productType) Dim myDataView As DataView = New DataView(myProducts.Tables("products")) myDataView.Sort = "ProductIntroductionDate DESC" Return myDataView(0)("ProductCode").ToString() End Function End Class End Namespace
As with all Visual Basic .NET components, set both Option Explicit and Option Strict so that the compiler takes care of a lot of the error checking and code validation. These will greatly help to reduce any runtime errors that may occur.
Since this class will be derived from the C# version of the business component, import the namespace for that class so that the compiler will understand the references to that class that are made in the new component:
Imports BusObjectCS Imports System.Data
There will also be a DataSet object in the derived class, so import the namespace containing that class as well. This is an important concept. Even though the base class imported this namespace, you still need to import it here. This is because the namespaces are not inherited by the derived class “ they are internally used by the base class, but not available externally.
The next two lines in the code are nearly identical to the VB.NET component created earlier. Define a SubBusinessClass namespace, and within that namespace create a public class called SubIBAProducts . Remember that class names only need to have unique names within the same namespace.
This means that you could have named the class IBAProducts , as in both original classes, and still no naming conflicts will occur. The key line in this class is the next line. The Inherits statement defines the class that the class being defined is inheriting from. It must be the first line in the class definition after the class declaration:
Namespace SubBusinessClass Public Class SubIBAProducts Inherits IBAProducts
The first method in the derived class will be the one to override. When defining a derived class, any public properties and methods from the parent class automatically become public properties or methods of the derived class. This automatically produces the two constructors of the parent class, along with the one property and three methods:
Public Overrides Function AveragePrice ( productType As String) As Double Dim iAverage As Double iAverage = MyBase.AveragePrice(productType) Return CDbl(iAverage * 0.65) End Function
However, this derived class changes the implementation of the third method. This is why in the base class the virtual keyword was added to the method declaration “ to allow for changing its implementation. The new implementation will not have the virtual keyword (unless you want to further derive from this class and override the method again) but rather an Overrides keyword. This keyword means that the function declared here will replace the base class version of this function. In order to override a function in a base class, the overriding function must have the same declaration “ function name , parameter list, and return type.
In the body of the function, utilize some of the functionality of the base class implementation. To do this, call the base class version of the function directly. Use the MyBase keyword as a preface to the function call so that the compiler knows which version to call. The value that is returned from the function is then modified and returned as the new return value for this function. There is no requirement to use any of the base class implementation; sometimes it is better to leverage the code that is in there rather than having to rewrite it.
The other method in the derived class (shown in the following snippet) is not found in the base class. This new method will only be accessible to instances of the derived class. In this method, calculate the newest product in a specific product category. There are two ways to do this. First, write a whole new method from scratch that had all of the database code necessary to execute the proper SQL query to obtain this information. This would in essence duplicate a great deal of code from the base class “ not normally the most efficient way to write code.
Public Function GetNewestProduct (productType As String) As String Dim myProducts As DataSet myProducts = GetProducts(productType) Dim myDataView As DataView = New DataView(myProducts.Tables("products")) myDataView.Sort = "ProductIntroductionDate DESC" Return myDataView(0)("ProductCode").ToString() End Function The other way to do this is to leverage a method from the base class “ GetProducts “ and perform some other work to determine the newest product. Notice that the call to GetProducts does not have to be prefaced with MyBase . This is because there isn't a function declared in the class that overrides the function in the base class. The compiler automatically figures out that it needs to call the implementation of this method from the base class.
With the DataSet that contains all of the products for a particular product type, next obtain a DataView that represents the table containing the information. Sorting the DataView in reverse order by ProductIntroductionDate ensures that the first product in the table is the newest. You can then just grab that row's ProductCode and return it from the new function.
To test this component, first compile it and then modify the test ASP.NET page so that this component is used instead of the original component. When executing displayProducts_ovr.aspx (the modified page), see that the new value for average price is now displayed.
Then, add some code to display the newest product as shown in Figure 17-3:
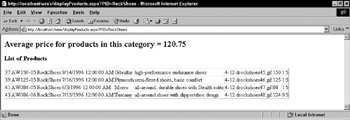
Figure 17-3:
Transactions in .NET
To provide integration with COM+, the CLR provides the same declarative transaction model. This allows managed objects to participate in existing transactions. Use these transactions from within ASP.NET pages, and also from within .NET components.
At the ASP.NET page level, you can add a page-level directive for this:
<%@ Page Transaction="Required" %> The allowable values are:
| Value | Description |
|---|---|
| Disabled | Transactional context will be ignored. This is the default. |
| NotSupported | The page does not run within a transaction. The object context is created without a transaction. |
| Supported | The page runs within the scope of an existing transaction, if one is active. If no transaction scope is active, the page runs without a transaction. |
| Required | The page runs within the scope of a transaction, either an existing one, or creating one if no existing transaction exists. |
| RequiresNew | The page requires a new transaction, and one will be created for each page request. |
To participate in the transaction success or failure, you can either rely on transaction AutoComplete or explicitly commit or abort the transaction. With AutoComplete enabled, the page will vote to commit the transaction if the page runs without throwing an exception. AutoComplete is enabled by default on a page, so if the page completes successfully, then the page will vote to commit.
Explicitly control the transaction result by calling the methods of the ContextUtil class. To vote to abort a transaction, call:
ContextUtil.SetAbort() And, to vote to commit a transaction, call:
ContextUtil.SetComplete() For transacted components, create a serviced component.
Serviced Components
A serviced component is one that is automatically serviced by the Windows Component Services, allowing managed classes to live within the existing ObjectContext . The key thing here is that the code is still managed, so you get all of the managed benefits, with the addition of transactional integration. A serviced component is a .NET component, but it is hosted inside of a COM+ application, and therefore can access the services offered by COM+.
A serviced component has its configuration information held by the COM+ catalog. When using a serviced component within an application, COM+ will create a context service layer based on the attributes you have assigned to the serviced component. Basically, the context service layer runs within COM+ Services, and communicates with the serviced components, which are still running within .NET.
There are several steps to go through to create serviced components:
-
Derive the class from the System.EnterpriseServices.ServicedComponent class.
-
Add the TransactionAttribute to the class.
-
Create a strong name for the assembly.
-
Add assembly attributes to identify the strong name, and the COM+ application name.
-
Register the assembly with the COM+ catalog. This can be manually done, or under certain circumstances, done automatically (this is called lazy registration ).
Creating a Serviced Component Class
Creating the class and adding the attributes is simple. Here is an example written in Visual Basic .NET:
Option Explicit Option Strict Imports System.EnterpriseServices Imports System.Reflection <assembly:AssemblyKeyFile("BankVB.snk")> <assembly:ApplicationName("DotNetBank")> Namespace Wrox <Transaction(TransactionOption.RequiresNew)> Public Class BankVB Inherits ServicedComponent Public Sub Transfer(FromAC As String, ToAC As String, Amt As Decimal) Dim f As String = "Transferring " & Amt.ToString() & " from " _ & FromAC & " to " & ToAC ContextUtil.SetComplete() End Sub End Class End Namespace
Look at the attributes that have been added to this class. The first two are:
<assembly:AssemblyKeyFile("BankVB.snk")> <assembly:ApplicationName("DotNetBank")> The AssemblyKeyFile attribute is used to indicate the file that contains the public and private keys for the strong name for this assembly. Later in this chapter, you will look at strong-named assemblies. These types of assemblies are required to have multiple versions of an assembly executable at the same time on the same system. The ApplicationName attribute defines the COM+ application that this .NET component will execute within. If the application is not found, then COM+ will create an application with the name supplied “ in this case DotNetBank .
The other attribute that has been included with this component is the Transaction attribute. This attribute specifies the transaction parameter for this component. In this case, make sure that the component executes inside a new transaction. The parameter passed is an enum defined as TransactionOption.RequiresNew :
<Transaction(TransactionOption.RequiresNew)>
The C# version of the serviced component is nearly identical to the Visual Basic .NET version. The only difference is the syntax that is used to denote the attributes within the code. Whereas the Visual Basic .NET version uses <...> to delineate the attributes, the C# version uses [...] to indicate the attributes:
using System.EnterpriseServices; using System.Reflection; [assembly:AssemblyKeyFile("BankCS.snk")] [assembly:ApplicationName("DotNetBank")] namespace Wrox [Transaction(TransactionOption.Required)] public class BankVB : ServicedComponent { public void Transfer(string FromAC, string ToAC, decimal Amt) { string f = "Transferring " + Amt.ToString() + " from " + FromAC + " to " + ToAC; ContextUtil.SetComplete(); } } }
Additional Assembly Attributes
As well as the ApplicationName attribute, you can also add COM+ component details such as:
-
ApplicationActivation , to determine how the assembly is activated ( Library or Server )
-
ApplicationID , to specify a GUID
-
Description , to give the assembly a description
For example, in Visual Basic .NET these would be:
<assembly:ApplicationActivation(ActivationOption.Library)> <assembly:ApplicationID(" guid ")> <assembly:Description(".NET bank assembly")>
Accessing COM+ Context
Use the System.EnterpriseServices.ContextUtil class to access the COM+ context from the .NET-serviced component. There are no major performance penalties since the cost to transition into COM+ context is very small. The context (including transactions) flows with the call, so transactions automatically flow.
Registering the Serviced Component
Classes using COM+ services must be registered, which can be done using the Register Services tool. The syntax is:
regsvcs [ Options ] AssemblyName Where Options can be one of the following:
| Option | Description |
|---|---|
| /fc | Find or create a target application. This is a default. |
| /c | Create the target application, generating an error if it already exists. |
| /exapp | Expect an existing application. |
| /tlb: tlbfile | Filename for the exported type library. |
| / appname : name | Use the specified name for the application. |
| /parname: name | Use the specified name or ID for the target partition. |
| /extlb | Use an existing type library. |
| /reconfig | Reconfigure the existing target application. This is a default. |
| /noreconfig | Do not reconfigure the existing target application. |
| /u | Uninstall the target application. |
| /componly | Configure only the components, not methods or interfaces. |
| /nologo | Suppress logo output. |
| /quiet | Suppress logo and success output. |
Using this utility performs the following actions:
-
Loads the assembly
-
Registers the assembly
-
Generates a type library
-
Registers the type library
-
Installs the type library into the COM+ application
-
Configures the COM+ application
For example, to register the bank assemblies, you will use the regsvcs command line tool, as seen in Figure 17-4:
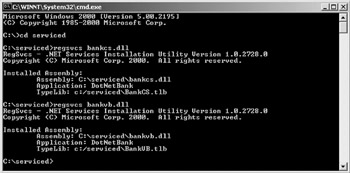
Figure 17-4:
In examining the COM+ Component Services, you'll see the .NET components as in Figure 17-5:
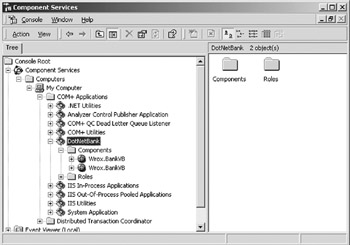
Figure 17-5:
These can be treated like any other transactional COM+ component.
Lazy Registration
If a serviced component is used from managed code and it is not already registered as part of a COM+ application, then the registration and configuration is performed automatically. This may seem like an ideal solution, but it does require administrative privileges, so is not suitable for all scenarios. By and large, it is best to manually register components, perhaps as part of the installation.
Serviced Component Security
Integration with COM+ security is also provided as part of serviced components, allowing access to the SecurityContext object of the COM+ application. For this to succeed, the managed code needs to obtain an NT security token and perform impersonation before calling the .NET object.
EAN: 2147483647
Pages: 243