Configuring Profiles and Personalization
| The profiles and personalization features in ASP.NET are closely allied to the membership and roles management features you saw in the previous chapter. They use the same database as the membership and roles features to store personalized data for each user. They also build on a provider model that allows you to extend or replace the underlying profiles or personalization system if you wish. Specifying the Profiles and Personalization ProvidersASP.NET supplies default profile and personalization providers called Sql ProfileProvider (from the System.Web.Profile namespace) and Sql PersonalizationProvider (from the System.Web.UI.WebControls.WebParts namespace). The default contents of the machine.config file specify SqlProfileProvider as the default provider for profiles, using SQL Server Express Edition as the database system and the aspnetdb database generated in the previous chapter. You can see this provider declaration in Listing 12.1, together with a second declaration that uses the same provider but specifies a remote SQL Server database system with a pre-attached copy of the aspnetdb database. The type attribute for each provider refers to the .NET class that implements the providerwe have removed the long version information string from the listing so that you can see the structure of the file more easily. Listing 12.1. The <profile> Section of machine.config
The default provider for the personalization system is specified in the root web.config file, located in the same folder as machine.config. The web.config file contains only settings that are specific to ASP.NET, whereas the machine.config file contains settings for all parts of the .NET Framework. The <webParts> section of web.config contains several settings, but Listing 12.2 shows those that are of interest when configuring personalization. As with the membership and roles providers, the connectionStringName attribute refers to a connection string declared in the <connectionStrings> section of machine.config. Listing 12.3 shows the two entries that relate to the provider declarations in Listing 12.1 and Listing 12.2. Listing 12.2. The <personalization> Section of the Root web.config File
For details about building custom providers, including a custom profile provider, see http://msdn.microsoft.com/library/enus/dnaspp/html/ASPNETProvMod_Prt8.asp. Listing 12.3. The <connectionStrings> Section of machine.config
Creating and Modifying the ASP.NET Application DatabaseOnce you have specified the providers for the profiles and personalization systems, or if you are happy to use the defaults, you must create or configure the aspnetdb database to store and manipulate the data. If you used the ASP.NET SQL Server Setup Wizard described in the previous chapter to configure the database for membership and roles, it will also have created the tables and procedures required in the database for the profiles and personalization system (see Figure 12.1). Figure 12.1. The ASP.NET SQL Server Setup Wizard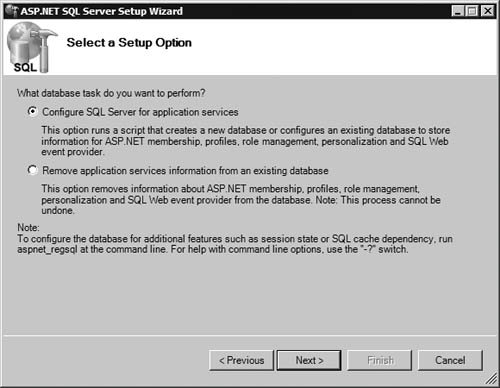
For more information about using the ASP.NET SQL Server Setup Wizard, see the section Creating the ASP.NET Application Database in the previous chapter. Alternatively, you can use the aspnet_regsql.exe utility to add (or remove) the profiles and personalization features from aspnetdb. The utility, which you run in a Command window, is located at: C:\WINDOWS\Microsoft.NET\Framework\v2.0.50727\aspnet_regsql.exe You must specify the database connection details using the server name (-S) and either the user name (-U) and password (-P), or integrated authentication using your current Windows credentials (-E). You also specify the feature you want to add (-A) or remove (-R). The feature identifiers are the following:
Optionally, you can specify the name of the database using the -d argument. If omitted, the utility assumes the default name aspnetdb. As an example, to connect to the local SQL Server Express Edition database using Windows authentication and add profiles and personalization features to aspnetdb, you would enter: aspnet_regsql -S.\SQLExpress -E -Apc To connect to a remote server and remove all the features, you would use: aspnet_regsql -Sservername -Uuserid -Ppassword -Rall You can connect to your aspnetdb database in the Server Explorer (Visual Studio 2005) or Database Explorer (Visual Web Developer) window to see what tables are in place, giving you a good indication of the features actually installed. Enabling Profiles and Declaring Profile PropertiesAfter specifying the profiles provider(s), or accepting the default provider settings, and creating or reconfiguring the ASP.NET application database, you are ready to enable profiles for your Web site or Web application. In the local web.config file in the root folder of the site, turn on profiles using the <profile> element, and specify any profile properties that you require to be available to your visitors and application code. Note In the early beta releases of ASP.NET 2.0, the Web Site Administration Tool provided features to enable and configure profiles and profile properties. This feature is not available in the release version, and you must perform all configuration and management by editing the machine.config and web.config files directly. Listing 12.4 shows the syntax and structure of the <profile> element. The attributes allow you to enable or disable this profile, specify the provider to use by default, optionally enable or disable automatic saving of profile values, and optionally specify the name of a custom class you want to use to manage the profile data. Listing 12.4. Enabling Profiles and Specifying Profile Properties in web.config
Usually, when using the ASP.NET SqlProfileProvider class, you will just include the enabled and defaultProvider attributes. The default value for the automaticSaveEnabled attribute, if omitted, is true, so that the profile system saves any changes to profile properties back to the database when page execution ends. The system does not save the values of profile properties that have not changed, which reduces the processing overhead required. The list of profile properties in the <properties> section defines the values available in your pages and stored in the database. You can clear the list (removing any properties added by web.config files in parent folders), remove individual properties, and add new ones. You specify the behavior and type of each property using the following series of attributes:
Profile Property GroupsYou can define groups of properties that you will access in code as subsets of the profile for each user. This provides a more structured set of profile data and can make it easier to manage the information in your code. Listing 12.5 shows an example profile for a Web site; the profile includes several properties that are String and Int32 types, a read-only profile property with a default value, and a profile property group named "Address". Remember that the default type for a profile property, if not specified, is String. Listing 12.5. A Simple Profile Configuration Example in web.config
Custom Profile Property TypesIt is also possible to store profile properties that are more complex data types. For example, Listing 12.6 shows a class that implements a simple shopping cart. It exposes three properties; the UserID property is a String, the CartItems property is a System.Data.DataTable instance that contains a row for each item in the cart, and the TotalValue property is the total value of all the items in the cart as a Double. There are also two public methods; the AddItem method takes the name, quantity, and value of an item to add, and the Clear method empties the cart. Obviously, a "real-world" cart would require extra features, such as a method to remove individual items, but this example will suffice to demonstrate the use of the profiles in ASP.NET. Listing 12.6. A Simple ShoppingCart Class
You can obtain a useful starter kit for building e-commerce applications from the ASP.NET Web site. Called the PayPal-enabled eCommerce Starter Kit, you can download it from http://www.asp.net/default.aspx?tabindex=5&tabid=41. You simply place the code file shown in Listing 12.6 that implements the class in the App_Code subfolder of your Web site and ASP.NET will compile it at runtime. You then add a using directive to the page to make it available to code in that page: using DemoShoppingCart; It is now possible to use this custom type as a profile property. In the web.config file for the site, you add it to the <properties> section; specifying the type as the namespace.classname for the classas shown in Listing 12.7. You will see how to access instances of this class, along with the other profile properties, in the section Storing and Using Dynamic Profile Data, later in this chapter. Listing 12.7. Adding the ShoppingCart Class as a Profile Property to web.config
Anonymous ProfilesSeveral of the examples in the code listings earlier in this chapter include the allowAnonymous="true" attribute in the <properties> section of the <profile> element in the web.config files. This is a useful feature of the profiles system, and means that you can store information for users who have not logged into the site. However, you should use it with care, because it does mean that you can end up storing many rows of profile data in your application database as anonymous visitors browse the site, and ASP.NET does not remove these rows at the end of their useful life. Anonymous profiles depend on a cookie stored on the user's machine, which ASP.NET generates when you enable anonymous profiles. When they visit the site again, the anonymous user ID stored in this cookie allows ASP.NET to reconnect visitors to their stored profile data. However, users may delete cookies, or just never visit your site again, and so the profile data rows remain in the aspnet_Profile table of the application database. Therefore, if you use anonymous profiles, you should consider creating a stored procedure or other code routine that purges old rows from the database, based on the LastUpdated value that is stored in each row. For this reason, anonymous profiles are not enabled by default. To enable them, you add the <anonymousIdentification> element to the <system.web> section of your web.config file, with the attribute enabled="true": <anonymousIdentification enabled="true" /> In fact, several features of ASP.NET use anonymous identification, not just profiles. You can use several attributes in this element to control how the anonymous identification process works, as shown in Listing 12.8. Listing 12.8. The <anonymousIdentification> Element Syntax and Structure
The cookiePath, domain, cookieTimeout, cookieSlidingExpiration, cookieProtection, cookieRequiresSSL, and cookieless attributes all work in the same way as the equivalents in the <forms> element of the <authentication> element that you saw in the section ASP.NET Authentication and Authorization, in the previous chapter. All these attributes are optional. If they are omitted, the cookie name is ".ASPXANONYMOUS" with a timeout of 100000 minutes (around 69 days). It uses only Validation protection without SSL, and it applies to the whole site. |
EAN: 2147483647
Pages: 147