Databinding and Displaying XML Data
| Databinding to XML data has been around for quite a long timein fact, since Internet Explorer 4, which allowed binding to inline XML, launched. Within ASP.NET, binding is achieved either in code or with the XmlDataSource control, which works similarly to the other data source controls by providing an interface between the actual data and controls that display the data. Manually Binding to XML FilesIf you are not using an XmlDataSource control, and are using the DataSource property to set the binding, the simplest way to bind to XML data is to create a DataSet, read the XML into the DataSet, and bind to that, as seen in Listing 7.1. Listing 7.1. Reading XML into a DataSet
Here the ReadXml method of the DataSet is used to read the file into the data set. This will infer the schema and construct a table equivalent to the XML data (you can also use the ReadXmlSchema method to read in a predefined schema). There is also a WriteXml method to write the internal data out to an XML file; this is an excellent method of constructing XML files from SQLjust load it into the DataSet using normal commands, and then use WriteXml to create the file. Using the XmlDataSource ControlTo use the data source form of binding, you use a form similar to the SQL and Object data source controls, defining the control and using the DataSourceID property on the bound control. One thing that is different, though, is that the XmlDataSource is read-only, so it provides no facility for updating the data, nor does it provide a parameters collection for selection of data. The XmlDataSource has three main properties for the loading and selection of data:
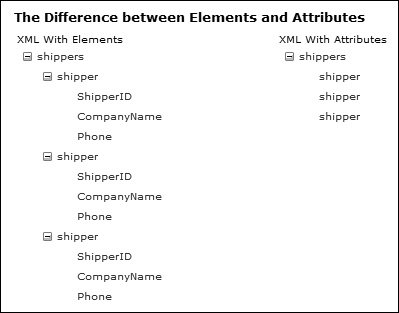
There are other properties, such as those that deal with caching, but these are the three that deal with the data files and selection. So at it's simplest, use of the control becomes: <asp:XmlDataSource runat="server" DataFile="~/ch07/ShippersAttributes.xml" > You can also specify the data inline, by use of the Data section: <asp:XmlDataSource runat="server"> <Data> <shippers> <shipper Shipper CompanyName="Speedy Express" Phone="(503) 555-9831" /> </shippers> </Data> </asp:XmlDataSource> If both the DataFile property and the Data section are present, only the DataFile is used. In use, you can use any of the controls that support databinding, but you have to be aware that some of these are designed for relational data, and XML is generally hierarchical. Thus, binding a grid to XML data might not be the best way to view the data, but using a hierarchical control such as a TreeView might be. For example: <asp:XmlDataSource runat="server" DataFile="~/ch07/ShippersAttributes.xml" > <asp:TreeView runat="server" DataSource> However, this still may not give the results you expect, and what you do get depends upon how the XML is formatted. For example, consider the XML in Listing 7.2 and Listing 7.3. These represent the same data expressed in different ways; one uses elements and one uses attributes. Listing 7.2. Shippers XML Using Elements
Listing 7.3. Shippers XML Using Attributes
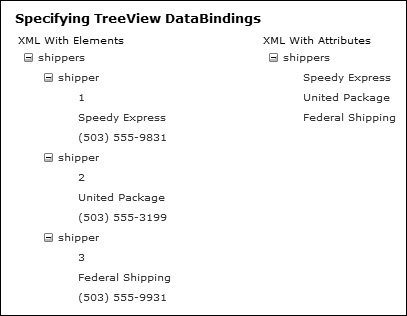
When you bind a TreeView to these XML files, you might not get the results you expect, as Figure 7.4 shows. Figure 7.4. Binding a TreeView to XML files The interesting thing to note here is that each nested element becomes a level in the TreeView. So for the element-based file, each element gets a level, while for the attributed file you only see two levelsthe top and the secondary level for each shipper. What you also note is that the binding is automatically to the element name, not the contents or attributes. To change this behavior, you need to add explicit data bindings using the DataBindings section. Specifying TreeView BindingsTo bind TreeView nodes to the contents of elements rather than the element names, you use the DataBindings section of the TreeView and create a treeNodeBinding for each element. You then specify the DataMember as the name of the element, and the TextField as #InnerText, which extracts the text from within the element, as seen in Listing 7.4. Listing 7.4. Binding TreeView Nodes to Elements
The treeNodeBinding has many properties for data binding that you'll be familiar with, such as TextField, ValueField, FormatString, and so on. The key to its use with XML files is that DataMember should be set to the XML elements, and the other properties (such as TextField) should be set to the data within the element (#InnerText) or the attribute name. You can see the attribute binding in Listing 7.5, which uses the attributed form of the XML file. Here the DataMember is set to the element name, shipper, and TextField is set to the attribute name, CompanyName. You can use other attributes for other bound items such as the ValueField, which in this case is bound to the ShipperID attribute. Listing 7.5. Binding TreeView Nodes to Attributes
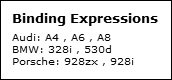
Each treeNodeBinding binds to a different level in the XML. The results of specifying the bindings can be seen in Figure 7.5. Figure 7.5. TreeView with explicit binding Binding ExpressionsIf you are binding to XML but don't want to use the automatic binding, you can use binding expressions, in a similar way to binding to SQL data. For XML data, you use the XPath expression. For example: <%# XPath("CompanyName") %>This would bind to the CompanyName element, displaying the contents of the element. To bind to attributes, you precede the attribute name with an @ symbol. <%# XPath("@Make") %>You can use these binding expressions within any databound control, such as within templates of DataLists and Repeaters. Applying SelectionsWhen binding to SQL data, you can filter the data returned by adding a WHERE clause to the SQL statement. When dealing with XML data, you use XPath to provide the selection. XPath is a language designed for selecting data within XML documents, and while a full description is beyond the scope of this book, basic queries can be achieved with a few simple rules:
To make this clear, let's look at a few examples, starting with the XML shown in Listing 7.6. To select all of the Manufacturer nodes, you would use the following XPath query: Automobiles/Manufacturer To select only the Manufacturer node for Audi, you would use: Automobiles/Manufacturer[@Make='Audi'] Listing 7.6. Cars XML File
To select the Car nodes for Audi, you would use: Automobiles/Manufacturer[@Make='Audi']/Car You can see that it's relatively straightforward to select nodes and attributes. Using Binding Expressions and SelectionsTo make a filter appear at the data level, before the data is presented to the bound control, you use the XPath property of the XmlDataSource. The attribute values are shown using the XPath binding expression, as seen in Listing 7.7. Listing 7.7. Selecting Nodes and Attributes
Since XML data is hierarchical, you may need to display this hierarchy. With the SqlDataSource controls, you can use select parameters or filters, but these aren't supported on the XmlDataSource. Instead you use the XPathSelect binding expression to return a subset of the nodes, and this can be used as the data source for a control. Extending Listing 7.7 to show not only the make of car, but also the model, you get the code in Listing 7.8. This shows a nested Repeater, with the inner repeater setting its Data-Source property to an XPathSelect expression, the parameter of which is a standard XPath expression. The outer Repeater binds to the manufacturer, and the inner one binds to the cars for that repeater, the results of which are shown in Figure 7.6. Figure 7.6. Nested binding with expressions Listing 7.8. Binding to XML Hierarchies
|
EAN: 2147483647
Pages: 147