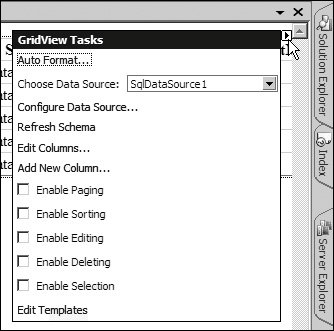
A Day in the Life of a Developer
| It's nine-thirty in the morning, and your second cup of coffee is just starting to take effect when the phone rings. At the other end is Margaret, the CEO of AdventureWorks Trading Inc., and she is in no mood for light conversation. It seems that, although they love the new Web site you created for them, they just discovered that there is no page for their staff to view lists of products. So you commit to provide one, drain the remnants of the now cold coffee, and fire up Visual Studio 2005. Using a Data Source Control and GridView to Display DataTo build almost all types of data access pages, you need to be able to get the data from the database and display it in a Web page. In previous versions of ASP and ASP.NET, you would already be thinking about creating a connection to the database, building a Recordset or filling a DataSet, and then either iterating through the rows to create an HTML table (in ASP 3.0) or taking advantage of server-side data binding in ASP.NET 1.x. However, in ASP.NET 2.0, the process is much easier. You start by using the Server Explorer window (or the Database Explorer window in Visual Web Developer) to create a connection to the database (see Figure 2.1). Figure 2.1. Connecting to a database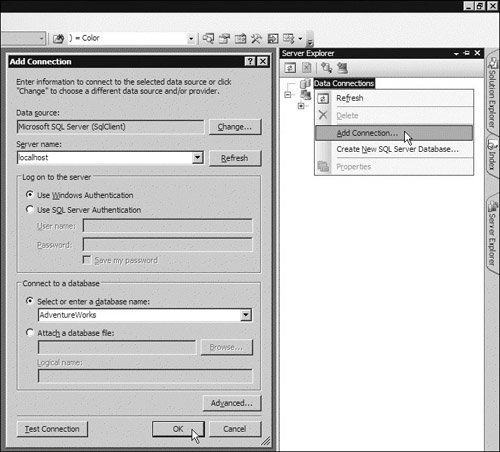 Now that you have access to the database, you need a new Web page. This will be part of the existing AdventureWorks Web site that you have already built, and so you must first open this site. Visual Studio 2005 and Visual Web Developer allow you to open an existing site using a range of techniquesincluding directly from the file system, from the local IIS folders via HTTP, or from a remote site via FTP or the Microsoft FrontPage Extensions (see Figure 2.2). Figure 2.2. Opening an existing Web site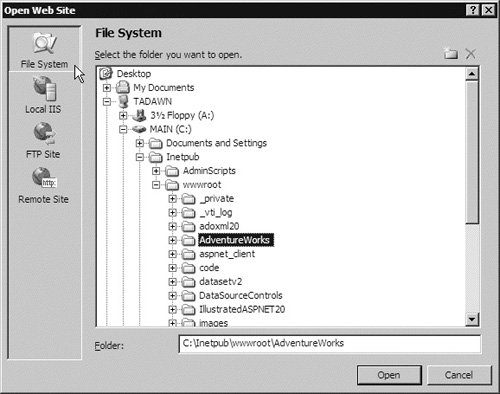 Next, you create a new Web Form, switch to Design view, and drag the Product table from the Server/Database Explorer window onto the new Web Form. This adds a SqlDataSource and a GridView control to the page and you can run the page to see the results. OK, so it isn't very pretty and probably contains columns that you don't want to display, but it really does save you time in getting the basics of the page up and runningand you haven't written any code at all! (see Figure 2.3). Figure 2.3. Creating a data display page with drag and drop in Visual Studio 2005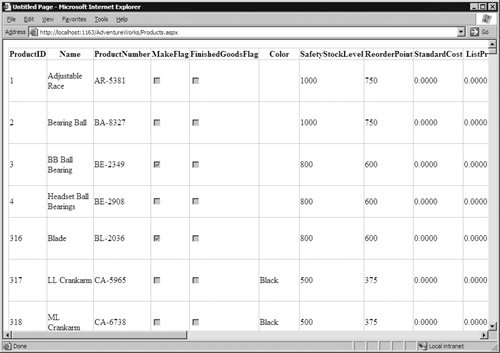 You can now fine-tune the page to provide just the features you want by removing columns, adding formatting to the values, and applying one of the predefined (Auto Format) styles to the GridView. The Visual Studio 2005 and Visual Web Developer page designers provide a "tasks" pane for many of the rich controls such as the GridView that makes it easy to complete all these tasks. The tasks pane appears when you first add a control to the page. You can also open it by clicking the small arrow icon that appears when you move the mouse over the control (see Figure 2.4). Figure 2.4. Opening the Tasks pane in Visual Studio and Visual Web Developer The tasks panes contain a set of links that open dialogs or start Wizardsdepending on the control type. For the GridView control, as you can see in Figure 2.4, the tasks include applying an Auto Format, selecting the appropriate data source control, enabling various features directly supported by the new GridView control in ASP.NET 2.0, and modifying the columns displayed by the GridView control. You only want to display the six most useful columns, so you can remove the rest from the list. Moreover, you want the StandardCost and ListPrice columns to display as currency values, so you can specify this in the DataFormatString property for these columns (see Figure 2.5). Figure 2.5. Modifying the columns displayed by the GridView control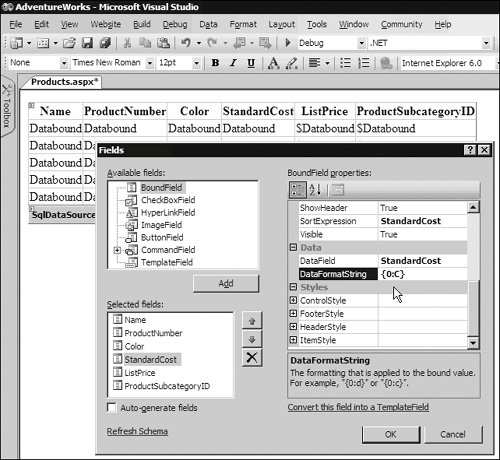 Enabling Sorting and Paging for the RowsThe GridView control now displays the required columns from the database table, but it is not very easy for the user to find the rows they want to view. All the rows appear in one long list sorted by product number. It would be helpful if users could sort the rows in a different order (perhaps by name when they don't know the product number), and it would also be nice to be able to limit the display to a specific number of rows and provide navigation controls so that they can see separate "pages" of rows. Prior to ASP.NET 2.0, you would now be writing code to sort the source rowset into the required order, and then connecting this code up to controls in the page. In ASP.NET 2.0, it is all automatic. You just turn on sorting and paging with the checkboxes in the tasks pane (see Figure 2.6). The column headings become hyperlinks, and the paging controls appear at the foot of the grid. Figure 2.6. Enabling sorting and paging in the GridView tasks pane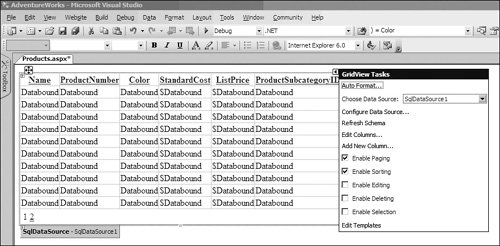 Then you can make the page look nicer by selecting an appropriate Auto Format option from the list that appears when you click the link in the tasks pane, and the page is complete (see Figure 2.7). Figure 2.7. Applying an Auto Format to the GridView control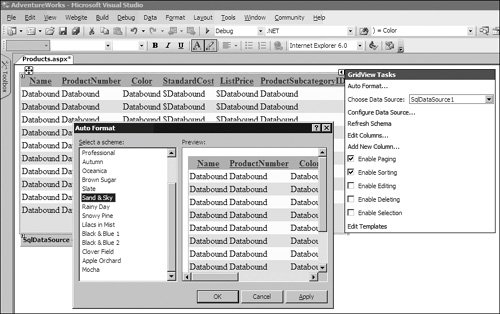 You run the page to see the results. Clicking any one of the column heading hyperlinks sorts the rows in ascending order by that column value. Another click on the heading changes the sort order to descending. You've created an extremely useful and usable page, and you have not written any code at all. Providing a Row Editing FeatureWhile you have the tasks pane open for the GridView control, you might as well take advantage of some of the other features it offers. How about allowing users to edit the rows? This used to involve a lot of work writing code to handle the edit/update/cancel options that are part of the process for editing rows in a Web page, even in ASP.NET 1.x, and you still had to figure out how to push the changes back into the database by executing SQL UPDATE statements. In ASP.NET 2.0, all of this goes away if you are happy to use the default parameterized SQL statement approach to updating the database table. You just select the Enable Editing and Enable Deleting options in the tasks pane for the GridView control. You will see the Edit and Delete links appear at the left-hand side of the grid (see Figure 2.8). Figure 2.8. Enabling editing in the tasks pane of a GridView control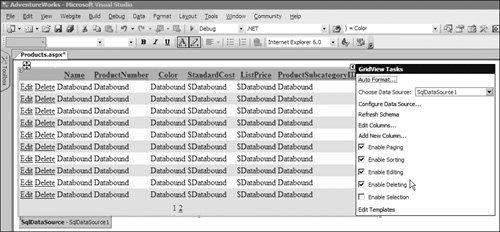 Now users can edit any of the column values in individual rows (except for the primary key column) and persist these changes back to the database (see Figure 2.9), while you still have not written a single line of code! Figure 2.9. Editing the rows in the GridView control Adding Filtering to Select Specific Sets of RowsJust when you think you've satisfied Margaret the CEO at AdventureWorks Trading Inc. with a shiny new Web page for displaying product information, the phone rings again. It's Mike, the AdventureWorks sales manager, who says that his sales people from different divisions of the company will want to be able to filter the list by category, rather than just getting a list of all of the products. He would also like this implemented as soon as possible. Thoughts of a nice long lunch break evaporate, and back you go to Visual Studio. You will need some kind of control where users can select the category they want to view, and the obvious one is a drop-down list box (a DropDownList control). You will also need some way of populating this drop-down list with the available categories, taken from the database rows in the Products table. Therefore, step one is to drag another SqlDataSource control onto the page and click the Configure Data Source link in the tasks pane to start the Configure Data Source Wizard. The first page of the Wizard specifies the connection string to use (you select the same one that was created for the previous SqlDataSource control from the list), and then you can specify the query to select the rows for the database. The table named ProductSubcategory contains the ID and name of each category for the items in the Products table (see Figure 2.10). Figure 2.10. Setting the properties of the new SqlDataSource to select the category details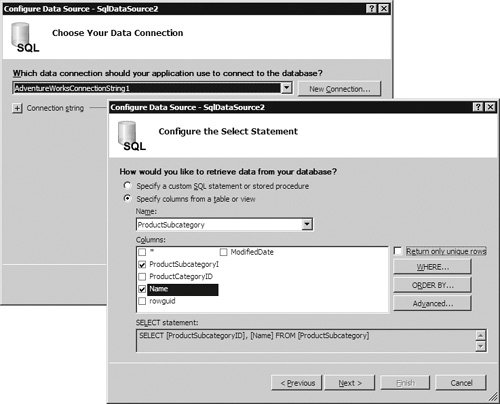 Now you can drag that DropDownList control onto the page and select the new SqlDataSource control as the source of the data. You specify that the DropDownList will show the name of the subcategory, while the value of each item in the list will be the ProductSubcategoryID. Also, make sure you set AutoPostback to true (in the tasks pane) so that changes to the selected value will submit the page to the server (see Figure 2.11). Figure 2.11. Setting the properties of the new DropDownList control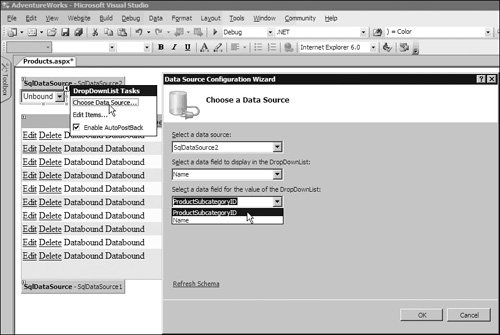 Run the page, and you see a list of the categories. All of the list controls that support server-side data binding can be used with a data source control in this way, even controls such as the DropDownList that were originally provided with ASP.NET version 1.x. All that remains is to connect the DropDownList and the GridView together so that the GridView displays rows from the category selected in the DropDownList. How much code do you need to write for this? Perhaps you can guess that the answer is (still) none. Select the SqlDataSource control that powers the GridView control and run the Configure Data Source Wizard again by selecting this option in the tasks pane. In the second page of the Wizard, click the WHERE button to open the Add WHERE Clause dialog. Here you specify the column to which the condition will apply; the comparison operator; and the source of the value to compare against the column value. This value is, of course, the value currently selected in the DropDownList control, and the dialog shows the SQL expression that will be added as the WHERE clause next to the Add button (see Figure 2.12). Figure 2.12. Adding a WHERE clause to select on subcategory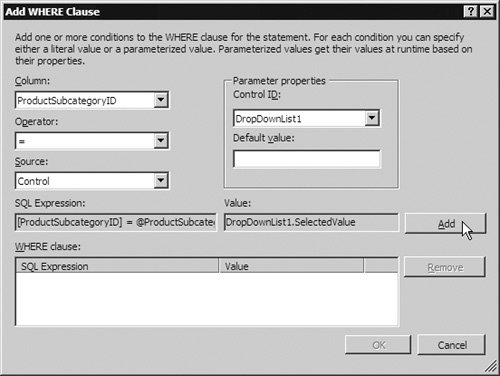 This adds a WHERE clause to the SQL statement that includes a parameter for the category, and adds a ControlParameter to the declaration of the SqlDataSource control. If you switch to Source view in Visual Studio 2005 or Visual Web Developer, you will see the code for the SqlDataSource control with this ControlParameter element nested in the SelectParameters section (see Listing 2.1). Listing 2.1. The SqlDataSource Control and Its Nested ControlParameter
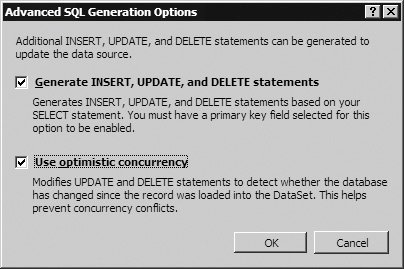
Now, as the page posts back each time the user makes a selection in the DropDownList, the original SqlDataSource control populates the parameter in the SQL statement with the SelectedValue property of the DropDownList, so that the GridView displays only rows from the selected category (see Figure 2.13). Figure 2.13. Filtering the rows by category using a DropDownList and ControlParameter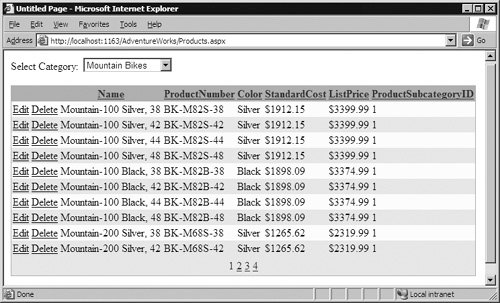 Displaying Single Rows in a Form for EditingThe page now displays the rows from the database table, allows them to be sorted in almost any order, and displays them in separate pages. It also allows filtering by product category to be applied to the rows, and editing to be performed on all but the primary key column. However, this editing feature is not the most ideal of approaches, and it is not as intuitive as the traditional approach for editing the values in one row in a separate "form"-style page. In ASP.NET 2.0, you can take advantage of a new control named DetailsView that provides a "one page at a time" view of the rows exposed by a data source control. Moreover, you can connect the GridView and DetailsView controls together so that viewing rows is easy in the grid, while editing is more intuitive in the "form" view. The first step in this process is to turn off editing in the GridView, and enable selection so that users can select a row in the GridView control. Both of these tasks are performed simply by setting the checkboxes in the tasks pane for the GridView control (see Figure 2.14). Figure 2.14. Specifying selection without editing features for a GridView control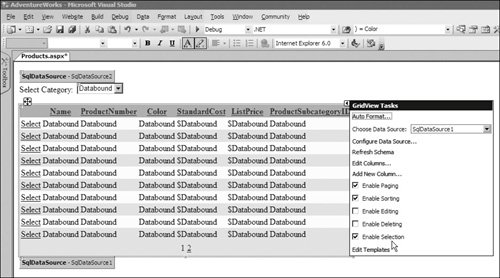 Now you drag another SqlDataSource control onto the page and click the Configure Data Source link in the tasks pane to start the Wizard. In the first page, you select the same connection string as before. In the second page of the Wizard, you specify that the query should include all except for the last two columns from the Product table. Then click the WHERE button to add a ControlParameter to the SqlDataSource control just as you did in the previous section. However, this time, specify the SelectedValue property of the GridView control so thatfollowing a postbackthis third SqlDataSource control will expose only the row selected in the GridView control (see Figure 2.15). Figure 2.15. Creating a ControlParameter for the third SqlDataSource control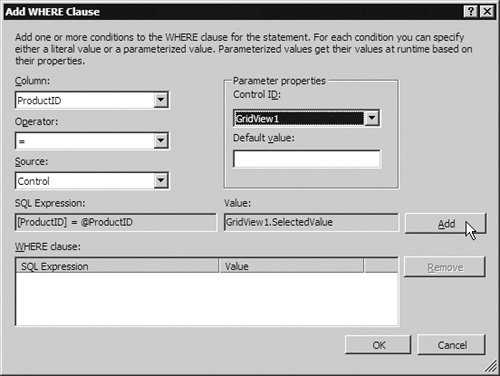 By default, the SqlDataSource does not provide for editing of rows. It only did so for the SqlDataSource that powers the main GridView control because you created this by dragging a table from the Server/Database Explorer window onto the page. When you add a SqlDataSource to a page from the Toolbox, you must specify if you want to be able to update the rows (in most cases you will not, and so this default makes sense). You therefore remember to click the Advanced button in the second page of the Wizard and tick the options in the dialog that appears (see Figure 2.16). Figure 2.16. Specifying the options to allow row updates through controls linked to this SqlDataSource Next, drag a DetailsView control onto the page and bind it to the new SqlDataSource control using the drop-down Choose Data Source list in the tasks pane. While you are there, use the options in the tasks pane for the DetailsView control to apply the same Auto Format as before, and turn on Enable Inserting, Enable Editing, and EnableDeleting. You then see the Edit, Delete, and New links appear at the bottom of the control (see Figure 2.17). You also adjust the width of the DetailsView control by dragging the right-hand border. Figure 2.17. Setting the editing options for the DetailsView control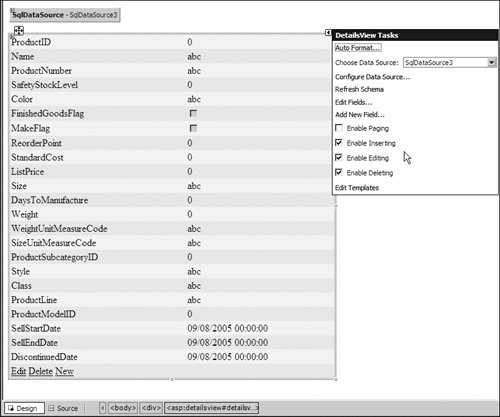 Now you can run the page to see the results. You discover that, as you select rows in the GridView, the DetailsView shows the values for that row. Moreover, using the links at the bottom of the DetailsView, all the values (except for the primary key) are available for editing. You can even insert new rows. It looks rather like a traditional executable data access application, yet you have built it in less than an hourand you still have not had to write any code at all (see Figure 2.18)! Figure 2.18. Viewing and editing rows in a linked DetailsView control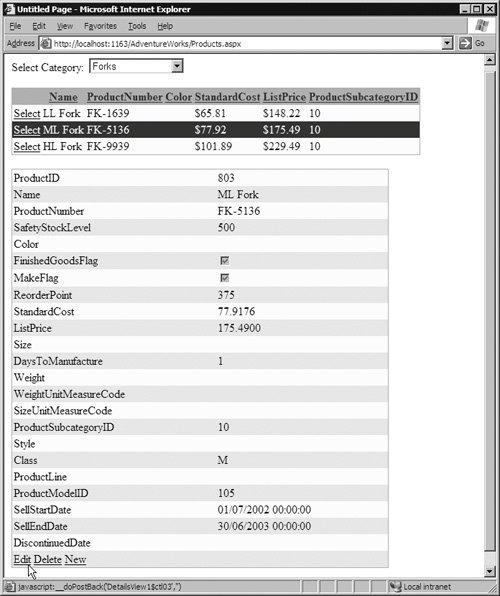 Working with Data Exposed through a Business ObjectJust as you are leaning back and admiring your handiwork, the phone rings again. This time, it is the senior developer at AdventureWorks Trading Inc.and he is not a happy fellow. His team has spent months building an object-oriented business and data access layer, and they do not approve of people using SQL statements to access the database directly. This n-tier architecture approach is a common scenario, and you probably should have known better at the start. The SqlDataSource can use stored procedures instead of SQL statements, but to use a data layer based on business objects means more significant changes are required. However, all you actually need do is change the controls that expose the data (the SqlDataSource controls) for controls that can communicate with business objects. AdventureWorks can provide a .NET managed code assembly that implements their data access layer, so all you have to do is switch to using this in place of direct database access. However, first, you must install the business object. As it is a .NET assembly, there is no registration required. A compiled DLL can just be dropped into the bin folder of the application, and then referenced in the pages. What happens if the code is not compiled? In that case, you can run the compiler from the command line, or use Visual Studio to compile it, and then deploy. Even better, in ASP.NET 2.0, you can deploy the source code and leave it to ASP.NET to compile it and register it with the application at runtime. Files placed in the App_Code subfolder of the application root folder are compiled automatically as soon as the application starts (when the first hit is received), and the compiled code is stored on disk for use in subsequent hits. If you edit or update the source code file, it is automatically recompiled and the application restarts. The (extremely simplified) data access component provided by the AdventureWorks team is a single class file named DataLayer.cs containing public methods that return the data to be displayed in the page (it does not support updates to the data). The three methods it exposes are named GetProductsByCategory, GetProductByProductID, and GetCategoryListas shown in Listing 2.2. Listing 2.2. The Data Access Component Implemented as a Class File
The data access class listed here is designed to be only a basic demonstration of using the ObjectDataSource control. A "real-world" example would generally contain a great deal more code, incorporate update methods, and use stored procedures rather than declarative SQL statements. The ASP.NET page calls these methods, via the data source control, to fetch rows from the database table. Therefore, the next step after deploying the data access class file is to remove the SqlDataSource controls from the page and replace them with instances of the ObjectDataSouce control. Using the Configure Data Source Wizard for each one, you connect these controls to the data access layer so that they can expose the same rowsets as the SqlDataSource controls did. No changes are required to the UI of the page, andbesides the data-access layer classthere is still no code required! Figure 2.19 shows the only two steps required to connect the ObjectDataSource that populates the DropDownList of categories to the GetCategoryList method, because this method accepts no parameters. The ObjectDataSource for the GridView control requires a parameter, and this is specified in the third step of the Configure Data Source Wizardit recognizes that a parameter is required, and you link it up to the SelectedValue property of the DropDownList just as you did when using a SqlDataSource control earlier (see Figure 2.20). Figure 2.19. Configuring the ObjectDataSource for the DropDownList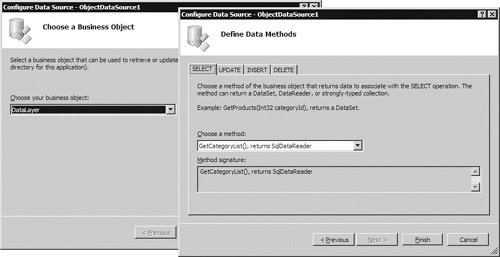 Figure 2.20. Configuring the ObjectDataSource for the GridView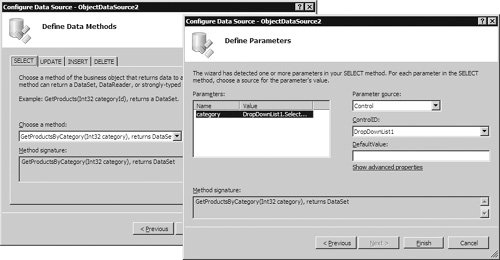 Having added a third ObjectDataSource control to replace the SqlDataSource that populates the DetailsView control, you just connect the DropDownList, GridView, and DetailsView controls to the new data source controls using the tasks panes for each one. Because the data layer does not support editing, the tasks panes do not display the Enable Editing checkbox (see Figure 2.21). Figure 2.21. Connecting the data display controls to the ObjectDataSource instances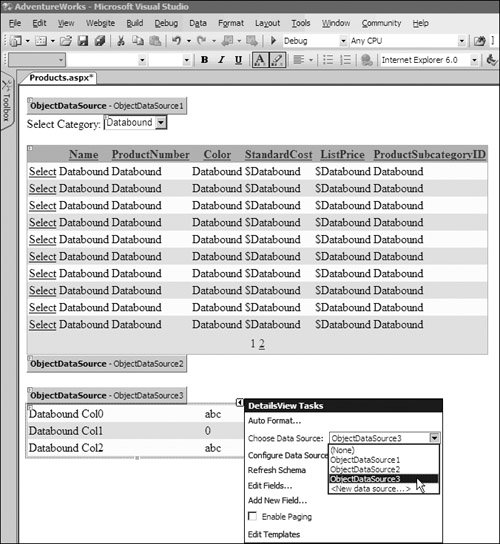 Now you can run the page, and see thatwith the exception of editing featuresthe results are the same (see Figure 2.22). This is just what you want and expect, because the UI has not changed. In addition, the work involved in changing to a data access/business object layer from declarative SQL statements is not difficult or time-consuming. Figure 2.22. The results from using a data access/business logic layer Caching the Data to Reduce Database AccessIt has taken a couple of hours to build the new page for Margaret at AdventureWorks Trading Inc., and you are ready for a break. However, Lucy (the database administrator), has just been told about the new features in the application. It is her job to keep the database running smoothly and efficiently, and she is worried that you are going to slow things down. You are generating constant hits on her database server for every postback as users sort, page, filter, select, and edit rows. Lucy is a great believer in caching data where it does not change very often, and wants you to implement this in the new page. No, not next week, but now. It looks very much like the game of golf you were planning is not going to happen today. AdventureWorks Trading Inc. uses the new SQL Server 2005 database, and so you can take advantage of a feature called database cache invalidation to improve performance and reduce database server loading. This makes much more sense than the traditional technique of caching for a specific period, based on a best guess as to how often the data might change. ASP.NET database cache invalidation supports both SQL Server 2000 and SQL Server 2005. In SQL Server 2000, you use the special tool named aspnet_regsql (in the %windir%\Microsoft.NET\Framework\[version] folder of your machine) to prepare the database and the table containing your source data. You also have to edit your Web.Config file (see Chapter 11 for more details). In SQL Server 2005, database cache invalidation depends on the Broker Service feature of the database. This allows a SqlCacheDependency to be linked to a data source control so that the data is cached within ASP.NET and only refreshed from the database when it changes (or when another notifiable event such as a server restart occurs on the database server). All that is required, when you use the data source controls, is to add an OutputCache directive to the page that includes a SqlDependency attribute. <%@OutputCache SqlDependency="CommandNotification" Duration="60" VaryByParam="*" %>
Note that you must enable the Broker Service for the database, and grant the relevant permissions, before using the Command Notification architecture. For more details, see http://msdn.microsoft.com/library/enus/dnvs05/html/querynotification.asp. Now you can run the page and then refresh it without causing a database query to occur (you can monitor database activity using the SQL Profiler tool that comes with SQL Server). However, if you open the source table in Visual Studio or Visual Web Developer and change one of the column values, you will see that the next time you refresh the page there is a hit on the database. Using a Master Page to Give a Consistent Look and FeelThe styles you applied to the GridView and DetailsView controls, using the Auto Format feature, provide a reasonably attractive outcome. However, they say that beauty is in the eye of the beholder, and so it is no surprise to hear the phone ringing again. This time, Juan-Paul from the marketing department is "just calling to say" that they have a corporate design scheme from their Web site, and he would really appreciate your help to "facilitate an outward appearance of compatibility for reasons of enhanced staff resource utilization via familiarization with the infrastructure." You take a wild guess that he means he wants the new page to follow the same style and layout as the existing pages. After promising Juan-Paul that you will "personally endeavor to push the envelope, drive the process, and aim skyward toward a satisfactory and visually coherent solution," you fire up Visual Studio again. Luckily, you took advantage of the Master Pages feature of ASP.NET 2.0 when you built the AdventureWorks Web site. Therefore, fitting the new page into the existing site simply means converting it from a "normal" Web page into a Content Page and referencing the Master Page file. You did this because you realized marketing departments have a changeable attitude to life, and you may well be required to change the whole design and layout of the site at some time in the future. Figure 2.23 shows the Master Page, with the ContentPlaceHolder control indicating the area occupied by the content from each of the Content Pages. The code that creates this page is shown in Listing 2.3, where you can see the PlaceHolder control within an HTML table. Figure 2.23. The AdventureWorks Master Page in Design View in Visual Studio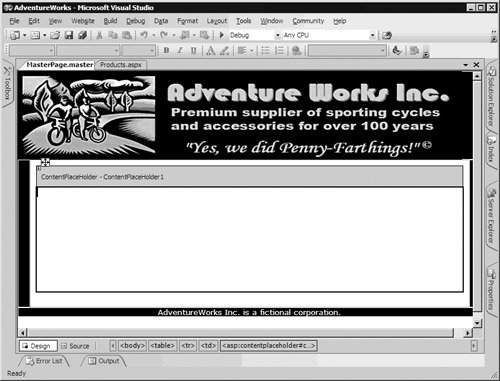 Listing 2.3. The Source Code of the AdventureWorks Master Page
All that is required is to strip out of the page all the <html>, <body>, <head>, <form>, and other elements that are not part of the display of rows from the new Web page. Then add the MasterPageFile attribute to the Page directive, and wrap the content in a Content control that specifies the ContentPlaceHolder control on the Master Page that it will populate. Listing 2.4 shows how this looks in outline. Listing 2.4. The Outline Structure of a Content Page
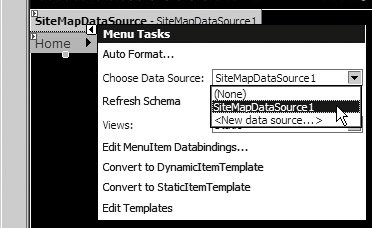
Now, in Design view of the "product list" page, you can see how the new page fits into the Master Page (see Figure 2.24), with the Master Page itself grayed out and not available for editing unless you open it in a separate window. At runtime, the Master Page content merges into the content generated by the new page you have been building to give the combined result. Figure 2.24. The new page running within the Master Page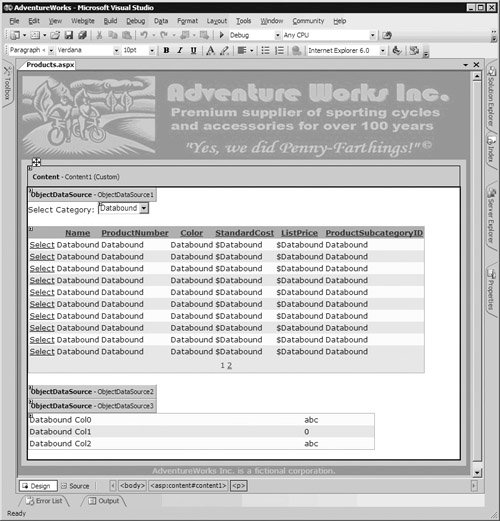 Adding a Menu and Other Navigation FeaturesOne item missing from the site is a menu that makes it easy to navigate from one page to another. Again, ASP.NET 2.0 provides all you need to implement various navigation strategies, and the common and effective solution is often a dynamic fly-out or drop-down menu. The data to drive the Menu control comes from an XML file named Web.sitemap, which defines the items for the menu, their position within the hierarchical menu structure, the pop-up tool-tip for each item, and the target URL for navigation. With the new "products" page added to the XML file, the menu will automatically provide a link to this page. You drag a SiteMapDataSource control from the Toolbox and drop it onto the page, using the Configure Data Source Wizard to select the Web.sitemap file. Then you drag a Menu control from the Toolbox and drop it onto the Master Page, select the new SiteMapDataSource control in the Choose Data Source list, and use the tasks pane to apply a suitable Auto Format (see Figure 2.25). Figure 2.25. Adding a SiteMapDataSource and menu control to the Master Page You also decide to make it easy for users to tell where they are in the site hierarchy by adding a SiteMapPath control to the Master Page as well, at the bottom of the right-hand section of the page below the ContentPlaceHolder control. This uses the same Web.sitemap file, and automatically displays a "breadcrumb trail" for the current page (see Figure 2.26). In addition, like all the other features of ASP.NET 2.0 you have used so far, there is no code to write! It all just works... Figure 2.26. Adding a menu and a navigation trail to the Master Page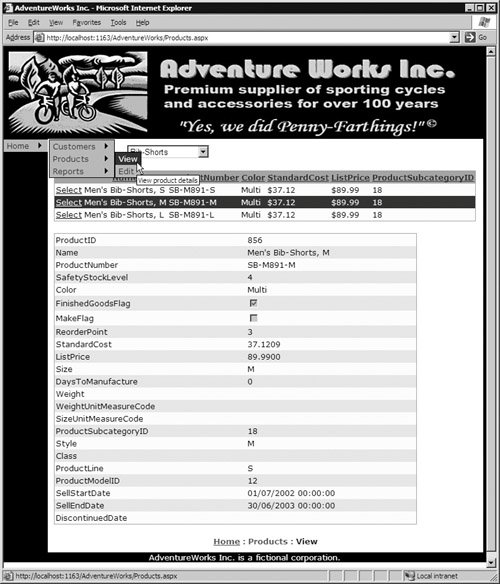 |
EAN: 2147483647
Pages: 147