Using the OPTGROUP Element
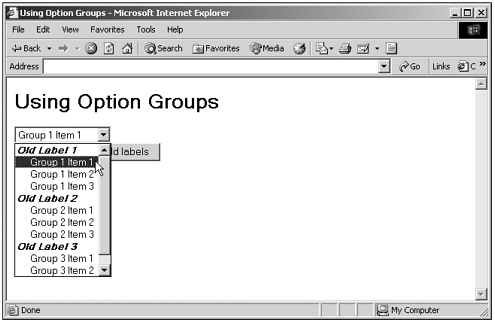
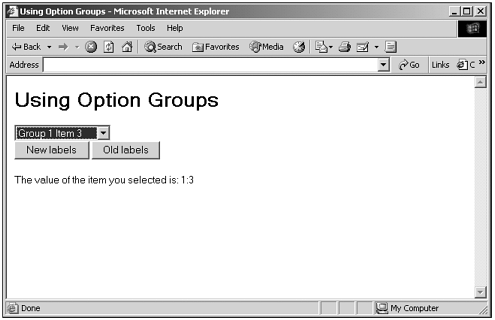
Using the <OPTGROUP> ElementHere's an example using the <OPTGROUP> element. In this case, the code will display three labels to divide a list of <OPTION> elements into groups. You can reset those labels at any time in code, just by assigning text to the label property of the <OPTGROUP> elements. Here's how you can alternate between the old labels and new labels when the user clicks buttons (you'll need NS6+ if using Netscape Navigator here): (Listing 13-12.html on the web site)<HTML> <HEAD> <TITLE>Using Option Groups</TITLE> <SCRIPT LANGUAGE="JavaScript"> <!-- function oldLabels() { var optionGroupElements = document.getElementsByTagName("OPTGROUP") optionGroupElements[0].label = "Old Label 1" optionGroupElements[1].label = "Old Label 2" optionGroupElements[2].label = "Old Label 3" } function newLabels() { var optionGroupElements = document.getElementsByTagName("OPTGROUP") optionGroupElements[0].label = "New Label 1" optionGroupElements[1].label = "New Label 2" optionGroupElements[2].label = "New Label 3" } function displaySelection() { document.getElementById("div1").innerHTML = "The value of the item you You can see the results of this code in Figure 13.13, where you see the original option group labels, and Figure 13.14, where I've clicked the New labels button and the code displays new option group labels. Figure 13.13. Using option groups in a <SELECT> control. Figure 13.14. Setting new option group labels in a <SELECT> control. This example also uses the value property of <OPTION> elements. This property is valuable because it enables you to store unseen data for each item in a <SELECT> control. For example, an item's caption may display an employee's name, while the value property holds their ID value that your code actually works with. In this example, I'm just assigning a string to each <OPTION> element, indicating its group and item number in the group: <OPTGROUP LABEL="Old Label 1"> <OPTION value="1:1">Group 1 Item 1 <OPTION value="1:2">Group 1 Item 2 <OPTION value="1:3">Group 1 Item 3 </OPTGROUP> When you make a selection in the web page itself, the code in this example displays the string in the value property of the selected item, as you see in Figure 13.15. Figure 13.15. Using the value property in a <SELECT> control. |