| In this example, we're going to be responsible for creating our own plug-in. Like the previous example, this plug-in is going to have its own menu item and toolbar button, but this time, we're going to do the legwork ourselves . Start by selecting File  New Project. In the New Project dialog, select Plug-in Development and Plug-in Project, and click Next. In the next pane, enter the new project's name , org.eclipsebook.ch11.Ch11_02 , and click Next to open the Plug-in Project Structure pane. Click Next again to accept the defaults. New Project. In the New Project dialog, select Plug-in Development and Plug-in Project, and click Next. In the next pane, enter the new project's name , org.eclipsebook.ch11.Ch11_02 , and click Next to open the Plug-in Project Structure pane. Click Next again to accept the defaults. In the Plug-in Code Generators pane, select the Default Plug-In Structure item as shown in Figure 11-11, and click Next. Figure 11-11. Setting the plug-in's code wizard 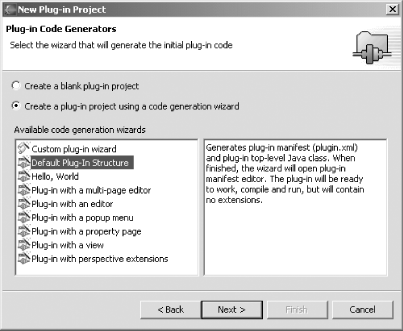 In the following pane, the Simple Plug-in Content pane shown in Figure 11-12, set the provider namewe'll use Eclipse Book in this example. We won't need the convenience methods the wizard can generate for us, so deselect the checkboxes in the "Plug-in code generation options" box. Then click Finish. Figure 11-12. Setting code options 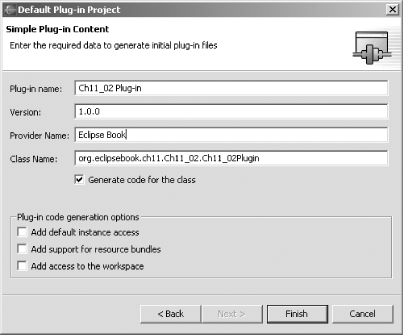 This should generate the Ch11_02 plug-in, and open the manifest editor in Eclipse. Click the Source page, which displays the XML in plugin.xml : <?xml version="1.0" encoding="UTF-8"?> <plugin id="org.eclipsebook.ch11.Ch1102" name="Ch11_02 Plug-in" version="1.0.0" provider-name="Eclipse Book" class="org.eclipsebook.ch11.Ch11_02.Ch11_02Plugin"> <runtime> <library name="Ch1102.jar"/> </runtime> <requires> <import plugin="org.eclipse.core.resources"/> <import plugin="org.eclipse.ui"/> </requires> </plugin> That's our new plug-in's manifest. Our goal in this plug-in is to add a new menu item and a button in the toolbar. To make things happen in a plug-in, you define actions and action sets . An action represents a command that the user can trigger. To implement what goes on in an action, you extend the Action class. You can work with the same Action object in a variety of situations, as when the user selects a menu item or clicks a toolbar buttonthe action object will make the same thing happen in either case. In this way, the same action can be initiated by different user-interface elements. As you can guess from the name, an action set is a set of actions. You tie actions to user-interface elements like menus and toolbars with an action set (the <actionSet> element in plugin.xml typically contains both <menu> elements and <action> elements). An action is a Java object defining what you want to have happen when the user issues a specific command, and an action set ties actions to user-interface elements. You create action sets as extensions of the org.eclipse.ui.actionSets extension point, which is how you implement menu items or buttons in a plug-in. You could implement this extension in the XML in plugin.xml directly, but it's much easier to use the manifest editor. 11.4.1 Creating an Action Set To see how to create an action set to tie a menu and toolbar button to an action, click the Extension tab in the manifest editor and click Add to open the New Extension wizard you see in Figure 11-13. Select the Generic Wizards item in the left box, the Schema-based Extension in the right box, and click Next. Figure 11-13. The New Extension wizard  The next pane is the Extension Point Selection pane, which you can see in Figure 11-14. In this case, we want to add support for a menu item and a toolbar button, which is all handled together in our action set, so select the org.eclipse.ui.actionSets extension point, and click Finish. Figure 11-14. Selecting an extension point 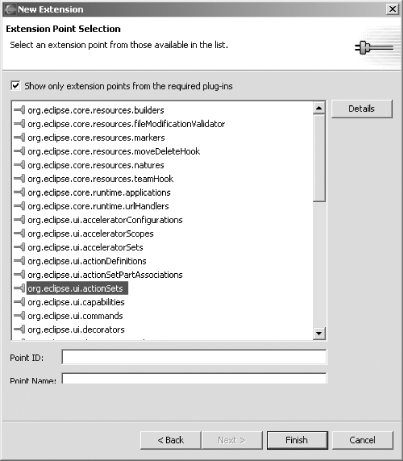 This adds the base extension we'll need for toolbar and menu support. To create the action set that we'll use, right-click the org.eclipse.ui.actionSets item in the All Extensions box and select the New actionSet item, creating a new action set as you see in Figure 11-15. Figure 11-15. Creating an action set 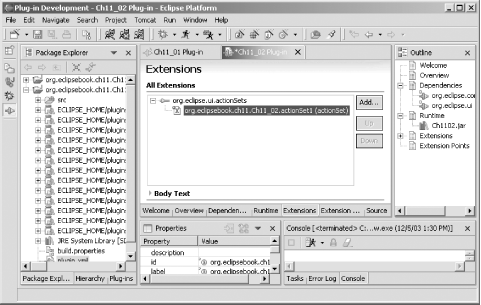 To set the properties of this new action set, select it and, in the Properties view, set the label property to New Action Set and the visible property to true. Using the manifest editor in this way lets you edit the XML in plugin.xml automatically; here's the new XML we've created, indicating that this extension contains an action set: <extension point="org.eclipse.ui.actionSets"> <actionSet label="New Action Set" visible="true" id="org.eclipsebook.ch11.Ch11_02.actionSet1"> </actionSet> </extension> 11.4.2 Creating a Menu To create a new menu, right-click New Action Set in the Extensions tab and select New menu. In the Properties view, set the id property of the new menu to newMenu, and the label property to New Menu, as you see in Figure 11-16. Figure 11-16. Creating a new menu 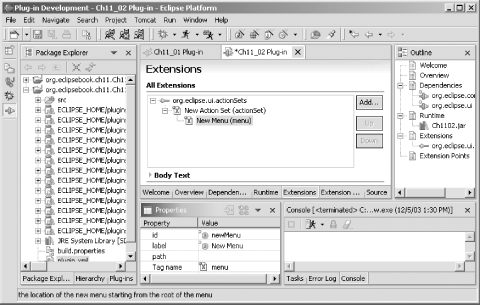 To add a menu item here, we'll create a menu separator, which acts as a placeholder and will allow us to add items to this menu at runtime. To add the menu separator, right-click New Menu and select New separator. In the Properties view, set the separator's name property to newGroup, as you see in Figure 11-17. Figure 11-17. Creating a menu separator 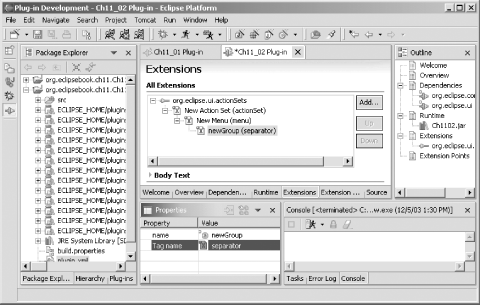 Our action set has a new menu at this point, and the next step is to tie an action to that menu. If you have multiple menus and multiple toolbar buttons, they could all go into the same action set (which would group your toolbar buttons next to each other in the toolbar). 11.4.3 Creating an Action Now we'll add a new action to connect Java code to the menu and toolbar handling supported by the action set. To create a new action, right-click the New Action Set item in the All Extensions box and select New action. To customize this action, we'll create a menu item and toolbar item that will display the message "No worries." To do that, select the new action in the Extensions box. In the Properties view, set the label property to New Action and the toolTip property to No worries. Next, set the menubarPath property to newMenu/newGroup and the toolbarPath property to newGroup. Now we need to connect this action to Java code. To do that, select the action, New Action, in the All Extensions box, and click the ellipsis (" . . . ") button that appears when you select the class property in the Properties view. This opens the Java Attribute Editor you see in Figure 11-18. Click the Generate a new Java class radio button, enter org.eclipsebook.ch11.Ch11_02 in the Package name box (or click the Browse button and select that package), and name the class NewAction , as you see in the figure. Then click Finish. Figure 11-18. Creating an action class 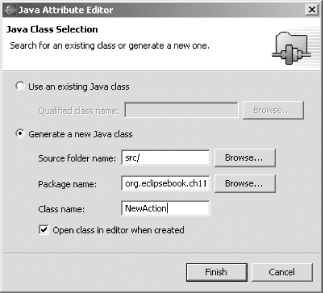 This will create a new <action> element in plugin.xml : <action label="New Action" tooltip="No worries." class="org.eclipsebook.ch11.Ch11_02.NewAction" menubarPath="newMenu/newGroup" toolbarPath="newGroup" id="org.eclipsebook.ch11.Ch11_02.action1"> </action> In addition, a new Java file, NewAction.java , has been created and added to the project. The framework of the plug-in is in place; all that's left is to write the code that will actually display a message box when the toolbar button or menu item is selected. 11.4.4 Writing the Code Open NewAction.java now. To display a message box, we'll need an object implementing the Workbench window interface, IWorkbenchWindow . The object we need is passed to the init method in NewAction.java , so begin by creating a private class variable, workbenchWindow , to hold it: public class NewAction implements IWorkbenchWindowActionDelegate { private IWorkbenchWindow workbenchWindow; . . . We'll store the workbench window passed to us in the init method in this variable this way: public void init(IWorkbenchWindow window) { workbenchWindow = window; } Now use this variable and the openInformation method of the MessageDialog class to display a message box with the message "No worries." in the run method: public void run(IAction action) { MessageDialog.openInformation( workbenchWindow.getShell( ) , " New Plug-in" , " No worries."); } Then save all files. That completes the plug-in development; to test this new plug-in, launch the Run-time Workbench. Select Window Customize Perspective as before, and select the box next to the New Action Set item. Doing so should give you the result you see in Figure 11-19, where you can see the default square button icon Eclipse uses for toolbar buttons and the new menu, New Menu. Figure 11-19. Using the new plug-in  When you select the New Menu New Action menu item or click the new button, you should see the New Plug-In message box, shown in Figure 11-20. Congratulationsthe new plug-in is doing exactly what it should. Figure 11-20. The message from the new plug-in 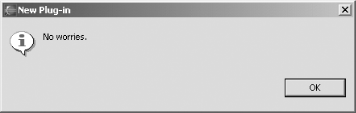 11.4.5 Automatically Customizing a Perspective The business of having to customize the perpective every time you launch a new plug-in using Window Customize Perspective is a little cumbersome. There's a way around it if you use the extension point org.eclipse.ui.perspectiveExtensions in plugin.xml , which can add the plug-in to a perspective automatically. It's easy enough to make this change simply by editing the XML in plugin.xml to use the extension point org.eclipse.ui.perspectiveExtensions . For example, to automatically add our plug-in to the Java perspective, you can use the org.eclipse.ui.javaPerspective class like this in plugin.xml : <?xml version="1.0" encoding="UTF-8"?> <plugin id="org.eclipsebook.ch11.Ch1102" name="Ch11_02 Plug-in" version="1.0.0" provider-name="Eclipse Book" class="org.eclipsebook.ch11.Ch11_02.Ch11_02Plugin"> <runtime> <library name="Ch1102.jar"/> </runtime> <requires> <import plugin="org.eclipse.core.resources"/> <import plugin="org.eclipse.ui"/> </requires> <extension point="org.eclipse.ui.actionSets"> <actionSet label="New Action Set" visible="true" id="org.eclipsebook.ch11.Ch11_02.actionSet1"> <menu label="New Menu" id="newMenu"> <separator name="newGroup"> </separator> </menu> <action label="New Action" tooltip="No worries." class="org.eclipsebook.ch11.Ch11_02.NewAction" menubarPath="newMenu/newGroup" toolbarPath="newGroup" id="org.eclipsebook.ch11.Ch11_02.action1"> </action> </actionSet> </extension> <extension point = "org.eclipse.ui.perspectiveExtensions"> <perspectiveExtension targetID="org.eclipse.ui.javaPerspective"> <actionSet id="org.eclipsebook.ch11.Ch11_02.actionSet1"> </actionSet> </perspectiveExtension> </extension> </plugin> To automatically add the plug-in to the Resource perspective, use the class org.eclipse.ui.resourcePerspective instead. Save plugin.xml after you make these changes and restart the Run-time Workbench. The plug-in should be installed on startup. |