| We're almost done with the code for the project; the final two code files are the summary page that displays the data the user entered, Ch10_05.jsp , and the bean that acts as the model and stores the data the user entered, Ch10_06.java . In the summary page, Ch10_05.jsp , we use the data passed on to us in a bean object and various Struts tags to display that data, as you see in Example 10-9. This file goes into the deployment directory, the same as the original view, Ch10_01.jsp . Example 10-9. The JSP to display order information <%@ taglib uri="/WEB-INF/struts-bean.tld" prefix="bean" %> <%@ taglib uri="/WEB-INF/struts-html.tld" prefix="html" %> <%@ taglib uri="/WEB-INF/struts-logic.tld" prefix="logic" %> <HTML> <HEAD> <TITLE>Here is what you ordered...</TITLE> </HEAD> <BODY> <H1>Here is what you ordered...</H1> <bean:message key="type"/> <bean:write name="Ch10_06" property="type"/> <BR> <BR> <bean:message key="items"/> <BR> <logic:iterate id="items1" name="Ch10_06" property="items"> <%= items1 %> <BR> </logic:iterate> <BR> <bean:message key="email"/> <bean:write name="Ch10_06" property="email"/> <BR> </BODY> </HTML> Ch10_06.java , the bean that stores the data the user entered, supports properties corresponding to that data to make it accessible to the controller and the summary page. You can see how this works in Example 10-10. This file, like all the other .java files in the project, goes into the src folder. Example 10-10. Form handler package org.eclipsebook.ch10; import org.apache.struts.action.ActionForm; public class Ch10_06 extends ActionForm { private String email = ""; private String type = ""; private String[] items; public String getEmail( ) { return email; } public void setEmail(String email) { this.email = email; } public String getType( ) { return type; } public void setType(String type) { this.type= type; } public String[] getItems( ) { return items; } public void setItems(String[] items) { this.items = items; } } That completes the entire applicationour first large-scale Eclipse projectbut it's still just about the minimum you need for a Struts application. Here's what the project looks like in overview in Eclipse: Ch10_01 _ _src _ _org.eclipsebook.ch10 _ _ Ch10_02.java _ _ Ch10_03.java _ _ Ch10_04.java _ _ Ch10_06.java _ _JRE System Library _ _servlet.jar _ _struts.jar _ _deployment _ _WEB-INF _ _classes _ _ApplicationResources.properties _ _lib _ _commons-beanutils.jar _ _commons-collections.jar _ _commons-digester.jar _ _struts.jar _ _Ch10.tld _ _struts-bean.tld _ _struts-config.xml _ _struts-html.tld _ _struts-logic.tld _ _struts-template.tld _ _web.xml _ _Ch10_01.jsp _ _Ch10_05.jsp Before building, there's one thing to note: the code for the action servlet, Ch10_04.java , uses objects of the Ch10_06 class to hold the data the user passed to us: public class Ch10_04 extends Action { public ActionForward execute(ActionMapping mapping, ActionForm form, HttpServletRequest request, HttpServletResponse response) throws Exception { ActionErrors actionerrors = new ActionErrors( ); Ch10_06 orderForm = (Ch10_06)form; String email = orderForm.getEmail( ); . . . That dependency could be a problem if Ch10_04.java were built before Ch10_06.java . Although this would be an issue using a build tool like Ant, it's not a problem here. It turns out that Eclipse checks build dependencies like this automatically and resolves them by compiling files in the correct order. On the other hand, if you have circular dependencies, where file A depends on file B, which in turn depends on file A, you'll get an error. You can enable or disable circular dependencies for a project (the default is disabled) with the Window  Preferences Java Compiler Build Path page, as you see in Figure 10-4. In that dialog, select the Use project settings radio button; then you can set the Circular dependencies item to Error or Warning. Preferences Java Compiler Build Path page, as you see in Figure 10-4. In that dialog, select the Use project settings radio button; then you can set the Circular dependencies item to Error or Warning. Note also that we've deselected the "Scrub output folders on full build" checkbox in Figure 10-4. To see why that's important, build the project now using either the Project Build Project or Project Rebuild Project menu items. When you select the Project Rebuild Project menu item, which builds everything from scratch, you'll get the expected result, which means all our .class files will appear in the org\eclipsebook\ch10 folder under the classes folder, which is what we want: deployment _ _WEB-INF _ _classes _ _org _ _eclipsebook _ _ch10 _ _Ch10_02.class _ _Ch10_03.class _ _Ch10_04.class _ _Ch10_06.class Figure 10-4. Setting compiler options 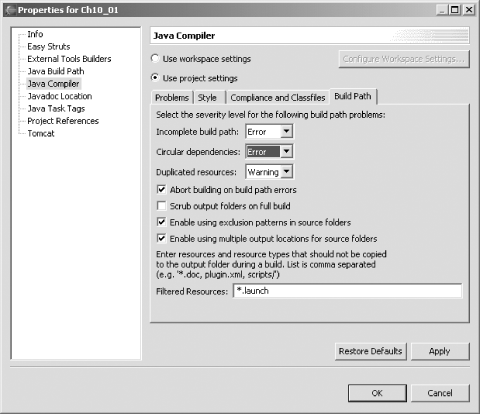 However, there's a problem: by default, Eclipse scrubs deletes the contents ofthe output folder, which we've linked to the classes folder. And that folder held the file ApplicationResources.properties , which has now been deleted (scrubbing happens by default if you select the Project Rebuild Project menu item but not if you select the Project Build Project item). Accidental scrubbing is the kind of issue we haven't had to deal with when creating smaller projects, but in a larger project with many files, it can be a problem. To solve it, deselect the "Scrub output folders on full build" checkbox, as you see in Figure 10-4. Now if you rebuild the project, ApplicationResources.properties will be preserved and the .class files will be built: deployment _ _WEB-INF _ _classes _ _ApplicationResources.properties _ _org _ _eclipsebook _ _ch10 _ _Ch10_02.class _ _Ch10_03.class _ _Ch10_04.class _ _Ch10_06.class Now that the project is built, you can run it as you saw in Figure 10-1 and Figure 10-2. As you can see, there was a lot of code and folder-juggling here, as there usually is when creating Struts applications. There's an Eclipse plug-in that can make life somewhat easier, the Easy Struts plug-in, and we'll take a look at using it next . |