| The V4ALL plug-in gives you a palette of Swing components that you can drag to a "whiteboard" to design your application. To see how this works, we'll create a Swing application using this plug-in. Create a new Java project named Ch06_05 , and give it a source folder, src , in the third pane of the New Project dialog as we've done before. Now create a new class, Ch06_05 , in the org.eclipsebook.ch06 package. 6.4.1 Adding a V4ALL Editor to a Project To add a new V4ALL editor to the project, right-click the org.eclipsebook.ch06 package and select New  Other, opening the New dialog you see in Figure 6-8. Other, opening the New dialog you see in Figure 6-8. Figure 6-8. The New dialog 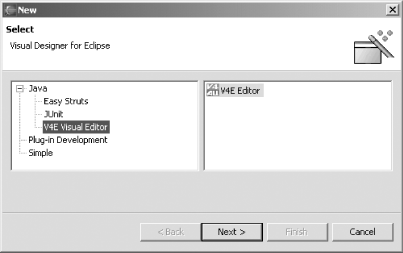 You should see V4E Visual Editor as one of the options; select that item and click Next to open the V4E dialog you see in Figure 6-9. Figure 6-9. The V4E dialog 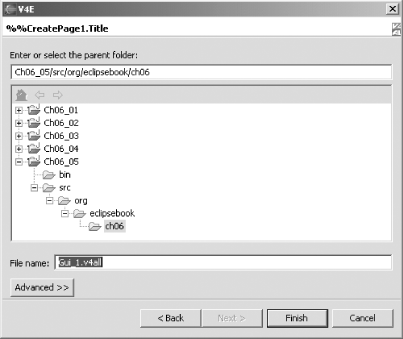 The V4E dialog lets you select the name of the V4ALL file that will contain the design information V4ALL will use. Keep the default name , Gui_1.v4all , and click Finish. 6.4.2 Designing the GUI When you name your V4ALL file of design information and click Finish, the V4ALL perspective that you see in Figure 6-10 will open. You can see the new entry, Gui_1.v4all , in the Package Explorer at left. In the center, you see the V4ALL palette, from which you can drag Swing containers and components. You create your application in the whiteboard, which appears to the right of the palette. Under the palette is the properties view, which lets you set various properties of items in the whiteboard. Our Swing example will display a button and a text field in a Swing frame, so find the Frame item in the Containers section of the palette and drag it to the whiteboard. You can see the results in Figure 6-10. Figure 6-10. Using V4ALL  Next, drag a button and a text field from the Components section of the palette to the Swing frame, as you see in Figure 6-11 (note that we've also resized the frame to fit better around these two controls). Figure 6-11. Adding a button and a text field 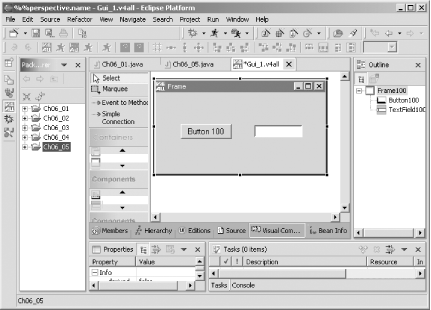 The default caption for the button is "Button 100"; to change that, select the button and click the Text property in the Properties view. Click the ellipsis (" . . . ") button that appears in the Text property line, enter "Click Me" in the Text Input dialog that appears, and click OK. 6.4.3 Creating a Method In this application, our goal is to display a message in the text field when the user clicks the button, so our next step is to create a method that will handle the button click. To create a new method, drag a method item from the palette Beans & Factories section (the method item's icon is a pair of parentheses) to the whiteboard. Double-click the new method item and edit its name to read processEvent( ) , as you see in Figure 6-12. Figure 6-12. Creating a new method 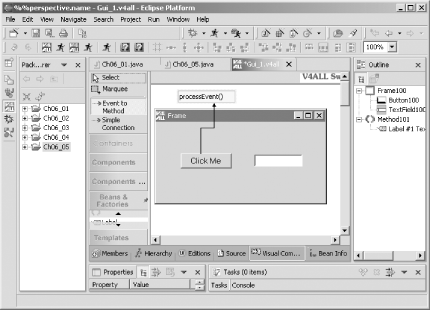 To connect the Click Me button to this method, select the Event to Method item in the palette, then click the button. Next, move the mouse to the processEvent method item and click that item. This connects the button with the method visually using an arrow, as you see in Figure 6-12. To indicate what event you want to handle, click Select at the top of the palette and click the arrow that extends from the button to the method. Then select the Action Performed item in the Events property in the Properties view. That's all it takes. 6.4.4 Generating and Editing the Code We're ready to generate some code. To do that, right-click the whiteboard and select the Code Generation Generate Code for Swing context menu item (or click the left-most V4ALL button in the second toolbar beneath the menu bar, which you can see in Figure 6-12). This creates Gui_1.java , which you can see opened in Figure 6-13. Figure 6-13. Working on V4ALL-generated code 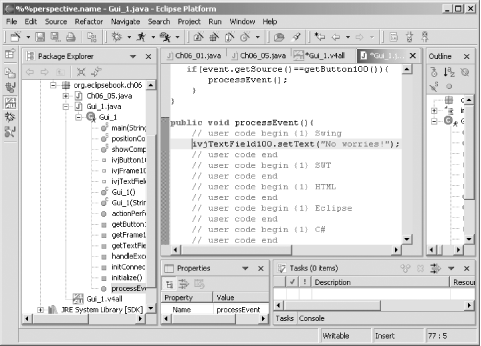 This code was generated for us by V4ALL. The processEvent method we've created will be called when the Click Me button is clicked. If you open the processEvent method, you'll see this generated code: public void processEvent( ){ // user code begin {1} Swing // user code end // user code begin {1} SWT // user code end // user code begin {1} HTML // user code end // user code begin {1} Eclipse // user code end // user code begin {1} C# // user code end } As you can see by looking at the code, the text field is referred to as ivjTextField100 , so we can use that object's setText method to display a message, "No worries!", like this (you can see this code entered in Figure 6-13): public void processEvent( ){ // user code begin {1} Swing ivjTextField100.setText("No worries!"); // user code end // user code begin {1} SWT // user code end // user code begin {1} HTML // user code end // user code begin {1} Eclipse // user code end // user code begin {1} C# // user code end } 6.4.5 Running the Result That's all we need. Save the Gui_1.java file now, select it in the Package Explorer, and select the Run As Java Application menu item, launching the new Swing application, as you see in Figure 6-14. When you click the button, the text field shows the message, as we've designed it to do. Figure 6-14. The new Swing application  And that's iteverything works as planned. You've created and launched a Swing application using the V4ALL plug-in. Our V4ALL example is complete, as is our look at applets, AWT, and Swing in this chapter. In the next chapter, we're going to start working with the new GUI alternative, the Standard Widget Toolkit, that comes with Eclipse. |