| First, let's look at the Select statement. In order to do this, we must complete the wizard. Click to close the Advanced SQL Generation Options dialog. Then click the Finish button on the main Wizard window. This wizard will close. Now we can use the Property window to examine how the wizard created the DataAdapter. Don't worry, we can run the wizard repeatedly to correct any problems or just to regenerate the Data Adapter. The wizard remembers the existing configuration and allows you to update it at any time. To get to the SQL Select statement we created in the wizard, we have to scroll down the Property window until we see the SelectCommand property. Expand it by clicking the Plus button. Your window should look like Figure 6.11. Figure 6.11. The SelectCommand of the DataAdapter. 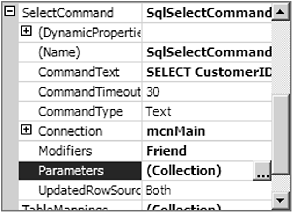 To view the Select statement, select the CommandText property. Next, click the ellipsis button that appears. This will open the familiar query designer we saw previously. In the SQL pane, the Select statement will appear. SELECT CustomerID, CompanyName, ContactName, ContactTitle, Address, City, Region, PostalCode, Country, Phone, Fax FROM Customers WHERE (CompanyName LIKE @CoName + N'%') We're selecting certain columns from the Customers table. We are also allowing the user to select rows based on the where clause. In case you are not that familiar with SQL, this statement says, "Give me the following columns from all rows in the Customers table where the CompanyName starts with the parameter (@CoName) provided." I included the where clause just for some complexity so you can see how the DataAdapter handles it. By including the "at" sign (@) in front of the parameter name , the DataAdapter will automatically create a parameter object for the placeholder. The data type of the parameter is determined by the data type of the column on the left of the operator. We can see the parameter that was created by viewing the Parameter collection. To do this, close the query designer and go to the Property window. Find and select the Parameters property of the SelectCommand. (See Figure 6.12.) When you click the ellipsis button, the Property collection form opens. Figure 6.12. The Parameter collection editor. 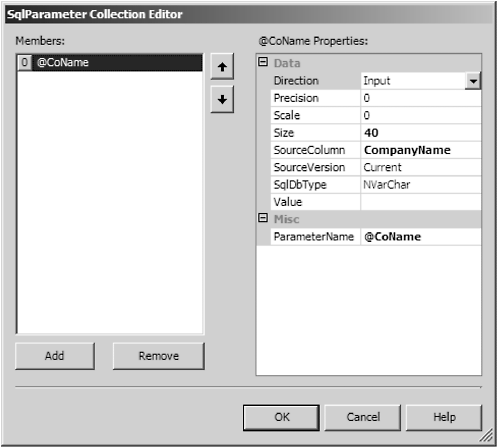 The editor shown in Figure 6.12 is a typical collection editor. It appears any place that a collection can be edited visually at design time. The items in the collection are listed by name in the list at the left. The details of each item appear in the property pane on the right. This is an improvement over the VB 6 Property pages. With this new editor, you can just scroll through the list of items and the properties appear automatically on the right. We will look at the parameter properties in detail when we examine the Property class. Right now, we just wanted to see what the wizard did with the parameter we included in the SQL statement.  |
