Creating a Windows Application
Creating a Windows ApplicationFor the next six chapters, we're going to get visual , working with Windows and Web applications. There is an immense amount of support for Windows and Web applications in the .NET FCL, and we're going to get a kick-start programming Windows applications here. Because this is a programmer-to-programmer book, we're going to focus on the skills needed to work with Windows and Web applications instead of discussing every individual property and method in the FCL. Once you know how to work with Windows controls in general, you can easily switch between, say, handling labels, text boxes, and list boxes. We'll be using the C# Integrated Development Environment (IDE) in the next few chapters. When it comes to writing Windows and Web applications, programmers almost invariably use the IDE, and we'll do so here. To introduce the IDE, we'll write your first Windows application by hand, and then let the IDE write it for us to get an idea of the IDE's advantages. You can see the first Windows application in ch07_01.cs, Listing 7.1. It's not much different from what we've seen before. To display a window and the controls in it, we're going rely on the FCL classes available to us. In this example, we're creating a new window by deriving our main class, ch07_01, from the System.Windows.Forms.Form class (the windows you develop are called forms in C#), and adding a text box (class: System.Windows.Forms.TextBox ) and a button (class: System.Windows.Forms.Button ) to the form.
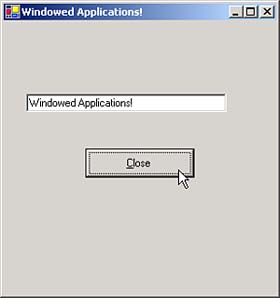
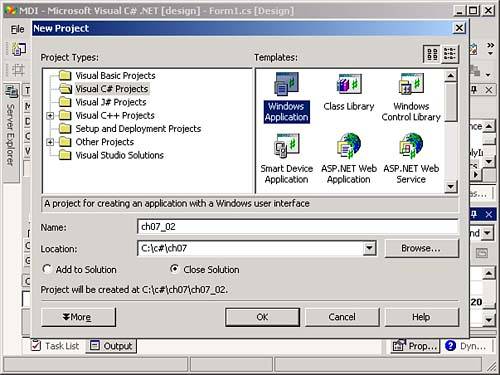
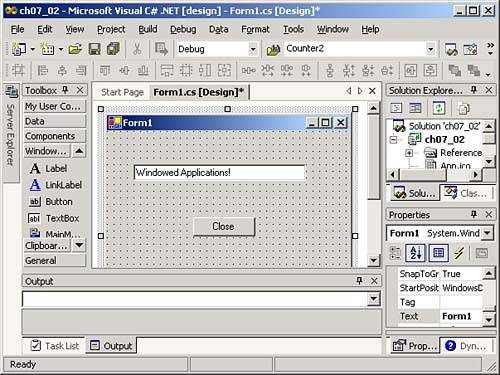
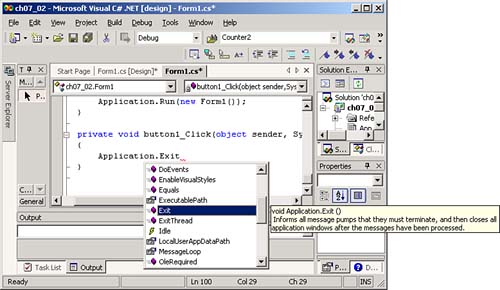
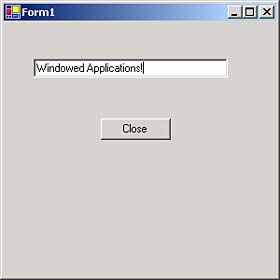
After customizing the text box and button by setting their Location properties (which you set to an object of the System.Drawing.Point class), Text properties (in this example, the text box will hold the text "Windowed Applications!" and the button will display the caption "Close" ), and Size properties (which you set to an object of the System.Drawing.Size class), we add these two controls to the form's Controls collection, which you need to do if you want to display those controls in that form. In the Main method, we run the application by passing an object of our new form class to the Application.Run method like this: Application.Run(new ch07_01()); . That's all it takes. Listing 7.1 A Windows Application (ch07_01.cs) using System; using System.Windows.Forms; public class ch07_01 : Form { private System.Windows.Forms.TextBox textBox1; private System.Windows.Forms.Button button1; public ch07_01() { this.textBox1 = new System.Windows.Forms.TextBox(); this.button1 = new System.Windows.Forms.Button(); this.Text = "Windowed Applications!"; textBox1.Location = new System.Drawing.Point(25, 80); textBox1.Text = "Windowed Applications!"; textBox1.Size = new System.Drawing.Size(220, 24); button1.Location = new System.Drawing.Point(90, 140); button1.Size = new System.Drawing.Size(120, 32); button1.Text = "&Close"; button1.Click += new System.EventHandler(this.button1_Click); this.ClientSize = new System.Drawing.Size(300, 300); this.Controls.Add(this.button1); this.Controls.Add(this.textBox1); } protected void button1_Click(object sender, System.EventArgs e) { Application.Exit(); } public static void Main() { Application.Run(new ch07_01()); } } In addition, we've created a method named button1_Click in ch07_01.cs which will handle Click events for the button we've labeled Close. In this case, it'll simply end the program with a call to Application.Exit . We connect the button's Click event to the button1_Click method using the standard delegate class System.EventHandler , similar to how we worked with delegates in Chapter 4: button1.Click += new System.EventHandler(this.button1_Click); Now when the application starts, you'll see a window with a text box with the text "Windowed Applications!" in it and a button with the caption Close in it, as shown in Figure 7.1. You can close the application with the Close button or with the X button in the upper-right corner of the window. That's our first real Windows application. Figure 7.1. Creating a new Windows application. Now let's take a look at creating the same application in the IDE. IDE was introduced in Chapter 1, "Essential C#," (take a look at Figure 1.2, where the parts of the IDE are labeled). To create a new Windows application named ch07_02, select the File, New Project menu item in the IDE. Doing so opens the New Project dialog box you see in Figure 7.2. Figure 7.2. Creating a new Windows application in the IDE. To create a new C# Windows application, select the Visual C# folder in the Project Types box and the Windows Application icon in the Templates box, as you see in Figure 7.2. Give this new application the name ch07_02, specify the location you want to use, and then click the OK button. This creates the new Windowed application you see under design in the IDE in Figure 7.3. The form of this application appears at the center of the IDE, in a form designer . Figure 7.3. Designing a new Windows application in the IDE. To create the example application we've already written by hand, drag a text box onto the form from the IDE's toolbox (the window just to the left of the form designer; refer to the labeled figure showing the IDE in Chapter 1, Figure 1.2), and then size the text box to match the one in Figure 7.3. The small boxes that appear around the perimeter of a control at design time are called sizing handles ; just drag these with the mouse to size the control as you want it. This creates a new text box object that the IDE names textBox1 in your code (the IDE will name the objects it creates using the same naming conventions used throughout the book). The new text box will have the text "textBox1" already in it; you can change that to "Windowed Applications!" by selecting the text box and clicking its Text property in the properties window at lower-right in the IDE (as labeled in Figure 1.2). Just change the data for the Text property to "Windowed Applications!" . Similarly, you create a button by dragging one from the toolbox to the form as you see in Figure 7.3. Change its Text property to "Close" in the properties window. The next step is to add some code to the Close button's Click event that will end the application when the user clicks that button. To add code to a control's event, select that control in the IDE and click the lightning button you see in the properties window. This will display the control's events (the button to the left of the lightning button will make the properties window display the control's properties again). Double-click the button's Click event in the properties window, which opens the code designer you see in Figure 7.4. The code designer displays a skeleton version of the click event handler method button1_Click . Figure 7.4. Adding code in a code designer.
The button1_Click method is called when the button is clicked, and it's passed two objects, sender and e (these are the same objects passed to every control event handler in C#). The sender object is a reference to the object that caused the event, which is the button in this case, and e is an object that holds event-dependent data, such as the location of the mouse in a mouse click event. In this case, we're simply going to end the application when the user clicks the Close button, so we add this code to the button1_Click method in the code designer: private void button1_Click(object sender, System.EventArgs e) { Application.Exit(); } As you type in this code, the IDE prompts you by displaying a list of members of the Application object you can select, as you see in Figure 7.4, and even describes the method it thinks you have selected. This is the IDE's IntelliSense facility, and it's a significant help in coding because you rarely have to remember all the arguments of every method. You just type the method's name followed by an open parenthesis, ( , and IntelliSense will list the various arguments for the methods, even for overloaded methods . That's completes the code; now you can run the application by selecting the Debug, Start menu item, which starts the application as shown in Figure 7.5. This displays the new Windows application with the IDE in the background. When you click the Close button, the application closes and the IDE comes to the foreground again. If there's a problem with your code, the IDE will reappear and let you debug your code, stepping line by line if you want, while your application is running. Figure 7.5. Running a Windows application.
You can also start an application from the IDE without the debugger running in the background with the Debug, Start Without Debugging menu item. And you can select the Build, Build Solution menu item to build ch07_02.exe, which can be run outside the IDE. The IDE created this example Windows application, ch07_02, for us. In fact, the code it generates is much like the code we generated in ch07_01.cs. The code for the form in this project is in the file Form1.cs, which you can see in Listing 7.2. Note the similarity of this code to the hand-written version in Listing 7.1. Listing 7.2 An IDE-Designed Windows Application (Form1.cs in the ch07_02 Project) using System; using System.Drawing; using System.Collections; using System.ComponentModel; using System.Windows.Forms; using System.Data; namespace ch07_02 { /// <summary> /// Summary description for Form1. /// </summary> public class Form1 : System.Windows.Forms.Form { private System.Windows.Forms.TextBox textBox1; private System.Windows.Forms.Button button1; /// <summary> /// Required designer variable. /// </summary> private System.ComponentModel.Container components = null; public Form1() { // // Required for Windows Form Designer support // InitializeComponent(); // // TODO: Add any constructor code after InitializeComponent call // } /// <summary> /// Clean up any resources being used. /// </summary> protected override void Dispose( bool disposing ) { if( disposing ) { if (components != null) { components.Dispose(); } } base.Dispose( disposing ); } #region Windows Form Designer generated code /// <summary> /// Required method for Designer support - do not modify /// the contents of this method with the code editor. /// </summary> private void InitializeComponent() { this.textBox1 = new System.Windows.Forms.TextBox(); this.button1 = new System.Windows.Forms.Button(); this.SuspendLayout(); // // textBox1 // this.textBox1.Location = new System.Drawing.Point(32, 40); this.textBox1.Name = "textBox1"; this.textBox1.Size = new System.Drawing.Size(208, 20); this.textBox1.TabIndex = 0; this.textBox1.Text = "Windowed Applications!"; // // button1 // this.button1.Location = new System.Drawing.Point(104, 104); this.button1.Name = "button1"; this.button1.TabIndex = 1; this.button1.Text = "Close"; this.button1.Click += new System.EventHandler(this.button1_Click); // // Form1 // this.AutoScaleBaseSize = new System.Drawing.Size(5, 13); this.ClientSize = new System.Drawing.Size(292, 273); this.Controls.Add(this.button1); this.Controls.Add(this.textBox1); this.Name = "Form1"; this.Text = "Form1"; this.ResumeLayout(false); } #endregion /// <summary> /// The main entry point for the application. /// </summary> [STAThread] static void Main() { Application.Run(new Form1()); } private void button1_Click(object sender, System.EventArgs e) { Application.Exit(); } } } We now have a start in Windows programming. We'll take a look at the basic Windows programming skills next, followed by a look at the available Windows controls, and finally a look at multi-window applications later in the chapter to round off the Windows programming coverage. |
EAN: 2147483647
Pages: 181
- Understanding SQL Basics and Creating Database Files
- Using SQL Data Manipulation Language (DML) to Insert and Manipulate Data Within SQL Tables
- Using Keys and Constraints to Maintain Database Integrity
- Writing External Applications to Query and Manipulate Database Data
- Working with Ms-sql Server Information Schema View