Using Ajax with XML
So far, the Ajax examples you’ve seen in this chapter exchange data with the server using text, but of course you can also send your data in XML format. Doing so involves using the responseXml property of the XMLHttpRequest object instead of the responseText property, but there’s more involved. For example, you have to use JavaScript to unravel the XML you receive from the server, and that’s by no means trivial. (In fact, Chapter 12 is devoted to the topic.)
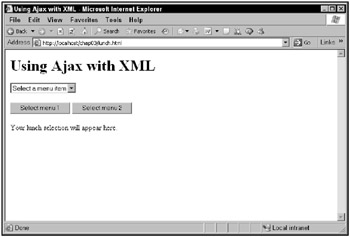
How about taking a look at an example that downloads XML from the server, using Ajax? You can see such an example in Figure 3.9, lunch.html.

Figure 3.9: The lunch.html page
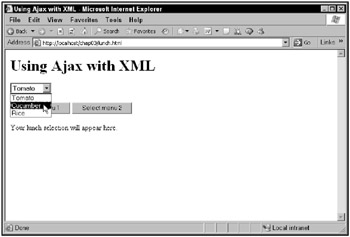
You can use this page to select between two menus. When you select a menu by clicking a button, that menu’s items are downloaded in XML format from the server, and displayed in a drop-down list box, as you see in Figure 3.10.

Figure 3.10: Retrieving a menu’s items from the server using XML
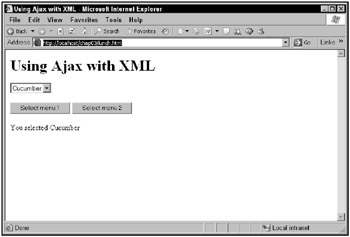
When you select an item from the drop-down list, that item appears in the Web page, as shown in Figure 3.11.

Figure 3.11: Selecting a menu item
So how does this all work behind the scenes?
Creating the XML
The XML for this example will be stored in two menu XML files: menu1.xml and menu2.xml. Each XML file starts, as any XML file must, with an XML declaration:
<?xml version = "1.0" ?> . . .
Each menu XML file uses a <menu> item as its document element (in XML, all elements must be contained inside a single document element):
<?xml version = "1.0" ?> <menu> . . . </menu>
Then you list the menu items in each menu using <menuitem> elements, like this in menu1.xml:
<?xml version = "1.0" ?> <menu> <menuitem>Ham</menuitem> <menuitem>Turkey</menuitem> <menuitem>Beef</menuitem> </menu>
Here’s what menu2.xml looks like:
<?xml version = "1.0" ?> <menu> <menuitem>Tomato</menuitem> <menuitem>Cucumber</menuitem> <menuitem>Rice</menuitem> </menu>
These XML files go into the same directory on the server as the main Web page, lunch.html. Okay, that prepares the XML. Now how do you download and use it?
Downloading the XML
It’s time to write some JavaScript to download and decode the XML in menu1.xml and menu2.xml. The first change from simple text-handling comes early on, during the XMLHttpRequest object-creation process. If you’re dealing with a Netscape/Firefox browser, you have to add this line when working with XML:
<html> <head> <title>Using Ajax with XML</title> <script language = "javascript"> var menu; var XMLHttpRequestObject = false; if (window.XMLHttpRequest) { XMLHttpRequestObject = new XMLHttpRequest(); XMLHttpRequestObject.overrideMimeType("text/xml"); } else if (window.ActiveXObject) { XMLHttpRequestObject = new ActiveXObject("Microsoft.XMLHTTP"); } . . . Why do you need this line of code, and what does it do? In some cases, Mozilla, Firefox, and Netscape can set the type of the data expected by the XMLHttpRequest object to non-XML values, so be sure to use this line to set the expected type of data to XML when you’re downloading XML.
Next come the controls you see in this Web page: the drop-down list box, which is a <select> control, two buttons, and a <div> element for displaying the results:
<body> <h1>Using Ajax with XML</h1> <form> <select size="1" onchange="setmenu()"> <option>Select a menu item</option> </select> <br> <br> <input type = "button" value = "Select menu 1" onclick = "getmenu1()"> <input type = "button" value = "Select menu 2" onclick = "getmenu2()"> </form> <div width =100 height=100>Your lunch selection will appear here.</div> </body>
Note the JavaScript functions these controls are tied to: the two buttons, which let the user select between menu 1 and menu 2 are connected to the functions getmenu1 and getmenu2. And the drop-down list, which shows the menu items for selection, is tied to a function named setmenu, which displays the user’s menu selection in the <div> element.
So how do the getmenu1 and getmenu2 functions look? You start getmenu1 by configuring an XMLHttpRequest object to get menu1.xml like this:
function getmenu1() { if(XMLHttpRequestObject) { XMLHttpRequestObject.open("GET", "menu1.xml"); . . . When the response comes back you want to use the responseXML property, not responseText; here’s how that’s handled in the code, where the XML is stored in a variable named xmlDocument:
function getmenu1() { if(XMLHttpRequestObject) { XMLHttpRequestObject.open("GET", "menu1.xml"); XMLHttpRequestObject.onreadystatechange = function() { if (XMLHttpRequestObject.readyState == 4 && XMLHttpRequestObject.status == 200) { var xmlDocument = XMLHttpRequestObject.responseXML; . . . } } XMLHttpRequestObject.send(null); } } The XML you download is stored in JavaScript XML document object form, and you’re going to see how to handle that XML throughout this book. In this case, the XML you’ve downloaded looks like this:
<?xml version = "1.0" ?> <menu> <menuitem>Ham</menuitem> <menuitem>Turkey</menuitem> <menuitem>Beef</menuitem> </menu>
The trick is to extract the data in the <menuitem> elements here and to display that data in the drop-down list. You can get an array of <menuitem> elements by using the getElementsByTagName method, passing it the element name "menuitem":
function getmenu1() { if(XMLHttpRequestObject) { XMLHttpRequestObject.open("GET", "menu1.xml"); XMLHttpRequestObject.onreadystatechange = function() { if (XMLHttpRequestObject.readyState == 4 && XMLHttpRequestObject.status == 200) { var xmlDocument = XMLHttpRequestObject.responseXML; menu = xmlDocument.getElementsByTagName("menuitem"); . . . } } XMLHttpRequestObject.send(null); } } Now you need to extract the names of the menu items from the menu object, which contains the <menuitem> elements. Might as well do that in a new function, listmenu:
function getmenu1() { if(XMLHttpRequestObject) { XMLHttpRequestObject.open("GET", "menu1.xml"); XMLHttpRequestObject.onreadystatechange = function() { if (XMLHttpRequestObject.readyState == 4 && XMLHttpRequestObject.status == 200) { var xmlDocument = XMLHttpRequestObject.responseXML; menu = xmlDocument.getElementsByTagName("menuitem"); listmenu(); } } XMLHttpRequestObject.send(null); } } In the listmenu function, you can loop over the <menuitem> elements in the menu array:
function listmenu () { var loopIndex; for (loopIndex = 0; loopIndex < menu.length; loopIndex++ ) { . . . } } Inside this loop is where you want to store the new menu items in the drop-down <select> control. You can access the <select> control’s items using the control’s options array like this:
function listmenu () { var loopIndex; var selectControl = document.getElementById('menuList'); for (loopIndex = 0; loopIndex < menu.length; loopIndex++ ) { selectControl.options[loopIndex] = . . . } } All that remains is to extract the names of each menu item from the <menuitem> elements:
<menuitem>Ham</menuitem> <menuitem>Turkey</menuitem> <menuitem>Beef</menuitem>
Here’s where you need some knowledge of XML. For example, the text "Ham" in the first <menuitem> element is actually considered a text node, and it’s the first child node of the <menuitem> element. So to access that text node, you’d use this expression: menu[0].first Child. But you’re not done yet; you still have to access the data in the text node to recover the "Ham" text, and you do that with this expression: menu[0].firstChild.data.
All that means is that you can recover the menu item’s text and place it in the <select> control like this:
function listmenu () { var loopIndex; var selectControl = document.getElementById('menuList'); for (loopIndex = 0; loopIndex < menu.length; loopIndex++ ) { selectControl.options[loopIndex] = new Option(menu[loopIndex].firstChild.data); } } That populates the drop-down list with the menu items recovered from the server using XML.
The last bit of code for this example is the setmenu function, which handles selections in the drop-down list. When users select a menu item, you should display their selection, as shown earlier in Figure 3.11. Here’s how the setmenu function does its thing:
function setmenu() { document.getElementById('targetDiv').innerHTML = "You selected " + menu[document.getElementById ('menuList').selectedIndex].firstChild.data; } And that’s it; this example is complete.
On the other hand, this example used static XML files. What if you wanted to interact with the server, sending it data and getting XML back? For example, what if you wanted to convert this example from using two XML files, menu1.xml and menu2.xml, to using one PHP file, menus.php? The menus.php file can pass back the data for both menus to the browser. All you have to do is pass it a parameter named menu, set to 1 for menu 1 and 2 for menu 2.
The menus.php file starts by setting the Content-type header of the data it’s going to send back to the browser to text/xml so the browser knows it will be XML:
<? header("Content-type: text/xml"); . . . ?> Next, menus.php creates an array of menu items depending on the value of the menu parameter:
<? header("Content-type: text/xml"); if ($_GET["menu"] == "1") $menuitems = array('Ham', 'Turkey', 'Beef'); if ($_GET["menu"] == "2") $menuitems = array('Tomato', 'Cucumber', 'Rice'); . . . ?> Finally, this PHP script loops over the array, creating the XML text to send back to the browser:
<? header("Content-type: text/xml"); if ($_GET["menu"] == "1") $menuitems = array('Ham', 'Turkey', 'Beef'); if ($_GET["menu"] == "2") $menuitems = array('Tomato', 'Cucumber', 'Rice'); echo '<?xml version="1.0" ?>'; echo '<menu>'; foreach ($menuitems as $value) { echo '<menuitem>'; echo $value; echo '</menuitem>'; } echo '</menu>'; ?> That takes care of the PHP side of things. What about the Ajax application itself, which you might call lunch2.html?
The changes here are easy: instead of getmenu1 and getmenu2 functions, you can put everything together into a single getmenu function to which you pass the number of the menu you want. Then you just call getmenu with the correct menu number when the user clicks a button:
<form> <select size="1" onchange="setmenu()"> <option>Select a menu item</option> </select> <br> <br> <input type = "button" value = "Select menu 1" onclick = "getmenu('1')"> <input type = "button" value = "Select menu 2" onclick = "getmenu('2')"> </form> In the getmenu function, you can URL-encode the number of the menu to fetch and pass that number to menus.php like this:
function getmenu(menuNumber) { if(XMLHttpRequestObject) { XMLHttpRequestObject.open("GET", "menus.php?menu=" + menuNumber); XMLHttpRequestObject.onreadystatechange = function() { if (XMLHttpRequestObject.readyState == 4 && XMLHttpRequestObject.status == 200) { var xmlDocument = XMLHttpRequestObject.responseXML; menu = xmlDocument.getElementsByTagName("menuitem"); listmenu(); } } XMLHttpRequestObject.send(null); } } And that’s all it takes. Now when the user requests menu 1, menu 1 will be fetched; when the user requests menu 2, menu 2 will be fetched. Cool. Now you’re fetching dynamic XML data from the server.