Chapter 10: iSeries Navigator
The iSeries has traditionally been a "green screen" system. For many years now, IBM has been trying to incorporate modern-looking GUI interfaces into the system. iSeries Navigator represents one of the best of those tools. Every system operator, administrator, and programmer should be familiar with the many features of iSeries Navigator. This chapter reviews its basic components and a few of its useful features.
Installing
Every iSeries should come packaged with an iSeries Access CD containing the software needed for a client to connect to the iSeries server. (Client Access is the name used in previous editions of the software. Therefore, in some systems, the CD will reference that product instead.) However, before using that CD to load the client software, verify that certain program products, described in the following sections, are installed on the server.
Installing iSeries Access on the iSeries Server
iSeries Access can be installed on an iSeries server and distributed from that server to PCs in the network. Before attempting the installation, verify that you have enough disk space. This product may take as much as 170 MB for the English-language version. Versions in other languages will vary in size. Also, verify that the user ID you are signing in to the iSeries with has a *SECOFR level of authority.
To install the licensed program software on the server, follow these steps:
-
End the system to a restricted state by entering the command ENDSBS * ALL * IMMED on the system console and pressing Enter. This forces all users off the system, so use discretion when determining the right time to perform this work.
-
Wait for the message "System ended to a restricted condition" to appear on the console.
-
Enter the command GO LICPGM, and press Enter to display the licensed program menu.
-
Type 11 to select the required products shown in Figure 10.1.

Figure 10.1: List of required licensed program products.
To select these program products, enter a 1 to the left of each and press Enter.
To provide support for 128-bit encryption, include the products shown in Figure 10.2.
![]()
Figure 10.2: List of optional licensed program products.
After installing all the desired licensed program products, install the latest PTFs as well. (For help on this topic, see Chapter 35, Managing PTFs.) After installing any necessary PTFs on the iSeries, begin loading iSeries Access onto the client systems.
Installing iSeries Access on a Windows Client
Before installing iSeries Access on a Windows client, verify that the system meets the minimum requirements. Two levels of prerequisites exist. The first is for iSeries Access itself. The second, and the one that concerns us in this section of the book, entails the requirements for running iSeries Navigator.
-
iSeries Access
-
Pentium processor running at 233 MHz or more (733 MHz for the 64-bit system)
-
128 MB of memory
-
150 MB of disk space
-
-
iSeries Access with iSeries Navigator
-
Pentium processor running at 850 MHz or more
-
512 MB of memory
-
221 MB of disk space
-
Insert the iSeries Access CD included with the iSeries server into the drive of a personal computer equipped with any of the following versions of the Windows operating system:
-
Windows NT
-
Windows 2000
-
Windows XP
-
Windows 2003 server (32-bit)
-
Windows 2003 server (64-bit)
The Autorun file on the CD should execute and initiate the setup program without further action on your part. If the setup program does not automatically begin, explore the contents of the CD-ROM and execute the "Setup" application. Once launched, the Setup program should display the wizard shown in Figure 10.3.
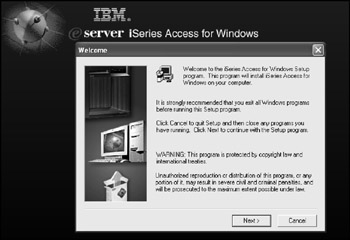
Figure 10.3: Welcome screen for iSeries Access Setup.
As always, when installing software on a Windows client, it is a good idea to exit from all other programs and perform only the install. Left-click Next and continue with the installation. Next, select the type of install, using the prompt shown in Figure 10.4. For our purposes, we want to perform a Full Install, so select that option and continue with the install process.
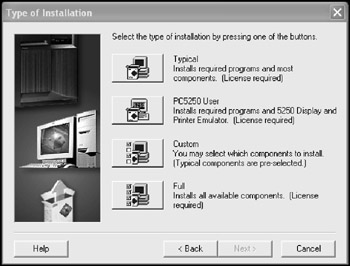
Figure 10.4: Type of Installation screen.
During the install process, a large amount of data is loaded onto the Windows client. Use the prompt shown in Figure 10.5 to set the name and location of the iSeries Access folder. Simply take the default, unless you have some overriding need to control the folder name and location. Left-click Next to continue with the install process.
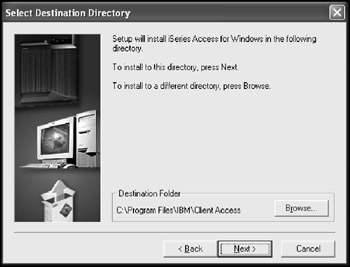
Figure 10.5: Select Destination Directory.
Once the software has been loaded, the wizard displays the final prompt, shown in Figure 10.6. Uncheck the README and Welcome Wizard options, unless you are sure you wish to see those. Left-click Next to complete the install process.
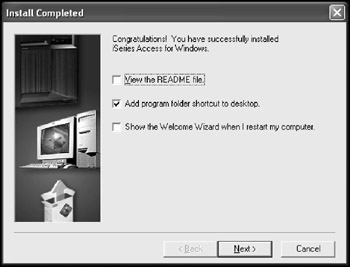
Figure 10.6: Install Completed.
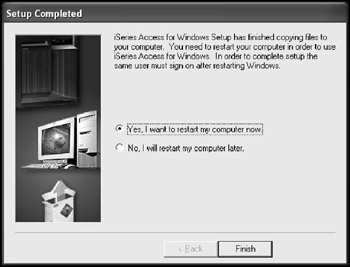
Figure 10.7: Restart screen.
Once the install is complete, you must restart the Windows client before you can begin using iSeries Navigator. You may allow the wizard to perform the restart for you and simply left-click Finish. Alternatively, you may change your selection to restart later before clicking Finish. Make sure that you perform a restart before using iSeries Access or any of its components, such as iSeries Navigator.
Setting Up a New Connection
To launch iSeries Navigator, select the icon shown in Figure 10.8 from either the desktop or the start menu. The first time iSeries Navigator opens after installation, an automated wizard (as illustrated in Figure 10.9) will assist in configuring a connection to an i5 server.
Figure 10.8: iSeries Navigator icon.
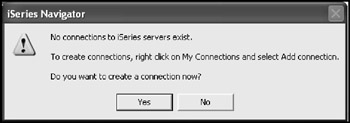
Figure 10.9: Create connection prompt.
Left-click Yes to launch the Add Connection wizard shown in Figure 10.10. This wizard will assist in the process of defining one or more i5 servers to interact with from your local Windows client. Every Windows client is able to define its own set of servers. To define the first i5 server, follow the instructions of the Add Connection Wizard, shown in Figure 10.10.
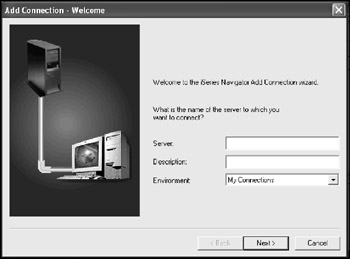
Figure 10.10: Create connection wizard.
Enter either the IP address of the i5 server or its system name. Find the system name in the upper right corner of the sign-on screen or any system menu. Use a previously configured client or the system console to find this value. The description can be anything you want, but should clearly identify the associated i5 server. In larger environments using multiple servers and partitions within each server, identifying each connection becomes increasingly important. To help manage larger, more complex environments, you can create multiple labeled environments, such as Production, Testing, Development, North America, Europe, and Asia. Later in this chapter, we review creating new environments.
| Tip | When configuring a new connection, you can refer to an i5 server by either its IP address or its system name. For best results, use the system name and update the host table on the client as well. |
If you choose to use the system name, which is the best choice, it is a good idea to update the host table even if you have a DNS server that routes the connection correctly. The host table is placed in different locations, based on which version of Windows you are using. Consult Table 10.1 for the specific location of the host table.
| Windows Version | Location of Hosts file |
|---|---|
| Windows NT | c:\winnt\system32\drivers\etc\hosts |
| Windows XP | c:\Windows\system32\drivers\etc\hosts |
| Windows 2000 | c:\winnt\system32\drivers\etc\hosts |
| Windows 2003 | c:\Windows\system32\drivers\etc\hosts |
| Tip | If communications problems persist, you may need to create an lmhosts file in the same directory as the hosts file. The lmhosts.sam sample file is already located there. Simply copy it and update it as necessary. You can find directions commented within the sample file. |
Once the server description is complete, click Next to display the sign-on options prompt, as displayed in Figure 10.11. Use this prompt to select the method for authenticating your connection to the server. You can select the option to use the ID and password of the current Windows user profile to establish the connection to the server. It is unlikely that the user profiles on the i5 server will match the Windows profiles. This option is rarely appropriate. Never select the option to prompt every time, because that will result in annoying repetitive requests to log in. Entering a default user profile and only prompting as needed is a far more practical solution.
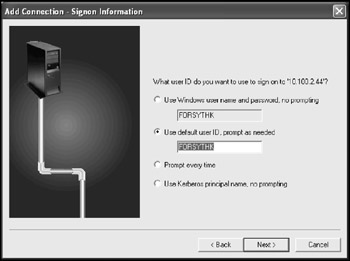
Figure 10.11: Select Signon options.
If you have implemented Enterprise Identity Mapping (EIM), sometimes referred to as "single sign-on," select the Kerberos option to indicate that a Kerberos server should authenticate the user.
After selecting the desired option, click Next to complete the definition of the connection. If desired, verify the connection using the prompt displayed in Figure 10.12. Otherwise, simply click Next to return to the iSeries Navigator, which now includes the new connection.
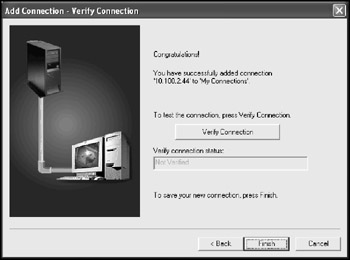
Figure 10.12: Verify Connection prompt.
When verifying the connection, the wizard performs a series of tests, as shown in Figure 10.13. If any of these tests fail, a problem must be resolved. If the tests are successful, click OK to return to iSeries Navigator, which will show the newly defined connection, as in Figure 10.14.
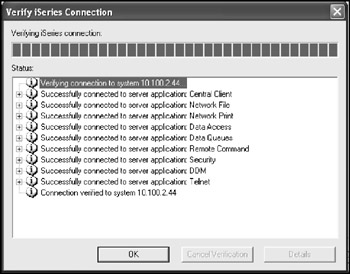
Figure 10.13: Verify Connection detail.
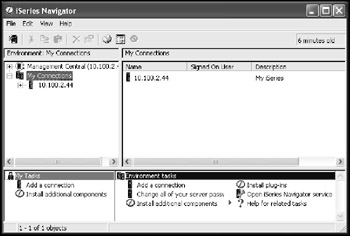
Figure 10.14: iSeries Navigator with i5 connection.
Standard Features
All server connections are organized into environments. The default environment is "My Connections." To create new environments, right-click My Connections, select Connection to Servers, then select Environments… This launches a wizard to create new environments, add new connections to environments, and select the active environment. An environment must have at least one connection before it can be activated. Only one environment can be active at a time. This allows you to define sets of connections, such as production and test, East Coast and West Coast, corporate and local. For the purposes of this book, we will only deal with one environment and one server connection within that environment.
To access the features of the newly defined i5 server, click the "+" sign to its left. A log-in may be required, as shown in Figure 10.15. If you selected the option to prompt only as needed, this prompt appears the first time a connection is established. The connection will time out if left idle, thus requiring a new log-in before using it again.
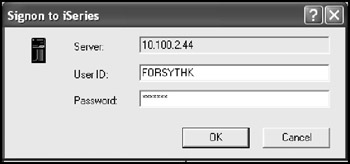
Figure 10.15: iSeries signon.
Enter a valid user ID and password to log in to the server, and then click OK to display the features available for the selected sever, as shown in Figure 10.16. (Because this book introduces the i5 server to new users and administrators, we will focus on the more commonly used features, Basic Operations, Security, Users and Groups, Database, File Systems, and Backups.)
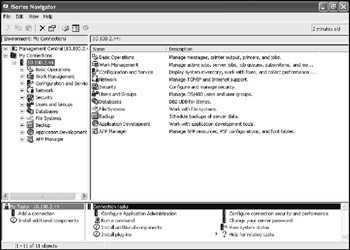
Figure 10.16: iSeries Navigator available features.
iSeries Navigator is separated into three distinct panes. The pane on the left side displays all the defined connections and Management Central tools. The right-hand pane displays the details of the item selected in the left-hand pane. The bottom panes display tasks related to the selected items. Select Basic Operations to display its associated tasks in the right-hand pane. To display the subtopics beneath Basic Operations, as shown in Figure 10.17, click the "+" sign to its left.
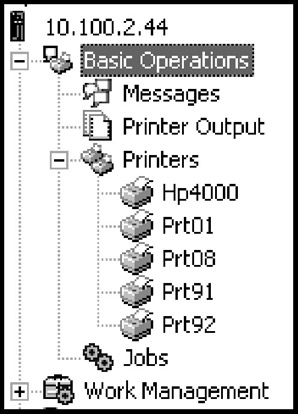
Figure 10.17: Basic Operations subtasks.
Standard Actions
Each task provides support for one or more function. Many of these functions are commonly available throughout most actions. The most commonly used actions are discussed below:
-
Explore
-
Open
-
Create Shortcut
-
Customize this View
-
Sort…
-
Include…
-
Columns…
-
Auto Refresh…
-
Use the Explore action to load the right-hand pane with data related to the selected task. To select new data to display, use the Include action, found beneath Customize this View. If the data on the display is not current, you can find its age (in minutes) displayed in the upper right corner of the view. Use F5 to refresh the view with current data.
The Open action loads the contents of the selected message queue into a new window. Otherwise, it is identical to Explore.
Create Shortcut places an icon on the desktop, which acts as a shortcut to return to this display without needing to launch the entire iSeries Navigator display.
Sort launches a customization wizard. Use this wizard to change the sort sequence of data included in the current view. This option is not available for all tasks.
The Include action launches one of the wizards used to customize this view. Use this wizard to filter the data displayed in the current view.
Use the Columns action to launch the customization wizard that determines which columns of information are included in the current view. Use "Add Before" and "Add After" to control the column's display sequence.
Auto Refresh launches a wizard that controls the refresh behavior of the display, defaulting to the settings of its parent, all the way back to the My Connections Environment. To set the refresh behavior of all tasks within iSeries Navigator, right-click My Connections and set its behavior. All other tasks will inherit its settings. Select Refresh Contents every time list is displayed to guarantee that the data is as current as possible.
These features are available for most, if not all, tasks within iSeries Navigator. Although they may change slightly depending on the content they are associated with, their basic functioning remains the same.
Basic Operations
The subtasks beneath the Basic Operations task are:
-
Messages
-
Printer Output
-
Printers
-
Jobs
Messages
Use Messages to manage the messages in one or more message queues. This task includes wizards to assist in sending messages as well as in removing them from the system. Right-click Messages to see all the available subtasks. Use Open or Explore to display messages. A question mark in the icon to the left of a message identifies it as needing a reply. Informational messages have a simple text balloon. Right-click a message and choose from the available actions:
-
Reply
-
Send Message
-
Delete
-
Monitor
-
Properties
Only messages requiring a reply allow the Reply option. Monitor opens a wizard that configures a Message Monitor. (Message Monitors are beyond the scope of this book; refer to the IBM documentation for more information.) Use the Properties action to display the attributes of the selected message.
The Send Message action launches the wizard shown in Figure 10.18. It assists in sending messages to one or more message queues. Select Interrupt User to identify the messages as break messages.
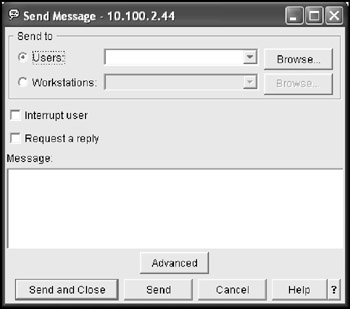
Figure 10.18: Send Message wizard.
Delete Messages launches the wizard used to delete messages from a selected message queue, as shown in Figure 10.19. Select which message queue to remove the messages from and which messages to remove.
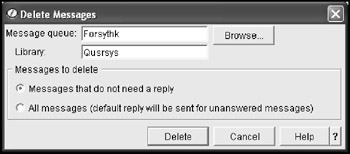
Figure 10.19: Delete Messages wizard.
Printer Output
Explore Printer Output to display a list of spool files, as shown in Figure 10.20. Double-click a spool file to open it using the AFP Viewer. This powerful tool allows you to manipulate the print spool before printing it. You may scale and rotate the image and perform a number of other features as well. You may also use tasks under the File pull-down menu to create AFP Overlays and Page segments, which are useful in eliminating preprinted forms.
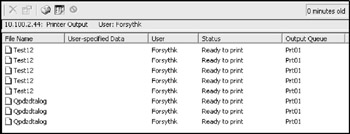
Figure 10.20: Printer Output.
One of the most useful features of this view is its ability to transfer a spool file to another computer, such as a PC or even another iSeries server. This feature includes support for Windows-style copy-and-paste and drag-and-drop to an ASCII format. To transfer a spool file to your PC, drag the spool file entry from this view to your desktop. iSeries Navigator will translate it from EBCDIC to ASCII on the fly.
To transfer a spool file to another iSeries system via either TCP/IP or SNA, right-click the spool file and select Send to begin the process.
A newer feature of iSeries Navigator is its support for creating PDF documents. To translate a spool file into a PDF, simply right-click it and select the option to Convert to PDF. This launches a wizard that walks you through that process.
| Tip | The Convert to PDF option requires the installation of the Licensed Program Product 5722-IP1 IBM Infoprint Server. |
Right-click a spool file and select properties to manage the attributes of the spool file, such as the number of copies to print and its current OUTQ assignment.
Printers
All the printers configured on the system appear when you use this task feature. Select one to display its associated spool files, or right-click a printer to display the list of related subtasks. These subtasks include making the device available or unavailable (Vary On/Vary Off), starting the printer, working with its associated spool files, and configuring it for sharing through iSeries NetServer.
Jobs
Select this task to display all the active jobs on the server, as shown in Figure 10.21. Use the Customize this View tasks to filter, sort, and arrange the content of this view. Double-click a job to display and manage its properties. Right-click a job to display the following subtasks:
-
Monitor
-
Printer Output
-
Job Log
-
Details
-
Call Stack
-
Library List
-
Locked Objects
-
Open Files
-
Library Objects
-
File System Objects
-
-
Threads
-
Transactions
-
Elapsed Performance Statistics
-
Last SQL Statement
-
-
Reply
-
Hold
-
Release
-
Move
-
Delete/End
-
Properties
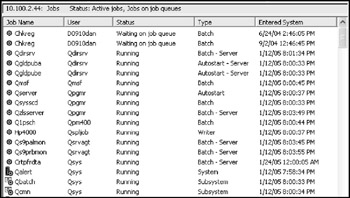
Figure 10.21: Active jobs.
Select any job and right-click it. From the list of available options, select Properties to open the dialog shown in Figure 10.22. This dialog provides the user with the ability to change a large number of attributes for the selected job. These attributes are the same as those modified through the WRKACTJOB command. This dialog separates the attributes into various panels. Each one contains a group of logically related attributes, accessed by clicking on its associated tab. Click the Performance tab to display all the attributes that affect the general performance characteristics of the selected job, as illustrated in Figure 10.23. Modifiable attributes appear as text boxes with a white background. Read-only attributes appear as simple black text on a gray background. Make any changes desired, and then click OK to processes the changes.
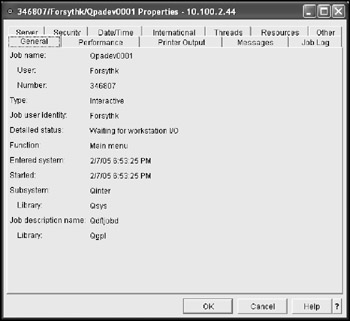
Figure 10.22: Job properties dialog.
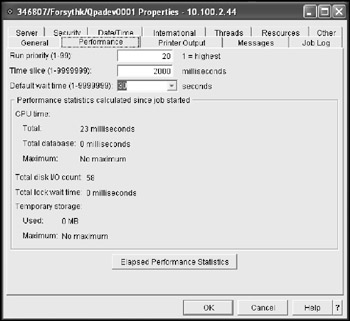
Figure 10.23: Job performance properties panel.
Change the attributes of the selected job as needed, and click OK to close the dialog. A large number of tabs organize the job attributes into logical groups. Select Job Log to display a list of all commands issued and error messages received for the current job. While this same information is available through the green screen interface, you may find that the scrolling content pane makes viewing here easier.

Figure 10.24: Job Log.
Occasionally, an application running on the iSeries will encounter an object lock. This problem occurs when two or more jobs are trying to acquire conflicting locks on an object. Well-designed applications will rarely, if ever, encounter this problem. However, if you do encounter problems with object locks, iSeries Navigator includes a great tool for handling them. Simply right-click the job that received the error lock error, and then select Locked Objects. A wizard, shown in Figure 10.25, launches and displays a list of objects in use by the selected job. "Held" in the Lock Status column indicates the object is locked appropriately. Search for an entry with a status of "Wait." Any such objects have a conflicting lock with one or more other jobs.
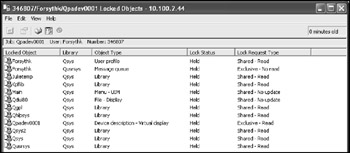
Figure 10.25: Display locked objects for selected job.
If you decide that you need to cancel or end a job, you should first verify that you know what tasks that job is performing and what the consequences are of ending that job. After you are certain that canceling the job is the best course of action, simply find the job on any of the wizards that display lists of jobs, right click the job, and select Delete/End. The wizard displayed in Figure 10.26 launches, requiring you to confirm the cancellation of the selected job. By default, the job will end in a controlled manner. A signal is sent to the job, indicating that it should end itself. Since few programs monitor for this signal, experienced administrators often change this setting to immediate to reduce the delay before the job completely ends.
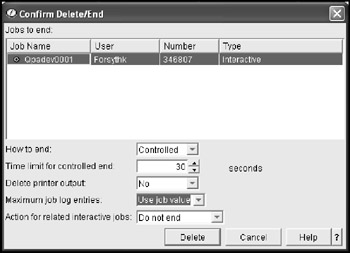
Figure 10.26: Confirm End Job command.
| Tip | RPG programs detect a controlled End of Job using the SHTDN operation code. |
| Tip | If a job is ending immediate, and it still takes an unacceptable amount of time to end, you may consider changing the Maximum job log entries to a smaller number, such as 100. In rare occasions, a job gets stuck in a loop writing errors to its job log. Setting a limit to log entries circumvents that loop. |
The system collects performance statistics for every job that on the system. To display the collected performance statistics for any given job, right-click the job, and select Elapsed Performance Statistics. The wizard shown in Figure 10.27 displays the specific statistics for the selected job. Some key statistics to look for are shown in Figure 10.27.
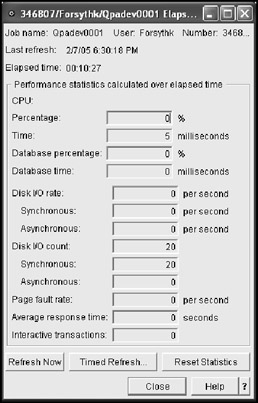
Figure 10.27: Job Performance statistics.
Many applications make heavy use of SQL and, in the future, SQL will probably become even more prevalent with iSeries-based application. iSeries Navigator includes the ability to display the last SQL statement executed by a given job. Simply right-click the desired job, select Details, then select Last SQL Statement. Figure 10.28 shows the associated wizard, and the last SQL statement executed by the job is displayed in the content pane of the wizard.
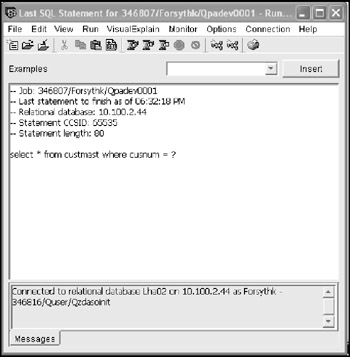
Figure 10.28: Last SQL statement run for selected job.
Work Management
The subtasks beneath the Work Management task (Figure 10.29) are:
-
Active Jobs
-
Server Jobs
-
Job Queues
-
Active Job Queues
-
All Job Queues
-
-
Output Queues
-
Subsystems
-
Active Subsystems
-
-
Memory Pools
-
Active pools
-
Shared Pools
-
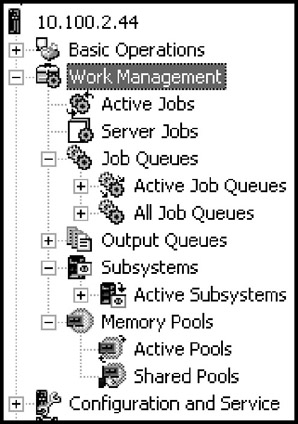
Figure 10.29: Work Management subtasks.
Work Management provides features similar to those found under Basic Operations with the addition of more sophisticated choices. Active Jobs displays only currently active jobs, but also provides many options for filtering the view. From within that view, simply right-click any job to get the same options discussed earlier under the Jobs task. Server Jobs specifically filters for server-side jobs running on the iSeries. This is the easiest way to find those server-side jobs that are supporting your currently executing client applications, such as iSeries Navigator. Job Queues provides a list of job queues on the system and allows them to be held, released, and cleared. The list of Job Queues may be limited to only Active Job Queues (those attached to a subsystem) or All Job Queues. You can also manage the job requests listed within each of the queues. Output Queues provides similar capabilities for managing the various Output Queues on the system and the spooled files contained within them. The options for working with the spooled files are the same as those discussed earlier under Printer Output.
Subsystems displays a list of currently active subsystems and allows you to manage their attached job queues, start a new subsystem, or end an active one. If you choose to end a subsystem, the wizard shown in Figure 10.30 allows you to set the options. By default, the subsystem will end in a controlled manner and generate job logs for each of the currently active jobs within that subsystem. To force the subsystem to end more quickly, you might choose to set the How to Stop option to Immediate.
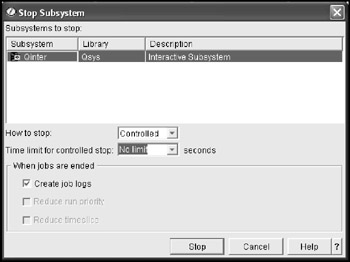
Figure 10.30: End Subsystem dialog.
| Warning | Never end a job or a subsystem unless you fully understand the consequences of doing so. |
The Memory Pools task has two subtasks, Active Pools and Shared Pools. The Active Pools task includes all currently active memory pools, both shared and private. The Shared pools list, illustrated in Figure 10.31, includes the standard shared pools provided by IBM whether or not they are currently in use. To release the memory currently allocated to a pool that is no longer in use, right click it and select Deallocate. This displays a confirmation wizard to confirm the process. To change the pool settings, right-click the desired pool and select Properties. Figure 10.32 shows the configuration tab of the Properties wizard.

Figure 10.31: Shared memory pool list.
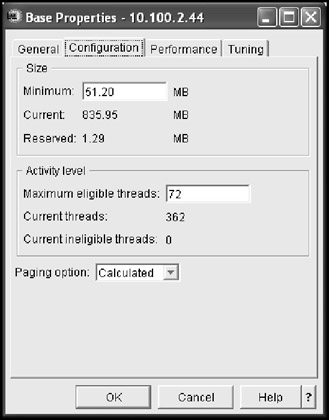
Figure 10.32: Base pool properties.
Configuration and Services
The subtasks beneath the Configuration and Services task (Figure 10.33) are:
-
System Values
-
Time Management
-
Hardware
-
Software
-
Fixes Inventory
-
Collection Services
-
Logical Partitions
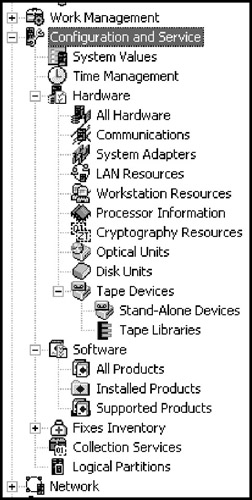
Figure 10.33: Configuration and Services.
Configuration and Services encompasses a large number of tasks. Many of them are seldom utilized, while others are quite useful. The System Values task provides the wizards shown in Figure 10.34, which are used to set virtually all system values. Simply selecting the desired wizard and let it walk you through the configuration process.
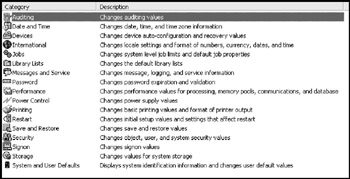
Figure 10.34: System value categories.
The Time Management wizard shown in Figure 10.35 provides the ability to set your current time zone and even create a new time definition, if necessary. Figures 10.35 and 10.36 illustrate the options within the time zone definition wizard.
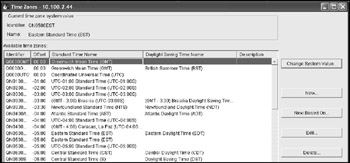
Figure 10.35: Time Zone list.
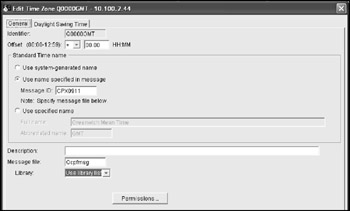
Figure 10.36: Time Zone properties.
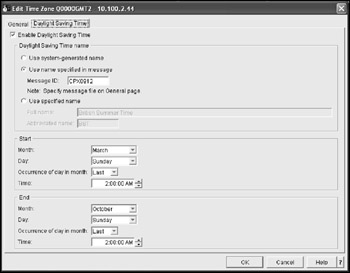
Figure 10.37: Daylight Savings Time settings.
A common problem that many administrators face is determining what tape formats a particular model supports. An easy way to determine this is to explore down into the hardware tasks and select Tape Devices, and then Stand Alone Devices. Select the desire tape drive from the list of available devices, as shown in Figure 10.38, right-click it, and select Properties. When the wizard shown in Figure 10.39 appears, select the Capabilities tab. All supported read and write densities are displayed.
![]()
Figure 10.38: List of tape devices.
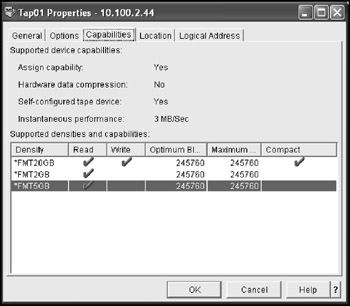
Figure 10.39: Tape device capabilities.
Fixes Inventory provides the ability to manage Program Temporary Fixes (PTFs). This includes reviewing installed PTFs, reading cover letters that provide information on the PTFs, and downloading and installing PTFs through the Internet. The topic of PTF management is covered in detail in Chapter 35. Also see the IBM iSeries Information Center for more information.
The Logical Partitions task is a topic too complex to cover here, but for users working on systems with logical partitions, this task provides the ability to configure and manage partitions on the system.
Collection Services provides tools for collecting information about the system for use locally or for reporting to IBM. Hardware, Software, and Performance data can be collected. Once the data is collected, reports can be created to analyze the information.
Network Tasks
The subtasks beneath the Network task (Figure 10.40) are:
-
TCP/IP Configuration
-
Remote Access Services
-
Servers
-
IP Policies
-
Windows Administration
-
Enterprise Identity Mapping
-
Internet
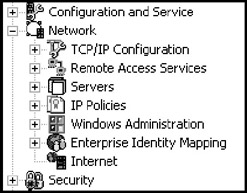
Figure 10.40: Network tasks.
The Network tasks are generally more complex than can be covered here. One simple task that you may wish to take advantage of is the starting and stopping of various server programs. Under the Servers task, select TCP/IP to display a list of available TCP/IP server programs, as shown in Figure 10.41. Right-click the desired server to access the related options. From here, servers may be started, stopped, or have their properties set. One common property available to all TCP/IP servers controls whether they Start When TCP/IP Starts. Select this option if the selected server program should start automatically.
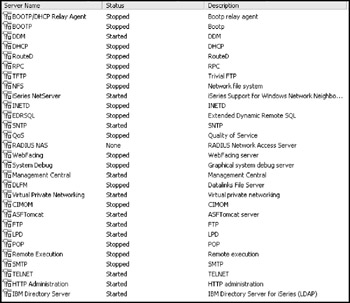
Figure 10.41: TCP/IP servers.
Security
The subtasks beneath the Security task (Figure 10.42) are:
-
Authorization Lists
-
Policies
-
Network Authentication Services
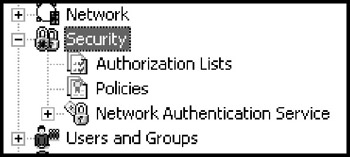
Figure 10.42: Security tasks.
Contrary to what you might expect, Security tasks do not include managing user and group profiles. The Users and Groups task discussed later in this chapter manages those. The Authorization Lists task displays all authorization lists on the system, as shown in Figure 10.43. Double-click an authorization list to launch the wizard shown in Figure 10.44. That wizard lists all the user and group profiles included in the authorization list and displays their associated permissions. To determine which objects this list secures, click the button labeled Secured Objects.

Figure 10.43: Authorization lists.
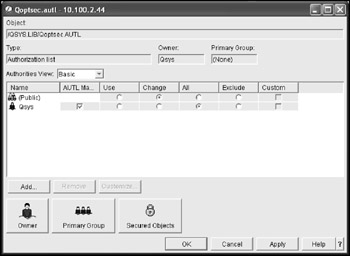
Figure 10.44: Authorization list detail.
Users and Groups
The subtasks beneath the Users and Groups task (Figure 10.45) are:
-
All Users
-
Groups
-
Users not in a Group
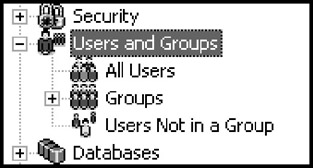
Figure 10.45: Users and Groups task.
One of the best features of iSeries Navigator is the Users and Groups task. This option provides great wizards for creating and updating user profiles that are far more intuitive than their green screen counter parts. Select All Users to display a list of every user profile on the system, as shown in Figure 10.46. This list includes user profiles provided by IBM as well as those created just for this iSeries server.
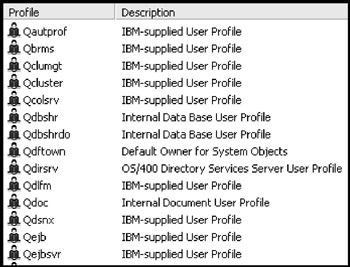
Figure 10.46: List of user profiles.
Right-click a user profile and select Properties, or double-click it to open the Properties wizard, as shown in Figure 10.47. The Groups button launches the wizard, shown in Figure 10.48, that manages the group profiles associated with the current user profile.
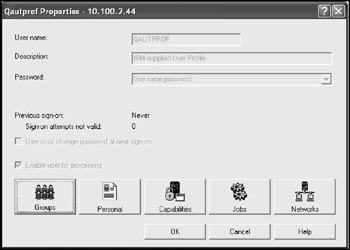
Figure 10.47: User profile properties.
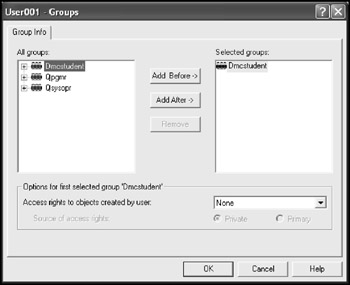
Figure 10.48: Group Profile Info for a user profile.
| Tip | The first profile listed is considered the primary group profile. Use the Add Before and Add After option to control the order in which the group profiles appear. |
The Capabilities button launches the wizard that defines the critical details of the user profile. To limit a users access to iSeries Navigator and Client Access features, use the Applications tab.
| Tip | It is possible to use options within Management Central to definestandard types of users and create new profiles modeled on those standards. |
Databases
The subtasks beneath the Databases task (Figure 10.49) are:
-
Manage your databases
-
Work With Schemas
-
Database Navigator
-
SQL Performance Monitor
-
Transactions
-
Database Transactions
-
Global Transactions
-
-
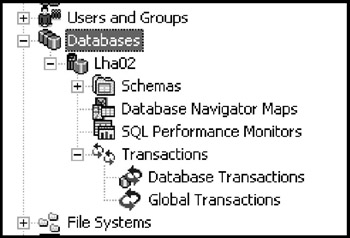
Figure 10.49: Databases tasks.
The Database tasks are among the most useful tools included within iSeries Navigator. Drill down into the Schemas (Libraries) to examine the associated objects. Open files and update the data inside, manage the properties of database tables, and even create new SQL indexes, views, functions, and procedures.
The Database Navigator option creates useful illustrations of selected database objects and all their associated objects. This is particularly useful when documenting a database design. The SQL Performance Monitors gather statistics for SQL statements as they execute on the system. The Transactions option lists details of uncommitted database transactions both inside and outside DB2/UDB.
Perhaps the best tool does not actually appear as a subtask. Find the Run SQL Scripts option by right-clicking a database, such as Lha02 in Figure 10.49. Once selected, that option launches the Run SQL Scripts wizard shown in Figure 10.50. Enter one or more SQL statements using a semi colon (";") to mark the end of each separate SQL statement.
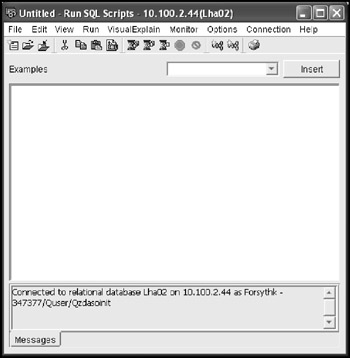
Figure 10.50: Run SQL Scripts.
| Tip | The Options pull-down menu allows you to configure manyuseful behaviors, such as executing a specific statement by double-clicking it. |
| Tip | The Connections pull-down menu allows you to configure the JDBC driver and connect to the desired iSeries server. |
| Tip | The Visual Explain pull-down menu allows you to perform particularly useful diagnostics against the SQL statements. |
File System
The subtasks beneath the File System task (Figure 10.51) are:
-
Integrated File System
-
Root
-
QOpenSys
-
QDLS
-
QSYS.LIB
-
QFileSvr.400
-
QOPT
-
QNTC
-
-
File Shares
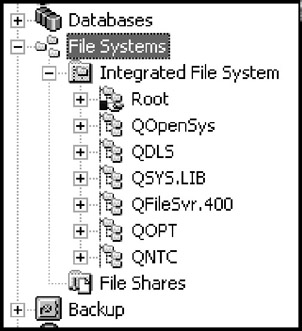
Figure 10.51: File System task.
The Integrated File Systems task provides access to all the various file systems supported by the iSeries, including DB2/UDB, the Windows File System, the UNIX file system, and more.
The Root folder represents the Root of a Windows File System. iSeries Navigator includes a text editor that can update these files. By default, it will only operate against files that Notepad can open. To enable the edit of a wider range of files, right-click Integrated File Systems and select Properties. The Properties dialog shown in Figure 10.52 will appear. Set the Enable Edit Menu option to All files. Any files you might normally store on a PC can be stored here on the iSeries instead. Files are often stored this way to support a web application or simply to store the data in a convenient location. To make a folder in the Windows File System available to PCs in the network as a mapped drive, right-click the desired folder and select Sharing and New Share. The wizard shown in Figure 10.53 launches to configure the new shared folder. This registers the folder as being available for sharing. To define a mapped drive on your PC to one of these shared folders, select the File Shares task displaying all the folders that allow sharing. Right-click the desired folder and select Map Network Drive to launch the wizard shown in Figure 10.54.
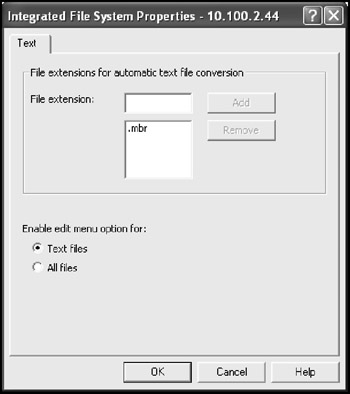
Figure 10.52: Integrated File System Properties.
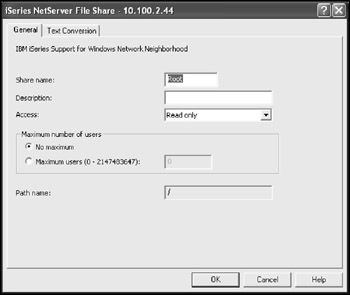
Figure 10.53: Defining a new shared folder.
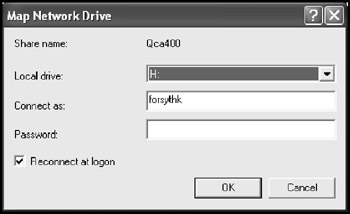
Figure 10.54: Mapping a network drive to the shared folder.
| Tip | You can use Copy and Paste to move files between Windows on your PC and the Integrated File System. |
Backups
The subtasks beneath the Backups task (Figure 10.55) are:
-
Policies
-
Daily
-
Weekly
-
Monthly
-
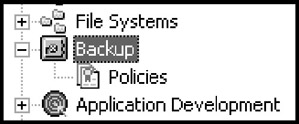
Figure 10.55: Backup tasks.
Select Policies to display the Daily, Weekly, and Monthly Policies, as shown in Figure 10.56. Double-click the desired policy to launch the wizard shown in Figure 10.57. This wizard consists of three tabs. The General tab determines a few basic options, such as whether these policies are used; the What tab (shown in Figure 10.58) determines which objects are saved under this policy; and the When tab (shown in Figure 10.59) determines what day and what time of day to run the backups. The General and When tabs are identical for all three policies.

Figure 10.56: Backup policies.
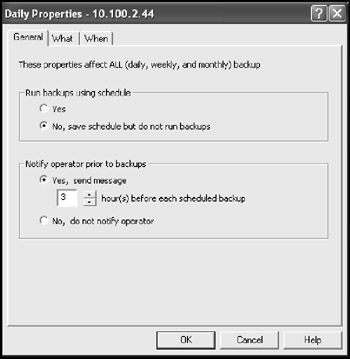
Figure 10.57: General policy settings.
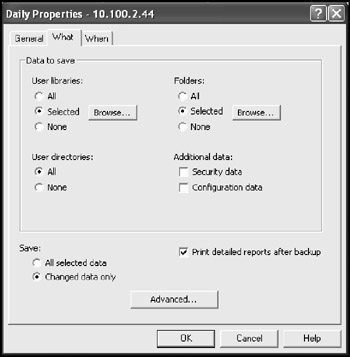
Figure 10.58: Settings to control which objects are saved.
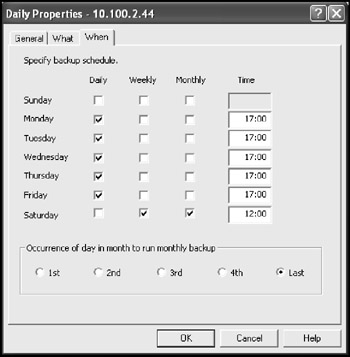
Figure 10.59: Settings to control when the backups occur.
EAN: N/A
Pages: 245