Chapter 29: IBM Utilities
IBM has several utilities to help programmers do a better and more organized job. This chapter quickly reviews three of them: Program Development Manager (PDM), Source Entry Utility (SEU), and Screen Design Aid (SDA).
IBM no longer enhances these utilities, recommending that programmers use the PC-based WebSphere Development Server client (WDSc) instead. However, the complexity of WDSC and the fact that a large workstation is required are reasons that many programmers still use these utilities for everyday development.
PDM
The main purpose of PDM is to provide an easy interface between the programmer and the system. To reach this goal, PDM presents lists of items in typical "Work with" panels from which you can perform actions by entering options and pressing function keys.
PDM's Main Menu
When you execute the Start PDM (STRPDM) command, you will see the PDM main menu, which looks similar to the screen in Figure 29.1.
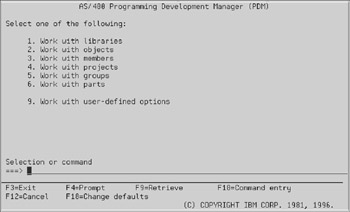
Figure 29.1: Working with PDM.
This menu illustrates the three methods you can follow to use PDM:
-
Working with libraries. This option runs the Work with Libraries using PDM (WRKLIBPDM) command.
-
Working with objects. This option runs the Work with Objects using PDM (WRKOBJPDM) command.
-
Working with file members. This option runs the Work with Members using PDM (WRKMBRPDM) command.
Options 4, 5, and 6 deal with the management of projects and will not be covered here. Option 9 is a shortcut to maintain user-defined options for PDM. PDM allows you to define your own options to make your work more productive.
Working with Libraries
When you run the WRKLIBPDM command (either manually or by selecting option 1 from the PDM main menu), you can select which libraries you want to work with. If you run the WRKLIBPDM command manually, you can do so by pressing F4, which invokes the command prompter. If you select option 1 from the PDM main menu, the panel resembling Figure 29.2 appears.
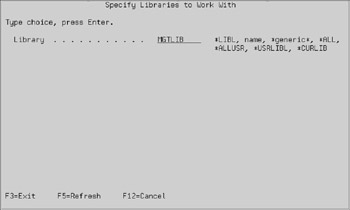
Figure 29.2: Working with the WRKLIBPDM command.
You can enter different values, depending on which libraries you want to work with:
-
Enter *LIBL to work with all the libraries contained in your library list.
-
Enter a specific name if you want to work with only one library, and you know its name.
-
Enter a generic name if you know part of the name, and you want to have a list of the libraries whose names match your entry. This generic name can contain an asterisk (*) at the beginning, in the middle, at the end, or at both the beginning and the end. When you press Enter, PDM considers the asterisk a wildcard.
-
Enter *ALL if you want a list of all libraries on the system.
-
Enter *ALLUSR for a list of all user libraries. This option eliminates the IBM-supplied libraries, such as QSYS.
-
*USRLIBL works like *LIBL, except that you get only the libraries contained in the user portion of the library list.
-
Enter *CURLIB if you want to work with your current library.
When you press Enter, PDM follows your selection instructions and shows a list of the libraries that meet your selection criteria. Figure 29.3 offers a sample of what your system might present if you selected *ALLUSR.
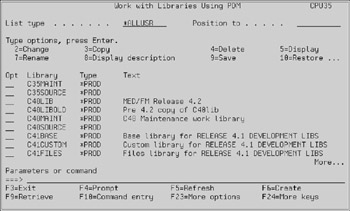
Figure 29.3: Working with Libraries using PDM.
The actual libraries listed will depend, of course, on the libraries you have on your system. From this panel (the main WRKLIBPDM panel), you can do several things:
-
You can change your mind and select another option for library search. As you can see at the top, the list type says *ALLUSR, which reflects what you selected. You can move the cursor, change this value, and press Enter.
-
If the list contains many libraries, you can use the "Position to" field (at the top) to shift the list at any point you want. For example, if you type an M and press Enter, WRKLIBPDM starts the list of libraries with the first library that begins with M. If there isn't any, it begins with the library immediately prior to that point (it could be a library named LYNN, for example).
-
You can move the cursor to one of the input fields on the left column, type an option number (from the option numbers listed near the top, such as 4=Delete), and press Enter. The option you selected is carried out. Each option performs a different task and, as you can see after 10=Restore, three dots (…) are shown. These dots mean that more options are available, and you can press F23 to display them.
-
You can press any of the function keys available, such as F3 to exit WRKLIBPDM or F6 to create a new library. F24 is available to display more function keys because all of them could not fit in the available space provided.
One of the options you can select on a library is 12. Option 12 starts the WRKOBJPDM command for that library and displays all the objects contained in it.
Working with Objects
The WRKOBJPDM command lets you work with the objects contained in a library. When you run WRKOBJPDM, you can specify which objects you want to work with. If you run WRKOBJPDM manually, you can narrow down your selection by pressing F4 to invoke the command prompter. If you select option 2 from the PDM main menu, the example in Figure 29.4 appears.
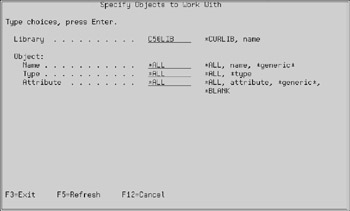
Figure 29.4: Working with objects using PDM.
WRKOBJPDM lets you select the library, the name of the object, its type, and its attribute. In the example provided above, you would get a list of all objects (regardless of name, type, or attribute) contained in library C50LIB.
The Type input field lets you select objects by their type. You can enter a value like *PGM, *DTAQ, or any other valid object type.
The Attribute input field lets you further narrow your search. Program objects (*PGM), for example, can have different attributes depending on the language that was used to write them. Program objects, therefore, can have an attribute of CLP if CL was used, or RPG if you used RPG IV.
If you press Enter from the panel shown in Figure 29.4, PDM presents the main WRKOBJPDM panel, which looks like that presented in Figure 29.5.
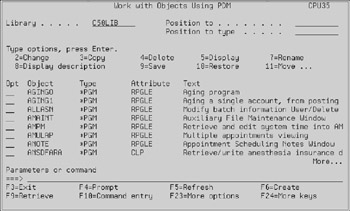
Figure 29.5: Working with Objects Using PDM.
The actual items you see on the screen depends on what library you choose and what objects are in that library.
You will note that this panel is virtually a duplicate of the WRKLIBPDM main panel. This panel shows one of the strong points about PDM: its consistency of interface. The only differences are those necessitated by the fact that now you are working with objects and not with libraries. Consequently, the numbered options you can select have changed.
Now two "Position" input fields are available at the top-right corner. One of them lets you reposition the list at a particular name, and the other lets you reposition the list at a particular object type. For example, now the list shows program objects (*PGM). If you want to look at files, enter the value *FILE in the "Position to type" input field and press Enter.
One of the numeric options you can select on a *FILE object is 12. Option 12 runs the WRKMBRPDM command on that file and lists all its members.
Working with File Members
The WRKMBRPDM command lets you work with the members contained in a file. Contrary to popular belief, you can use WRKMBRPDM on either a database file or a source file. For the most part, however, you will use it on source files.
When you run WRKMBRPDM, you can specify which members you want to work with. If you run the command manually, you can narrow your selection by pressing F4 to invoke the command prompter. If you select option 3 from the PDM main menu, a panel resembling that in Figure 29.6 appears.
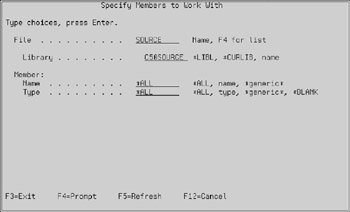
Figure 29.6: Working with file members using PDM.
In this example, you obtain a list of all members (regardless of name or type) contained in file C50SOURCE/SOURCE. You can narrow the list by selecting members by name (usually a generic name is used because you might not remember the actual member name). You can also narrow the list by member type, such as RPGLE for RPG IV source members or DSPF for display file DDS source members.
If you don't change the values shown above, you get a list resembling that displayed in Figure 29.7. Once again, you see PDM's consistency at work. This panel has the same features you have already seen in WRKLIBPDM and WRKOBJPDM.
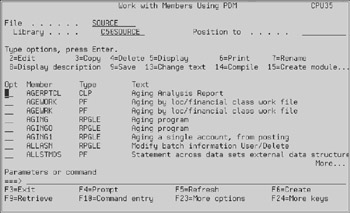
Figure 29.7: Working with Members Using PDM.
Changing Defaults
PDM is customizable. Each programmer can use it differently depending on individual needs. From any of the three main panels (WRKLIBPDM, WRKOBJPDM, or WRKMBRPDM), you can press F18 to reach the panel shown in Figure 29.8.
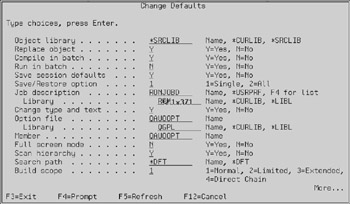
Figure 29.8: Customizing PDM options.
For brevity, only four input fields are explained here. You can obtain additional information by pressing the Help key or by referring to the PDM manual.
-
Object library. Option 14 in the WRKMBRPDM panel lets you compile a source member. Unless you press the F4 key when you select option 14, PDM creates the compiled object in the library you specify here. You can put a fixed library name (if all your compiled objects go to the same library, which is unlikely), *CURLIB, or *SRCLIB.
*CURLIB places the compiled object in the current library. Avoid this setting unless you know for sure which library is your current library; you could "lose" a newly created object. Worse, it could end in QGPL if you don't have a current library. You should always use *SRCLIB, which places the compiled object in the same library as your source code. If you ever need to compile into a different library, press F4 instead of Enter when you select option 14 to compile.
-
Compile in batch. Option 14 in the WRKMBRPDM panel (which programmers use all the time) lets you compile a source member. This compile can be run either in batch mode or interactively. If you want to run the compile in batch mode (recommended), enter a ‘Y’ in this input field; otherwise, enter an ‘N.’
-
Change type and text. The WRKMBRPDM panel shows the type and the text description of the members contained in the file you are examining. When you select ‘N’ in this field, WRKMBRPDM protects the type and the text from input, so that you cannot change them. If you would rather have the type and text input-capable, select a ‘Y’ in this field. Remember that ‘N’ protects type and text from accidental erasure or change.
-
Full-screen mode. Normally, all three main panels (WRKXXXPDM) contain a list of available numeric options and a list of function keys. These lists are provided at the cost of reducing the number of libraries, objects, or members. If you select ‘Y’ in this input field, PDM enters the full-screen mode. WRKXXXPDM omits the numeric option list and the function key list to make room for more items. When you gain more experience with PDM, you should consider selecting full-screen mode.
EAN: N/A
Pages: 245