| In this workshop, you will edit the rest of Scene 2 and all of Scene 3. Now that you have a bit of a handle on things, it's time to speed things up. You will begin with the remaining edits you need to finish Scene 2 and then will close this workshop by finishing Scene 3. Rearrange Your Windows If you haven't already done this, try a new arrangement for your windows. If you've been using the two-up arrangement, try a standard arrangement, or vice versa. You can also create a custom arrangement by simply dragging the windows around the screen until you are satisfied with the new arrangement and then saving this arrangement for later use. Quickly arranging your windows with these preset or your custom views is a great way to keep them from overlapping. For example, if the Viewer is overlapped by another window, playback might stutter. Playback also might stutter in the Viewer or Canvas if they are not set to Fit to Window or smaller. You cannot easily play back material if you are cropping the video because you've zoomed in on the image. You can quickly get the image to be set to Fit to Window by activating the Viewer or Canvas and then pressing Shift+Z. You can drag the double gray line in the Timeline window up to reveal more of the multiple audio tracks. You might want to save this new view you've created by holding down the Option key and selecting Window, Arrange, Set Custom Layout 1. By pressing Shift+U, you can reset to this arrangement later. In the top left of the Timeline window, click the far-right button with the plus sign on it. This lets you see more or even all of your audio and video tracks in one view. Don't forget to use this during the workshops, especially if you are working with a smaller single-computer display, such as what is found on a PowerBook or iMac. Add an Audio Filter to an Audio Clip -
Navigate to 01:01:29;23 in Sequence 1. On the A1 track is a series of four speeches between Sam and his girlfriend. They need an effect added to them to match the style used when we hear what's going on in Sam's memory later in the scene (remember the reverberation that the later clips use?). The "City, 19th century" sounds clip on A2 needs this effect as well. -
Double-click the first speech ("VO Girlfriend Tk #4-04") so that it appears in the Viewer. -
Click the Effects tab in the Browser to pull it up front, and open the Audio Filters>Final Cut Pro folder. In that folder, locate the Reverberation filter. Drag it to the Viewer window, and then click the Filters tab in the Viewer to reveal the Reverberation controls. -
The default setting for this filter is an Effect Mix of 50 with no change to Brightness or the Effect Level. The Type is set to Room (Medium). To give the effect a more dramatic and appropriate feel, select Tunnel from the pop-up Type menu, as shown in Figure 8.48. Figure 8.48. The room type selection pop-up menu. 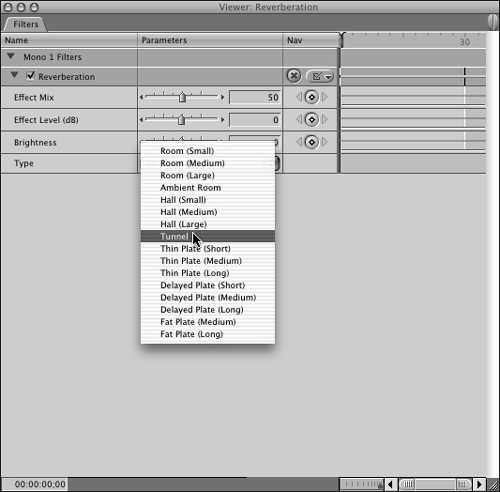 -
Play back the clip. -
It doesn't match the less-prominent reverberation heard later, so set the Effect Mix to 22, the Effect Level to 11, and the Brightness to 36. Play it back in the Canvas. Notice too that you can mark this clip in its entirety (mark an In point on the first frame and an Out point on the last frame). Select View, Looping Playback, or press Opt+L. Click Play In to Out. You can change the filter's settings as you listen to the changes. -
Spend some time changing this filter's settings. Change rooms, change Brightness and Effect Mix levels, and see the results. Most of the time, you'll need to do this sort of experimentation to achieve just the feel you're going for. Figure 8.49 shows how your filter's settings should be set when you are done. Figure 8.49. The Filters settings after step 6. 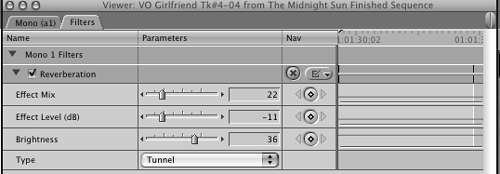 Copy the Reverberation Filter to Other Clips There are several ways to apply this same newly programmed effect without adding and reprogramming a fresh Reverberation filter for each clip you need to add it to: -
Drag the filter directly from the Viewer to each of the clips (by clicking and dragging its name ). -
Select all the clips, and drag the filter to the highlighted set. You can save it for further use later by dragging it from the Viewer to any bin in the Browser. -
Drag the filter to the Favorites folder contained in the Effects tab. This makes it available for use from the Effects menu, and you can select it when you want to use it. It will be contained in your audio Favorites list located just under the Audio Filters selection. -
A very powerful tool to learn is the Paste Attributes command. You can copy (Cmd+C) a programmed clip in the Timeline, Ctrl-click one or more selected clips, and select Paste Attributes from the context menu that opens. With this command, you can take any number of complex effects, filters, and other attributes you've programmed in one clip and apply them to as many clips as you want. Figure 8.50 shows your choices. Included here is the choice to even paste the contents, which replaces the selected clip or clips you've chosen for pasting with the actual shot or audio clip you have copied . Figure 8.50. The Paste Attributes window. 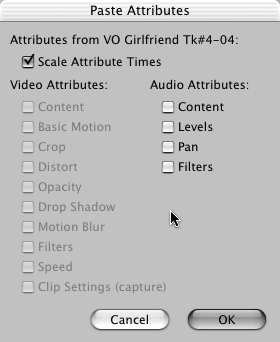 For this exercise, highlight the remaining three speeches and the City sounds clip beneath them, as shown in Figure 8.51. You can command-click them to select them individually and keep the earlier selection highlighted. From the Filters tab, drag the effect to the set of selected audio clips. When they are active, you see a change in their highlight to be "boxed"-looking. When you see the boxed look, release the mouse button. All the clips will have this added (and programmed only once) Reverberation filter. Play them back. Figure 8.51. Dragging the filter to the highlighted clips.  Add Reverberation to the COMEIN Clip You need to add reverberation to one more clipthe clip at 01:02:25;02 in the A1 track named "COMEIN~1.AIF-02." -
Drag the Reverberation filter again, but this time, drag it to the Favorites folder contained in the Effects tab in the Browser. -
Select the clip. Apply the filter by selecting Effects, Favorites, or drag the filter from the Favorites folder in the Effects tab of the Browser to the clip in the Timeline. You can rename it here as well to further specify what the filter is used for, such as Reverb for Memories or something like that. If you rename it, its new name is reflected in the Filters tab of the clip you applied it to. Play back the clip. Create Scene 3 Start by creating a Scene 3 bin. -
Open the Picture Clips bin, and open the disclosure triangle next to the 1 hr timecode section master clip. The last three markers are the ones you'll use to edit the next section of our story. Create subclips of these markers by highlighting them and pressing Cmd+U. Drag these subclips to the newly created Scene 3 bin. -
Open the disclosure triangle next to the 3 hr timecode section clip in the Picture clips bin. Create subclips of the first four markers you made, from "Sam Asks Cap for Cremation tk 1 Pan" through "CU over shoulder of Picture." Drag these four subclips to the Scene 3 bin as well. When you are finished, your Scene 3 bin should look like Figure 8.52. Figure 8.52. The Scene 3 bin after step 2. 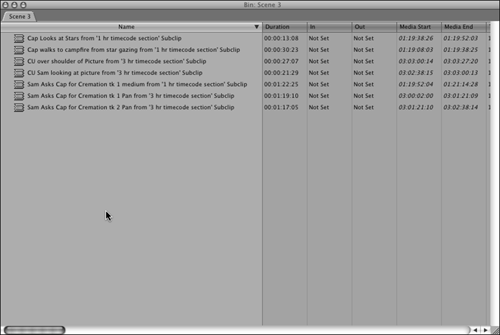 -
Option-double-click the Scene 3 bin to open it and place its tab in the Browser window. -
Make sure the Scene 3 bin is sorted in alphabetical order, starting with "Cap Looks at Stars." (Just click the Name column in the bin's List view to make it so.) Select the first four clips and drag them to the Timeline window. Place them on the V1 track right next to the "Cap walks to Sam tk 2" clip, as shown in Figure 8.53. Figure 8.53. Four clips overwriting. 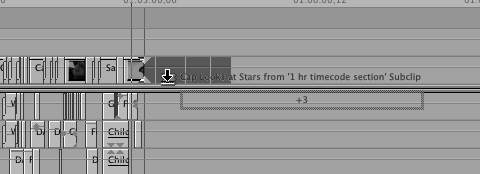 Notice the +3 shadow, showing you the first clip's name and then adding the three additional clips in the ghosted name. Also notice the down-arrow indicator. It lets you know that you are overwriting, not inserting. -
Take a look at the sequence of shots. The way it is, we start with two shots of Cap (the reverse of him looking at the stars, which we can't see, but we'll fix later), then a wide angle of the scene, followed by an over-the-shoulder of Sam, followed by a close-up of Sam. It's not too inspired. We'll start by changing the order of the shots. -
Turn on snapping by pressing N. Place the playhead in the Timeline at 1:03:20;13. Use the arrow keys to be exact. -
Click the CU of Sam shot (the last one in the current series of four), and then begin to drag it directly to the left. When you start to drag it, hold down the Option key so that you can see the insert curved arrow pointing down. Drag the shot until it sits over the "Cap walks to campfire from star gazing" clip and its head snaps to the playhead's position. Release the mouse button. When you are done, this area of the sequence should look like Figure 8.54. Figure 8.54. Detail of the Timeline after step 7.  -
First you establish night with the close-up of Cap looking at the stars. Then you establish more of the scene with the wide angle. Then from the wide you go to Sam's close-up (detailing this from the wide angle). It still needs some help, because we are motivated to see what Sam is intently looking at next, not the moment where Cap walks over. So you need to swap the last two shots. Using the same method as before, drag (while holding down the Option key) the last shot of the over-the-shoulder of Sam to insert it between his close-up and the second instance of the wide angle on the scene. When you are done, your sequence should look like Figure 8.55. Figure 8.55. Detail of the Timeline after step 8.  Notice the two red triangles now present between the third and fourth shots. They appear because this is continuous footage. In other words, the last frame of Sam's CU and the first frame of the over-the-shoulder shot are next to each other in the source media file (3 hr timecode section), and they are also next to each other on the tape that captured this footage. This is called a through edit. If you don't see the red triangles, check the Show Through Edits check box in the Timeline Options of the User Preferences (found on the Final Cut Pro menu). You can also press Opt+Q to open the User Preferences. Trim the Shots The shots definitely need some trimming. This time, you'll trim them in the Timeline window. -
Use the Zoom tool (press Z) to zoom into the Timeline so that you'll have better control over the next five trims. You'll find that this works better when you trim in the Timeline window. -
Press RR to activate the Ripple edit tool, and snapping off by pressing N. -
With the Ripple edit tool active, first trim the outgoing shot of Sam lying in the snow. Click its Out point, and then drag to the left until the two-up display shows 02:16:21:29 as its Out point. Figure 8.56 shows the final point where you should release the mouse button after the dragging. You'll find that you can ramp down the Ripple and Roll edit tools in the Timeline to achieve a more accurate trim if, while you are dragging the tools and trimming, you hold down the Command key. This allows for a slower and more precise handling of the trim, and you can be very accurate with the trims that way. When you release the mouse button, the trim is instantly reflected in your sequence. Figure 8.56. A ripple edit trim in the Timeline after step 3.  -
Click the incoming shot (Cap's reverse looking up at the stars) at the same edit point and drag it to the right until you've trimmed it to have it start at 01:19:39:27. Then trim its Out point to be 01:19:43:24, again with the Ripple edit tool in the Timeline window. The last frame of "Cap Looks at Stars" should now sit on 1:02:55:14 in the Timeline's timecode. -
The wide-angle shot now coming in should be trimmed at its head to 01:19:16:18, and its Out point should be trimmed to 01:19:20:04. To do this, you have to drag the Ripple tool on the shot's Out point to the right this time. Don't forget to hold down the Command key to make this easy. -
Trim the "CU Sam looking at picture" shot's In point to be 03:02:40:20 and its Out point to be 03:02:46:01. -
Trim the "CU over shoulder of Picture" clip's In point to be 03:03:01:24 and its Out point to be 03:03:13:20. -
Trim the incoming shot's ("Cap Walks to campfire from star gazing") head to 01:19:19:07, dragging the Ripple edit tool to the left to add a few frames. Note that you are repeating frames. If your User Preferences are set to show all duplicated frames, you'll see a colored line at the bottom of the two instances of this clip in the Timeline, indicating the duplicated frames. The reason for the duplication is that the audience will not notice the double use of a few frames , and it's Cap's head move that should start this edit. Furthermore, using this same head turn earlier motivated the cut to the close-up of Sam in the first place. Cap began to look at Sam, and this draws attention to him. Whenever you can, you should start and end an edit with a cut on action. In this case, you cut out on the head turn and then cut back to the angle repeating the same head turn. Detecting these repeated shots would be almost impossible when your audience sees the edits. -
Trim the Out of the last shot in the sequence to 01:19:30:25. When you are done with this step, your sequence of these five shots should look like Figure 8.57. Figure 8.57. Scene 3 after step 9.  -
Place a 2;00 dissolve that begins at the edit between "Cap walks to Sam tk 2" and "Cap looks at stars." -
Open the Sound Clips bin, locate the "Wind,desert Lonely,66_1-04" clip, and double-click it to open it in the Viewer. Mark an In point at 3:11 and an Out point at 22:29. Overwrite it at 01:02:32;27, right next to the outgoing wind sounds on tracks A6 and A7. -
Locate "Campfire Small crackling 77_1," and load it into the Viewer. Set an In point at 00:00:02:23, and edit it directly to tracks A6 and A7 next to "Wind, desert Lonely,66_1-04." Lower its level to 12dB. Add a 2-second audio fade that ends on the edit between the wind and campfire sound effects to match the duration of the video dissolve between the scenes. With the campfire sound effect still loaded in the Viewer, remove the mark In by pressing Opt+I. Drag the entire clip to the Timeline, and place it on Tracks 6 and 7 right next to the earlier edit. Lower its level to 12dB. The reason you put the In point in the first instance of this edit was in preparation for the cross-fade. You couldn't have had the cross-fade end at the edit point without unused media available for the task. -
Navigate to 01:02:59;20. Set an In point there in the Canvas. Locate the sound clip "Train, steam , station 23_1 Verb" in the Sound Clips bin. With snapping turned on, drag the icon with the hand and speaker in the Viewer to the In point created in the Timeline on tracks A2 and A3. With the Roll edit tool (press R), drag the clip's Out point to match up with the edit at 01:03:16;11 in the sequence so that it ends with the "CU over shoulder of Picture" clip on the V1 track. Raise its level to +12 dB, and create a fade-out at its end with the Pen tool for a duration of 2 seconds. There is no need for a fade-up at the head, because it's built into this sound effect. -
Move the playhead in the Timeline window to 01:03:01;26. Turn on snapping if it's off. Locate the "MOTHER~1.AIF-02 Verb" clip in the Sound Clips bin. Drag it directly to the playhead on Track A1 (you don't have to have an In point to snap to). Trim this clip's Out point by 1 second with the Roll edit tool. Raise its level to +12 dB. -
Move the playhead forward in the Timeline to 01:03:07;14. Locate "SAMSDIIALOG.AIF-14" in the Sound Clips bin, and place its head at the playhead's position on the A1 track. Raise its level to +7 dB. -
Move the playhead forward in the Timeline to 01:03:11;28, locate "SAMSDIIALOG.AIF-15" in the Sound clips bin, and place its head at the playhead's position on the A1 track. Raise its level to +7 dB. Create a 15-frame fade-out at the end of this clip and one at the end of Sam's mother's line. -
Locate the Reverberation filter you saved earlier, and add it to the first of Sam's lines. Play it back to see if it works. It's a little too much and doesn't quite match the lesser reverb already built into the train and the mother's speech. So change the Type to Hall (Large) and lower the Effect level to 16 on both clips. It's now much more like the mother's line. After modifying the new version of this filter on the first clip, drag its name in the Filters tab now open in the Viewer to the second of Sam's lines. Play back the affected audio clips. -
Load the "Foley 1-Cap'n Campfire #1" clip in the *Foley bin. Set an In point at 00:00:22:01, and edit it to the A3 track in the sequence at 01:03:18;00. Raise its level to +12dB. It's Cap's footsteps. Sync the Sound So far, you've been supplied with the sound sync already figured out for you. It's time you did one for yourself to learn the techniques used. Create a new sequence with the OfflineRT NTSC (Photo JPEG) as its setting, and name it Sound Sync (press Cmd+N). If the Select Sequence Preset dialog box does not open, highlight this new sequence and press Cmd+0 to open this particular sequence's settings. Click the Load Sequence Presets button, and make sure it is set to OfflineRT NTSC (Photo JPEG). -
Locate the "S9FT2.AIF" sound sync clip in the Sound Clips bin. Drag it in its entirety to the new sequence 10 seconds from its start point (at 1:00:10:00 in the Timeline's timecode). -
Locate the clip named "Sam Asks Cap for Cremation tk 2 Pan" in the Scene 3 bin. Place it on the V1 track with its In point directly above the audio edit's In point. -
Enlarge the Track Height by pressing Shift+T until it is at its widest. Turn on the waveforms in the audio track by highlighting the Timeline window and pressing Opt+Cmd+W. The Timeline should look like Figure 8.58. Figure 8.58. The sound sync sequence ready for syncing.  -
Play the sequence. At its start you see the closed clapstick, but you don't hear it close until much later. This indicates that we are out of sync. You can see where the clapstick's sound is, though. It's the spike in the audio waveform 7:25 in from the start of the audio clip. But there is a problem. The clapstick is already closed at the beginning of the video subclip. Because it was the whole subclip used, you cannot just trim back some frames to locate this point in the video to match it up with the sound, because Final Cut Pro behaves as if there is no more media in a subclip before its start point or after its end point. But there is a way to sort of "unsubclip" this clip to remove its limits. -
Highlight the video clip in the sequence, and select Modify, Remove Subclip Limits. After you do this, no longer is there a limit to how much you can trim this subclip, except for the actual length of the original master clip's media file it came from. Double-click the video clip's In edit point to open it in the Trim Edit window. Click the 5 button three times to add 15 frames to its head. You see the clapstick open. -
Close the Trim Edit window. -
Locate the first frame where the clapstick is truly closed, and with the clip highlighted in the Timeline window, place a marker there by pressing M. (It actually was the first frame of the video, but you had to make sure it was the frame at 3:01:21:10 in the source clip's video. Turning on Show Overlays with Show Timecode Overlays checked in the far-right oval button near the center top of the Canvas window reveals this in the Canvas window.) -
Highlight the audio clip, and place a marker at the spike in the audio waveform (the sound of the clapstick closing). The production audio person can be heard saying "Mark" right before the sound of the clapstick closing. To be exact, though, zoom into the audio at this point to make sure you've put the marker at the head of this sound. -
Drag the video clip until the marker in it and the marker in the audio clip line up perfectly . Then take a look at the clapstick's sync. It should be right on. There are many ways to perform this syncing exercise. You could also have set In points in both the picture clip and the sound clip and merged the clips just for the experience. Try it. -
Play the sequence all the way through to make sure it looks and sounds in sync. Use the Slip tool (press S) to slip it one way or the other until you are satisfied with the sync. It probably is within a frame or so if it's off at all. By experimenting with slipping the video left or right by a frame at a time, you'll begin to get a feel for syncing yet another way and pay attention to the Slip tool and how it acts on the clip. Think of those times when you don't have a clapstickthe Slip tool might become your best friend! -
When you are satisfied with the sync, trim the video's In point to 1:00:22:10, and trim the video's tail until it lines up with the end of the audio clip, using the Roll edit tool with snapping turned on. Then trim the audio's In point to match that of the video's In point. Finally, link the clips by highlighting them and pressing Cmd+L. Their names will become underlined after they are linked. -
Double-click the head of these clips. Notice that because they are linked, both the audio and the video are trimmed at the same time. -
Trim the last 1:07 of the outgoing media. The clip should be 1:08:11 in total length now. If it isn't, trim the Out or In point so that it is this duration. -
Copy the linked clips (highlight them and press Cmd+C), and paste them at 01:03:28;01 to the V1 and A1 tracks (don't forget to target the tracks) in your Sequence 1 sequence. -
Close the Sound Sync sequence in the Timeline window by Ctrl-clicking its tab. -
Add a fade-out at the end of the audio and video of the "Sam Asks Cap for Cremation tk 2" clip and the accompanying sound sync clip on track A1, which lasts 4:15. A long fade-out is used to accentuate the gravity of the moment. The easiest way to do both at once is to Ctrl-click the Out edit and add a cross-dissolve to both. Double-click them to change the durations of both in the Viewer's transition editor when it opens. -
Trim the end of the fire sound effect to line up with the shots above it (about 21 frames), and then add a cross-dissolve of 4:15. But because you just made one of this duration, simply copy it and paste it to the stereo sound effect of the fire. Notice that because the campfire sound is a stereo pair, you need to add the dissolve only once for both tracks. When you are finished, the sequence should look like Figure 8.59. Figure 8.59. The sequence after step 17.  Edit the Middle of the Film to Sequence 1 Rather than being too redundant by having you edit the entire movie, because much of the next section would be repetitive editorial actions, the next edit takes you through the next few scenes. -
Position the playhead at 01:04:30;18. Locate the clip "Midnight Sun Full Mix center" in the Sound Clips bin, and edit it to tracks A8 and A9 in its entirety at 01:04:30;18. Here, you'll start the music at the point of Cap's promise, indicated by his head shake, to cremate Sam in the event of his death. The reason for the music's starting here instead of in the following scene is to accent this huge moment in the story and to use an L cut to smooth the way to the next scene. -
Position the playhead at 01:04:36;13. Turn on snapping. Open the sequence "The Midnight Sun finished Sequence" if it's not already open. (If it is, just click its tab to bring it forward.) Highlight all the video clips above the edit you just made, and copy them (press Cmd+C). The first of these clips is named "Sam Dies tk 1," and the last is named "Cap sees boat full shot." Paste the video shots in your sequence (press Cmd+V). When you are finished, your sequence should look like Figure 8.60. Save your project file (press Cmd+S). Figure 8.60. The center section of the sequence after step 2.  -
I've purposefully let you skip this portion of the edit. There really isn't any point in repeating the mechanics of editing this portion of the footage, because they are the same as what's preceded the edit up to the end of these scenes. -
Save your project file. The Aesthetics of the Middle of the Film Sam is going to die. Cap's promise to cremate him will give him quite an adventure that involves a tremendous amount of struggle and pain. Where does one cremate a body in the middle of the snowy Klondike? The use of a fade-out and then a fade-in at the beginning of this section is also an accent. We've consistently used dissolves for transitional effects, but these fades punctuate the moment much better than a dissolve between clips would, just because it's different. A page turn or some other digital effect or wipe is not organic enough for the feel of our turn-of-the-century movie; it's simply the wrong style. A fade to black and back is very organic, much like closing and opening your eyes. In actuality, it's in the same family as a dissolveit's a dissolve to black and back. Sam's death scene sets up the creepiness of the following night scene where Cap can't light a match. A sense of horror is being emphasized here (and the music is just right). Notice the point of view (POV) shots cut between the closer shots of Cap attempting to light the match. The editorial construction here was thought out to make you think that something awful is about to happen. Hopefully the viewers get little hairs standing up on the backs of their necks. When you watch this center section, notice how Cap's scenes cut where they are real-time and dissolve when we go to another location or time. You should aim for consistency of style throughout any piece, and that's what's happened here. Notice too how little the voice-over actually drives the story. The pictures are driving the story. The action is pushing us forward, not the words, and it's the music that draws emotion. Anytime action can dominate your storytelling, I suggest you choose it. Film is a visual medium, even when you're editing industrial training films . Repeating theme music is also used in this set of scenes. Pay particular attention to the scene where Cap has to destroy the dogs because he's out of food for them. This scene uses a series of jump cuts called a montage. A jump cut is an edit between two shots where there is a change in time or a scene location (in this case it was time). A montage is a series of these jump cuts, a series of shots that separately don't seem to relate to each other, but as a whole and in a certain order (such as chronological order) they tell a story. They cut only when a new bit of information is told, and as a group they tell the story of only one scene. That's why no dissolves are used or needed here. As a group, they tell the story of Cap losing his dogs. |