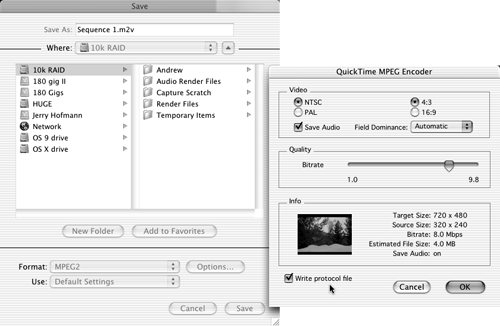
| You can choose from more options when exporting MPEG compressions for use with DVD Studio Pro. First, when you install DVD SP, you add an MPEG compressor to your list of available compressors using the Export, QuickTime Conversion dialog box, as shown in Figure B.9. This MPEG converter is supplied with DVD SP. The quality of this compression is probably a bit higher than that used by iDVD, because it is a professional-quality codec. When you install FCP 4, you get the MPEG-2 converter via Compressor, which is not available from QT Player for export. DVD SP 2 ships with Compressor as well. In either case, you get better-quality MPEG-2 files from Compressor's dual-pass VBR settings. Figure B.9. Using the QuickTime Conversion dialog box to create MPEG-2 files.  Using Compressor Figure B.9 shows the QuickTime Conversion dialog box. You open it after selecting MPEG2 as the file format from the pop-up menu and clicking the Options button. You can select the bit rate and format for your DVD's movie files. The second and better (but possibly more time-consuming ) way to create MPEG-2 files from Final Cut Pro is to use the supplied compression program, aptly named Compressor. Unfortunately, iDVD currently cannot accept files from Compressor. Compressor lets you use a dual-pass compression algorithm called a two-pass VBR (Variable Bit Rate) compression. The first pass analyzes where the motion is in the file. Then, on the second pass, Compressor allocates bits where they're most needed while it does the encoding. No encoding is done on the first pass. There are two ways to use Compressor: -
You can export directly to Compressor from within Final Cut Pro by selecting File, Export, Using Compressor. Final Cut Pro then creates a temporary non-self-contained QuickTime movie. It opens Compressor on your computer and sends this information directly to Compressor so that you can choose from among several preset compression schemes or refine one of these presets into a custom preset. With Compressor, you can also change the video levels, crop the picture, and more. It also includes the ability to create a render queue and compress more than one sequence at a time and into more than one compressed format. You might want to prepare video for the web using an MPEG-4 compression or another QuickTime compression and at the same time create files for use in DVD SP. However, doing so "locks up" Final Cut Pro. In other words, you cannot edit in Final Cut Pro if you export directly from FCP to Compressor. There is a hidden advantage, though. When you use this direct-export method, Final Cut Pro's rendering engine is used, which might speed up the process. -
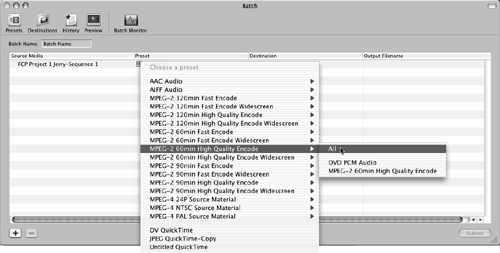
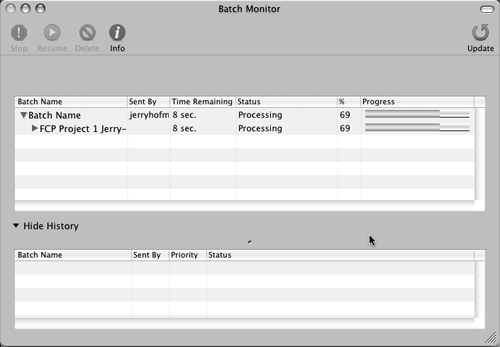
A second way to prepare sequences created in Final Cut Pro for use with DVD Studio Pro is to export a QuickTime Movie file as either a self-contained movie (which takes up more space, because it includes the actual picture and sound files but doesn't require that the original media files be on the same computer) or a non-self-contained movie, exactly as you would for iDVD. The difference is that you import this file into Compressor for the compressed-file creation. Either of these methods results in the same quality files, but using the second method allows you to continue working in Final Cut Pro while you are compressing files with Compressor. You need a lot of RAM to do this with stability. A minimum of a gigabyte or more is recommended. It also might be wise to save your file from Compressor onto a drive you are not using for Final Cut Pro. Using Compressor to Create MPEG-2 Files for DVDs Compressor is a very sophisticated but intuitive program that compresses MPEG-2 files (used for DVDs), MPEG 4 files (used primarily for the web and CDs), and QuickTime movies that are compressed for the web, CD, or intranet use. It's outside the scope of this book to explain all the compressions and techniques used to create compressed video files, so the discussion here covers the use of Compressor to create files for DVDs. DVD Studio Pro requires that audio/video assets used within it be M2v files (MPEG-2 files containing video) and AIFF files (containing audio). Using DVD SP with a Superdrive on your computer results in high-quality , professional-looking DVDs. You use Compressor to create the audio and video assets used by DVD SP. It can be as simple as importing your QuickTime movie into Compressor, choosing a preset, and clicking a button to start the compression. Figure B.10 shows the result of selecting Sequence 1 from the project file and exporting it using Compressor by Ctrl-clicking it. Figure B.10. Compressor's Batch window.  In this case, I've selected the 60min High Quality Encode preset by clicking the Preset selection button in the column to the right of the Name column and selecting a standard preset that comes with Compressor. I selected All from the menu to include audio and video. You then select the destination disk for your files to be saved on (the MPEG and audio file you'll use with DVD SP). If you've placed chapter and compression markers in your sequence, they are included with the MPEG file you export from Compressor and are recognized by DVD Studio Pro 2. It's then as simple as clicking the Submit button in the lower-right corner of Compressor's Batch window to start and save the encoding. The Batch Monitor window, shown in Figure B.11, opens to keep you apprised of the encoding's progress. You can stop and resume the encoding process and delete the batch as well. Figure B.11. The Batch Monitor window.  note DVD Studio Pro 2 has the capability to compress to MPEG-2 uncompressed files and do so in the background while you continue to work with the application. DVD Studio Pro 1.x does not and requires that you import MPEG files for use with the application. DVD SP 2 however uses the same software code during its "in the background" compressions, and doesn't require then an MPEG compressed file to begin with. However, I'd probably do the compression beforehand with Compressor for this if your computer isn't the fastest . Stability will be enhanced if you do so with slower computers or computers without a lot of RAM in them. As of this writing I've not tried this new feature on a G5, but predict that rendering in the background would be a better workflow with these super fast Macintoshes experimenting with your particular computer is advised.
Learning to Compress High-Quality Video and Software Used for the Job Describing all the compression techniques you can use to improve the quality of your compressed files would take an entire book. I suggest that you take the time to start using Compressor to its fullest capabilities by reading the PDF manual that comes with FCP 4 (you can access it from Compressor's Help menu). You can crop, change data rates, add filters, and more to your compressed video files, whether they are MPEG or other QuickTime compressions. You'll find Compressor very easy to use. The video it creates is of extremely high quality. It creates some of the best software-encoded files in the world. If you use the presets supplied by Compressor, you get very high-quality files, but the secret to the very best compressions is in preprocessing the files. Another application I find extremely easy to use and whose results are world-class is Sorenson Media's Sorenson Squeeze 3 Compression Suite. As of this writing, it includes the ability to compress QuickTime, MPEG-4, and Flash movies using the highest-quality software codecs available. It supplies the Sorenson 3 Professional version of the Sorenson 3 codec, considered by most to be the best codec to use for QuickTime. After you install it, this Pro version of the codec is available in both Compressor and Final Cut Pro 4. You should import QuickTime Movie exports into Squeeze. It's best to ask questions about compression issues at the Creative Cow (http://www.creativecow.net). You'll find answers to issues with the latest software. Cleaner 6 from Discreet Logic is another software application that is used to compress for the web and to create QuickTime files, Real Windows Media files, and more from Final Cut Pro. You use QuickTime movie exported files to import into Cleaner 6. However, by the time you read this, all the companies will probably have shifted their focus somewhat. It's best to ask questions about compression issues at the Creative Cow (http://www.creativecow.net) for definitive answers on issues with the latest software that's doing the best job. Compression is really its own art form. Explaining it completely is outside the scope of this book. For further exploration of compression techniques, I suggest Ben Waggoner's book Compression for Great Digital Video: Power Tips, Techniques, and Common Sense from CMP Books. Keep in mind that there are professional compressionists whose sole occupation is compressing video for the web and DVDs. Final Cut Pro has made this job extremely easy with Compressor. You'll be amazed at just how easily you can create professional-quality encoded files with this extremely powerful application. |