Roaming Profiles
Client Management: User Roaming Profiles
As the old song goes, wouldn't it be nice if we could wake up and find our user data on any computer that we logged into? Perhaps this analogy is a stretch, but it's the concept behind what is known as a roaming profile . But before we can discuss a roaming profile, we should define the function of a normal profile.
For those of you familiar with Unix, you know that it is a multiple user operating system from the ground up. Each user in the system has his or her own settings and preferences which are kept separate (and secure) from other users. A user profile is Microsoft Windows' version of this, and they have been a part of Windows since Windows 95 shipped. However, they came of age in Windows NT. Under the older Windows 95/98/Me systems, different users could log in with username/password credentials, but the operating system did not prevent one user from snooping into another user's data. With Windows 2000 and now Windows XP, each user's data is kept separate from other users' data. This grouping of user data is called the user profile.
Normally, a user profile is kept on the user's local hard drive in the Documents and Settings folder, usually on the boot drive, as shown here in figure 4-11:
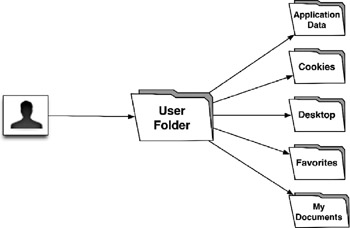
Figure 4-11: A standard user profile under Windows 2000/XP.
When a user logs into her computer, all her data, from her My Documents folder to her email preferences reside in her user folder stored on the computer's hard drive.
As a system administrator, imagine trying to back up 100 user folders strewn out over 100 computers. Wouldn't an easier way be to place the user folders in a centralized location, similar to the folder redirection GPO discussed earlier? That way, a user could log in from literally anywhere on the network, from any computer on the network, and his settings would follow him wherever he went, right down to the positions of the icons on his Desktop. You can think of the roaming profile as the folder redirection GPO on steroids.
Figure 4-12 shows how a Roaming Profile works.

Figure 4-12: A network roaming profile under Windows 2000/XP.
When a user assigned a roaming profile logs into the domain, her user folder is redirected to a server. This makes the user's computing experience consistent, no matter what computer she logs into.
Tutorial: Creating a Roaming Profile
This tutorial is very similar to the tutorial discussing the folder redirection GPO earlier in the chapter. Specifically, we create a share with Full Control network share permissions for the Everyone and Administrators groups. We also set Full Control NTFS file permissions for the Administrators Group and the Creator Owner user. We top this off with Modify permissions for the group that the user belongs to.
This tutorial deals with the Art group.
-
Open our Shares directory and create a new folder inside. Name this folder roamingpro (for roaming profiles).
-
Open the roamingpro folder and create a new folder named art_roam .
-
Open art_roam and create a new folder inside. Name this folder after a user in the Art group. For this example, we use Platte N. Umm, naming the folder pumm .
-
Share the pumm folder assigning Full Control permissions for the Everyone and Administrators groups.
-
Assign Full Control NTFS permissions to the Administrators group and the Creator Owner user. Assign Modify permissions to the Art group.
-
Open Active Directory Users and Computers , expand the East Wing OU, click the Users OU, right-click a user in the right pane ( pumm for our example here), and choose Properties .
-
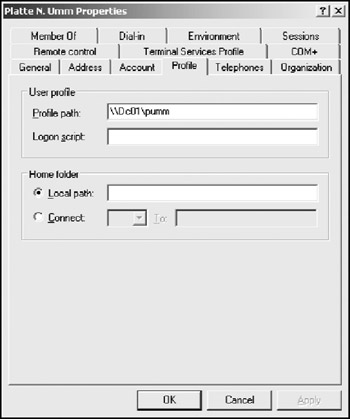
Click the Profile tab.
-
In the Profile path field, enter the network path to pumm's folder that we created in step 3. For our example here, we have:
\\DC01\pumm
This directs the Windows client to use the network folder instead of its own hard drive for the user folder:
-
Click Apply and OK . Open pumm's folder on the server. Notice that it is empty.
-
Log into the domain as our test user from a client Windows computer. Again, we use pumm.
-
Create a new folder on the client computer's desktop and name it test folder and log out of the client computer. You may notice that the client takes a bit longer than normal to log out. The client is synchronizing with the user folder on the server for the first time.
-
On the server, pumm's folder is no longer empty:
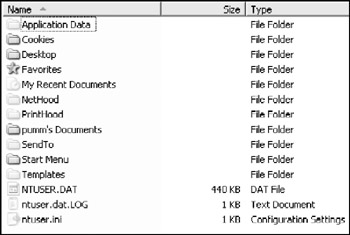
Pumm's folder is now populated with the data that would normally be present in his hard drive's user folder. To prove this, double-click the folder labeled Desktop . Notice that the test folder we created in step 11 is present here.
-
Log into the domain as your test user from a different client computer. Notice that the test folder is present on this client, even though we did not create the test folder on this new client. In effect, the user's custom desktop settings have followed him.
EAN: 2147483647
Pages: 88